Horseman SW612D Instruction Manual Download Page 8

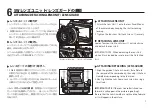
S Wビューファインダー⑪(別売)は ファイ ン
ダーストッパー㉓を指で押し下げ、アクセサリー
シュー㉒にファインダーをストッパー㉓が上がる
まで押し込みます。

ファインダーストッパー㉓を押し下げたままの状
態で、ファインダーを後方へ引き取り外します。

While pusing down the Accessory Shoe Safety 
Lock Spring ㉓ by the Finder Shoe ㉒ , slide the 
Viewfinder⑪ into the Accessory Shoe ㉒ . When 
the Viewfinder is inserted properly, the Accessory 
Shoe Safety Lock Spring ㉓ comes up and locks 
the Viewfinder.

While pushing down on the Accessory Shoe 
Safety Lock Spring ㉓ , pull the Viewfinder out.

SWビューファインダー⑪は、ご使用レンズに合っ
たマスクを装着してご使用下さい。

1.ファインダー後部を保持し、前枠を反時計方

向に回して取り外します。

2.ファインダーマスクの凸部( )をファイン

ダー凹部に合わせ、装着します。

3.前枠を時計方向に回しファインダーに取り付

けます。

ATTACHING AN INTERCHANGEABLE FINDER MASK

ファインダーマスクの着脱方法

Set the proper one corresponding to the focal 
length of the lens used.
While holding the Revolving Mask Housing 
of the Viewfinder ⑪ firmly, rotate the Mask 
Lock Ring anti-clockwise and detach. Attach 
an Interchangeable Finder Mask aligning the 
protruding part of the Mask to the Mask Index of 
the Viewfinder. Screw the Mask Lock Ring firmly.

The SW Viewfinder⑩ has a Revolving Mask Housing so that the 
Interchangeable Mask can be set to either landscape or portrait 
(horizontal or vertical) format. When used on SW612D camera, only 
landscape (horizontal) format should be used.

SWビューファインダー⑪には画面の縦位置横位置を切り替えるレボル
ビングリングがついていますが、SW612Dで使用する際には必ず横位
置にセットしてください。

SWビューファインダーの着脱

ATTACHING/DETACHING VIEWFINDER

7

 DETACHING VIEWFINDER

 ATTACHING VIEWFINDER

 ビューファインダー取付け

 ビューファインダー取外し

ファインダーマスク

Finder Mask

8

Summary of Contents for SW612D

Page 1: ...Instruction Manual SW 612D...

Page 2: ...CIFICATIONS CAUTION NOMENCLATURES ATTACHING DETACHING ADAPTER PLATE DIGITAL CAMERA BACK ATTACHING DETACHING ROLL FILM HOLDER GROUND GLASS FRAME ATTACHING DETACHING LENS UNIT LENS GUARD ATTACHING DETAC...

Page 3: ...ken itself by strong force Please treat it carefully as well Do not use cleaners that contain organic solvents to clean the camera body or lens 3 SPECIFICATIONS 1 SW 6 12cm 6 7cm 1 182 W 170 H 70 D mm...

Page 4: ...er Speed Ring Press Focus Lever Focus Ring Lens Panel SW SW SW612D V SW Viewfinder SW Lens Guard SW612D Camera Body Lock Buttons Neck Strap Lugs Spirit Level Tripod Socket Lens Unit Lock Screw Holes U...

Page 5: ...camera back 3 Push the two Lock Buttons all the back in at the top of the camera body to lock Push the two Unlock Buttons at the bottom of the camera body Detach the Adapter Plate from the camera bac...

Page 6: ...ottom of the camera body 2 Place the Spacer keeping the two hole edge left and the light shield side up toward film surface 3 Attach the Film Holder onto the camera back by aligning the four pins on t...

Page 7: ...ixed too forward as it will appear in the picture 1 SW612D 2 SW612D 1 Align the guide of the Lens Guard Base Plate to the rear end of the camera body then adjust the Lens Guard Bar corresponding to th...

Page 8: ...ength of the lens used While holding the Revolving Mask Housing of the Viewfinder firmly rotate the Mask Lock Ring anti clockwise and detach Attach an Interchangeable Finder Mask aligning the protrudi...

Page 9: ...Unit The View Finder Frame has markings for each format to determine 33x44mm and 24x36mm See the illustration B for details Spirit Level and Distance scale can be observed through the round opening of...

Page 10: ...ld Scale SW612D T P11 Attach optional Ground Glass Frame and Spacer set the Aperture Setting Lever at full opening position set the Shutter Speed Ring at T then push the Shutter Release Button down Fo...

Page 11: ...rds The Press Focus Lever is locked at the factory by means of a Focus Lever Locking Plate in order to avoid accidental opening of the shutter When using a Ground Glass Back for focusing the shutter b...

Page 12: ...to change without notice www komamura co jp As a nature of such super wide angle lens light falls off at the corners of the image If this caracteristic is not desirable use of a center filter is reco...

Reviews: