


SWレンズユニット/レンズガードの着脱
ATTACHING/DETACHING LENS UNIT / LENS GUARD
6
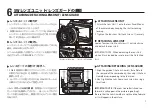
ATTACHING LENS UNIT
↑取付け /ATTACHING
↑取外し /DETACHING
レンズユニットの取付け
※フィルムを装填した状態でレンズユニットを取外す場合
は必ずホルダーに引板を挿入してください。
1. レンズユニット①をシャッターチャージレバー③が上に
くるようにSW612Dにセットします。
2. 四隅にあるレンズユニットロックノブ⑤を、SW612Dの
レンズユニット取付けネジ穴⑱に合わせて時計方向に
回して、4カ所ともしっかり締めます。
レンズユニットロックノブ⑤を反時計方向に回してネジを
緩め、SW612Dからはずします。
IMPORTANT NOTE : When detaching the Lens Unit
while a film is loaded, be sure to insert the Dark Slide
first.
IMPORTANT NOTE
: If the Lens Guard Bar is fixed too
forward, it will appear in the picture (vignetting).
Be sure that the Lens Guard Bar is not fixed too forward
as it will appear in the picture.
1. SW612D底部の三脚ネジ穴⑰にレンズガード⑫(別売)
の取付けネジを合わせ、各使用レンズに応じた長さに
調節します
(※)。
2. レンズガード⑫の取り付けネジを、SW612Dフレームの
三脚ネジ穴⑱にねじ込んで固定します。
1. Align the guide of the Lens Guard ⑫ Base Plate to
the rear end of the camera body, then adjust the Lens
Guard Bar corresponding to the lens used.
2. Next, tighten the Lens Guard Lock Screw by using a
small coin.
※レンズガードの長さ調節:各使用レンズに合わせて
ガードの長さを調節してください。正しくセットされずに
ガードが前に出過ぎると、画面に写り込んでしまう場合
があります。
ATTACHING/DETACHING / LENS GUARD
レンズガードの取付け / 取外し
1. Attach the Lens Unit ① onto the Lens Panel Mount
of the camera body, keeping the shutter cocking
lever up.
2. Tighten the four Lens Unit Lock Screws ⑤ securely.
Loosen four Lens Unit Lock Screws ⑤ anti-clock wise
and detach the Lens Unit.
DETACHING LENS UNIT
レンズユニットの取外し
❶ ③
⑫
⑰
⑤
⑱
7
Summary of Contents for SW612D
Page 1: ...Instruction Manual SW 612D...


