Horseman SW612D Instruction Manual Download Page 11

※ストロボをご使用の場合は、シンクロターミナル②をご利用ください。

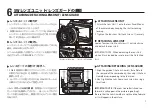
レンズユニットの絞りレバー④を左右に動かして調節し
ます。ピントガラスを見る場合は開放にします。

Set the Aperture Setting Lever ④ at the desired f-stop. 
When using a Ground Glass Back for focusing, set at 
the fully open position.

Turn the Shutter Speed Ring ⑦ to the desired shutter 
speed. 

Shutter cocking is necessary each time before 
releasing the shutter. Turn the Shutter Cocking Lever
③ in the direction of the arrow firmly until it stops.

Press the Shutter Release Button ⑥ downwards. 

The Press Focus Lever ⑧ is locked at the factory by means of a Focus 
Lever Locking Plate in order to avoid accidental opening of the shutter. 
When using a Ground Glass Back for focusing, the shutter blades can be 
opened or closed by using the shutter speed "T". 
For electronic flash, use Sync Terminal ② .

プレスフォーカスレバー⑧はご使用になれせん。誤って作動しないようにあ
らかじめストッパー板が装着されています。
シャッタースピードリング⑦を、

「T」にセットしてシャッターをチャージし、レ

リーズボタン⑥を押します。閉じる時は再度レリーズボタン⑥を押します。

 SETTING F-STOPS

 絞りの調節

 SETTING SHUTTER SPEED

 SHUTTER COCKING

 SHUTTER RELEASE

 シャッタースピードの調整

 シャッターの開閉

 SHUTTER OPEN

 シャッターチャージ

 シャッターレリーズ

IMPORTANT NOTE : 

Be sure to set the Shutter Speed Ring ⑦ 

accurately on the click stop. If it is set in between the click 
stop, the shutter mechanism will not function properly.

レンズユニットのシャッタースピードリング⑦を回してご
希望のシャッタースピードにセットします。
シャッタースピードはクリック式で目盛の中央で止まりま
す。クリックの止まる位置でご使用下さい。
※クリックの止まる位置以外はご使用はできません。

シャッターを切る前には必ずチャージを行います。
レンズユニットのシャッターチャージレバー③を矢印の方
向に止まるまで押してチャージしてください。

レンズユニットのシャッターレリーズボタン⑥を押し下げます。

シャッター操作

SHUTTER OPERATION

10

11

Summary of Contents for SW612D

Page 1: ...Instruction Manual SW 612D...

Page 2: ...CIFICATIONS CAUTION NOMENCLATURES ATTACHING DETACHING ADAPTER PLATE DIGITAL CAMERA BACK ATTACHING DETACHING ROLL FILM HOLDER GROUND GLASS FRAME ATTACHING DETACHING LENS UNIT LENS GUARD ATTACHING DETAC...

Page 3: ...ken itself by strong force Please treat it carefully as well Do not use cleaners that contain organic solvents to clean the camera body or lens 3 SPECIFICATIONS 1 SW 6 12cm 6 7cm 1 182 W 170 H 70 D mm...

Page 4: ...er Speed Ring Press Focus Lever Focus Ring Lens Panel SW SW SW612D V SW Viewfinder SW Lens Guard SW612D Camera Body Lock Buttons Neck Strap Lugs Spirit Level Tripod Socket Lens Unit Lock Screw Holes U...

Page 5: ...camera back 3 Push the two Lock Buttons all the back in at the top of the camera body to lock Push the two Unlock Buttons at the bottom of the camera body Detach the Adapter Plate from the camera bac...

Page 6: ...ottom of the camera body 2 Place the Spacer keeping the two hole edge left and the light shield side up toward film surface 3 Attach the Film Holder onto the camera back by aligning the four pins on t...

Page 7: ...ixed too forward as it will appear in the picture 1 SW612D 2 SW612D 1 Align the guide of the Lens Guard Base Plate to the rear end of the camera body then adjust the Lens Guard Bar corresponding to th...

Page 8: ...ength of the lens used While holding the Revolving Mask Housing of the Viewfinder firmly rotate the Mask Lock Ring anti clockwise and detach Attach an Interchangeable Finder Mask aligning the protrudi...

Page 9: ...Unit The View Finder Frame has markings for each format to determine 33x44mm and 24x36mm See the illustration B for details Spirit Level and Distance scale can be observed through the round opening of...

Page 10: ...ld Scale SW612D T P11 Attach optional Ground Glass Frame and Spacer set the Aperture Setting Lever at full opening position set the Shutter Speed Ring at T then push the Shutter Release Button down Fo...

Page 11: ...rds The Press Focus Lever is locked at the factory by means of a Focus Lever Locking Plate in order to avoid accidental opening of the shutter When using a Ground Glass Back for focusing the shutter b...

Page 12: ...to change without notice www komamura co jp As a nature of such super wide angle lens light falls off at the corners of the image If this caracteristic is not desirable use of a center filter is reco...

Reviews: