background image

4

ZIPPER II INSTRUCTION MANUAL

Circuit breaker

•  This machine is fitted with a built-in circuit breaker to protect it from 

damage in the case of electrical overload. 

•  When tripped, a small dowel will be ejected and will protrude from the 

rear of the machine. To reset the circuit breaker, push the dowel back 

into the machine until it locks into place.

•  The circuit breaker may be caused to trip by excessive heat in 

the working environment, by extreme tension set by the tension 

adjustment nut (see section "Tension adjustment before shearing"), 

by an incorrectly set up comb and cutter (see section "Fitting the comb 

and cutter"), or by an obstruction of the cutter. If the circuit breaker 

trips without any of the above causes, the machine should be referred 

to a qualified service person.

•  This circuit breaker does not take the place of, nor reduce the need 

for, an external socket-mounted RCD circuit breaker, which should 

always be used with any shearing machine. 

Operation

•  Switch: Position 

I

 - the power is ON.  Position 

O

 – the power is OFF.

•  Switch to 

off (position O) before plugging into, or disconnecting from, 

the power supply.

•  Always disconnect the power supply before changing the comb or 

cutter.

•  Always ensure that the comb is correctly positioned as shown in the 

diagram at the bottom of page 5.

•  Never wrap the power cable around the machine.
•  Keep away from all liquids.
•  Never shear wet animals.
•  Do not use combs with missing or broken teeth.
•  Look out for wire, etc. in the fleece and remove before shearing.
•  Keep clear of ear tags.
•  Keep children away from the working area and store the machine out 

of their reach.

•  Sharpen combs and cutters on a specialist grinder.
•  All persons using this machine must be trained in its safe use
•  Operating instructions should be kept in the storage case and should 

be accessible at all times.

Summary of Contents for Zipper II

Page 1: ...Instruction Manual Setting up and maintaining your machine ...

Page 2: ..._______________ 3 Sacrificial gear safety feature__________________________________________ 3 Circuit breaker________________________________________________________ 4 Operation ____________________________________________________________ 4 Fitting the comb and cutter ___________________________________________ 5 When to change the comb and cutter ________________________________ 6 Lubrication ___...

Page 3: ...240 volt AC 50 Hz electricity supply Use a Circuit Breaker RCD with this machine Use a 3 amp fuse in the plug Never insert the plug into a damaged socket Keep the electric lead up out of the way of animals Switch off and unplug the machine before changing the comb or cutter and before any maintenance Never use the machine if you suspect it of having been in contact with liquids Check the machine b...

Page 4: ...s not take the place of nor reduce the need for an external socket mounted RCD circuit breaker which should always be used with any shearing machine Operation Switch Position I the power is ON Position O the power is OFF Switch to off position O before plugging into or disconnecting from the power supply Always disconnect the power supply before changing the comb or cutter Always ensure that the c...

Page 5: ...ned screws Semi tighten the comb screws Move the comb until the sharp surface of the comb projects 1 2mm 2 0mm beyond the tips of the cutter Note the cutter must not overhang the hollows on the end of the comb teeth Tighten the combs screws Tighten the tension nut until the cutter is pressed against the comb and you can feel a slight resistance Always check that both conical pins are still in the ...

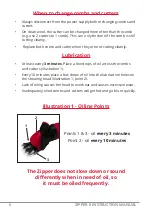
Page 6: ...Lubrication At least every 3 minutes Place a few drops of oil across the combs and cutters illustration 1 Every 10 minutes place a few drops of oil into the lubrication holes on the shearing head illustration 1 point 2 Lack of oiling causes the head to overheat and causes excessive wear Inadequately oiled combs and cutters will get hot and go blunt quickly Illustration 1 Oiling Points The Zipper d...

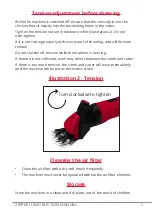
Page 7: ...add a little more tension Do not slacken off tension while the machine is running If tension is not sufficient wool may collect between the comb and cutter If there is too much tension the comb and cutter will wear prematurely and the machine will be put under excess strain Illustration 2 Tension Cleaning the air filter Clean the air filter with a dry soft brush frequently The machine must never b...

Page 8: ...ws H12 030 11 Zipper Sliding Sleeve H12 010 35 Zipper Comb Screw H12 031 12 Zipper Tension Nut H12 011 36 Zipper Fulcrum Post Nut H12 032 13 Zipper Thumb Plate Screw H12 012 37 Zipper Fulcrum Post H12 033 14 Zipper Thumb Plate H12 013 38 Zipper Head Retaining Nut H12 034 15 Zipper Casing Top Half H12 014 39 Zipper Casing Bottom Half H12 035 16 Zipper Switch Actuator Rod H12 015 40 Zipper Air Filte...

Reviews: