background image

4

5

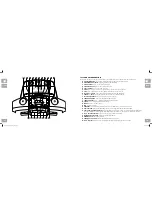
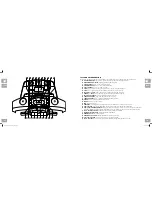
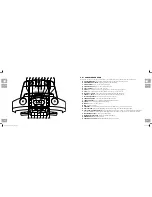
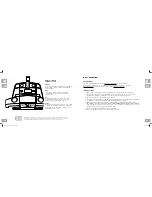
SPEAKERS

WATER BOTTLE HOLDER

GRIP PULSE HANDRAILS

CONSOLE FAN

ON/OFF SWITCH

CIRCUIT BREAKER

TRANSPORT WHEEL

RUNNING BELT / RUNNING DECK

UNDERNEATH FOOT LATCH

READING RACK

CONSOLE

IPOD/MP3 PLAYER POCKET

TOUCH PAD PANEL AND DISPLAY WINDOWS

MOTOR COVER

SIDE RAIL

ROLLER END CAP

FOOT LOCK LATCH (UNDERNEATH DECK)

SAFETY KEY PLACEMENT

CONSOLE MAST

POWER CORD

REAR ROLLER

TENSION/ALIGNMENT BOLTS

FOOT LOCK LATCH DECAL

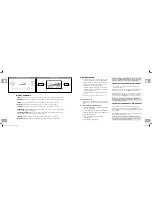
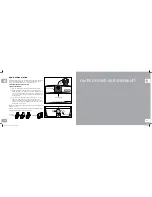
CAUTION ATTENTION PRECAUCIÓN

KEEP HANDS AND FEET 
AWAY FROM THIS AREA. 

HIGH-PRESSURE 

SHOCKS COULD CAUSE 

BODILY INJURY.

GARDER LES MAINS ET LES 

PIEDS LOIN DE CETTE REGION. 

LES AMORTISSEURS HAUTE 

PRESSION PEUVENT CAUSER 

DES BLESSURES CORPORELLES.

MANTENGA LAS MANOS Y LOS 

PIES LEJOS DE ESTA ÁREA. 
LOS AMORTIGUADORES DE 

ALTA PRESIÓN PODRÍAN 

CAUSAR LESIONES.

SUJETE LA LLAVE DE SEGURIDAD A SU ROPA ANTES DE COMENZAR. PARA EVITAR 
LESIONES PÁRESE EN LO RIELES LATERALES ANTES DE PONER A FUNCIONAR LA 
CAMINADORA. LEA Y SIGA LAS INSTRUCCIONES ANTES DE USAR ESTA 
CAMINADORA. NO DEJE QUE LOS NIÑOS SE ACERQUEN A ESTE EQUIPO. CUANDO 
NO LA ESTÉ USANDO, SAQUE LA LLAVE DE SEGURIDAD Y GUÁRDELA FUERA DEL 
ALCANZE DE LOS NIÑOS. CONSULTE A UN MÉDICO ANTES DE USAR ESTE EQUIPO. 
DEJE DE HACER EJERCICIO SI SIENTE DOLOR, DESMAYO, MAREO O SI LE FALTA EL 
ALIENTO. ESTE EQUIPO ES SÓLO PARA EL USO DEL CONSUMIDOR.

ATTACHER LA PINCE DE LA CLÉ DE SÉCURITÉ AUX VÊTEMENTS AVANT DE METTRE L’APPAREIL 
EN MARCHE. POUR ÉVITER TOUTE BLESSURE, METTRE LES PIEDS SUR LES RAILS LATÉRAUX 
AVANT DE LANCER LE TAPIS ROULANT. LIRE ET SUIVRE TOUTES LES INSTRUCTIONS AVANT LA 
MISE EN MARCHE. TENIR LES ENFANTS ÉLOIGNÉS DE L’APPAREIL. RETIRER LA CLÉ DE 
SÉCURITÉ LORSQUE L’APPAREIL N’EST PAS UTILISÉ ET LA CONSERVER HORS DE PORTÉE DES 
ENFANTS. CONSULTER UN MÉDECIN AVANT D’UTILISER CET APPAREIL. EN CAS DE 
DOULEURS, DE NAUSÉES, DE VERTIGES OU D’ESSOUFFLEMENTS, ARRÊTER IMMÉDIATEMENT 
TOUT EXERCICE. À L’USAGE DU CLIENT SEULEMENT.

ADVERTENCIA

AVERTISSEMENT

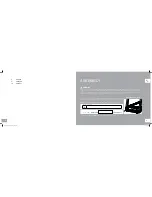
TooLS inCLUDED: 


F

6 mm T-Wrench


F

5 mm L-Wrench


F

4 mm T-Wrench

PArTS inCLUDED: 


F

1 Console Assembly


F

2 Console Masts


F

2 Console Mast Brackets


F

4 Hardware Bags


F

1 Safety Key


F

1 Audio Adapter Cable


F

1 Bottle of Silicone Lubricant 

   (for 2 applications) 
T202/T203:
 

F

4 iPod

®

 Dock Inserts


F

1 iPod

®

 Dock Rubber Plug

If you have questions or if 

there are any missing parts, 

contact Customer Tech 

Support. Contact information 

is located on the back panel 

of this manual.

DO NOT ATTEMPT TO LIFT THE TREADMILL! Do not move or lift treadmill 
from packaging until specified to do so in the assembly instructions. You may 
remove the plastic wrap from console masts.

WArninG

UnPACKinG

Place the treadmill carton on a level flat surface. It is recommended that you place a 

protective covering on your floor. Take CAUTION when handling and transporting this 

unit. Never open box when it is on its side. Once the banding straps have been removed, 

do  not  lift  or  transport  this  unit  unless  it  is  fully  assembled  and  in  the  upright  folded 

position, with the lock latch secure. Unpack and assemble the unit where it will be used. 

The enclosed treadmill is equipped with high-pressure shocks and may spring open if 

mishandled. Never grab hold of any portion of the incline frame and attempt to lift or 

move the treadmill.

FAILURE TO FOLLOW THESE INSTRUCTIONS COULD RESULT IN INJURY! 

WArninG

nEED HELP?

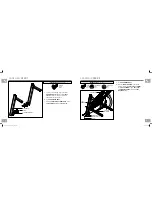
NOTE:  During  each  assembly  step,  ensure  that  ALL  nuts  and  bolts  are  in  place  and 

partially threaded in before completely tightening any ONE bolt.

NOTE: A light application of grease may aid in the installation of hardware. Any grease, 

such as lithium bike grease is recommended.

PrE 

ASSEMBLY

T202-T203-CT7.1-OM-rev1.4.indd   4-5

8/5/10   8:32 AM

Summary of Contents for CT7.1

Page 1: ... LA CAMINADORA Read the treadmill guide before using this owner s manual Lire le GUIDE DU TAPIS ROULANT avant de se servir du présent MANUEL DU PROPRIÉTAIRE Lea la GUÍA DE LA CAMINADORA antes de usar este MANUAL DEL PROPIETARIO T202 T203 CT7 1 T202 T203 CT7 1 OM rev1 4 indd 1 8 5 10 8 32 AM ...

Page 2: ...se and may cause irritating noises To prevent damage to the treadmill the assembly instructions must be reviewed and corrective actions should be taken Before proceeding find your treadmill s serial number located on a white barcode sticker near the on off power switch and power cord and enter it in the space provided below ENTER YOUR SERIAL NUMBER AND MODEL NAME IN THE BOXES BELOW Refer to the SE...

Page 3: ...N AVANT D UTILISER CET APPAREIL EN CAS DE DOULEURS DE NAUSÉES DE VERTIGES OU D ESSOUFFLEMENTS ARRÊTER IMMÉDIATEMENT TOUT EXERCICE À L USAGE DU CLIENT SEULEMENT ADVERTENCIA AVERTISSEMENT TOOLS INCLUDED F F 6 mm T Wrench F F 5 mm L Wrench F F 4 mm T Wrench PARTS INCLUDED F F 1 Console Assembly F F 2 Console Masts F F 2 Console Mast Brackets F F 4 Hardware Bags F F 1 Safety Key F F 1 Audio Adapter Ca...

Page 4: ...TENTS BOLTS B SPRING WASHERS C FLAT WASHERS D LEFT CONSOLE MAST BASE FRAME RUNNING DECK FOOT LATCH ASSEMBLY STEP 1 A Cut the yellow banding straps and lift the running deck upward until the foot latch locks Remove all contents from underneath the running deck B Open hardware bag 1 C Attach console mast brackets to the console masts using 8 bolts a BOLT A 10 mm Qty 8 HARDWARE BAG 1 CONTENTS BOLTS A...

Page 5: ... by following the instructions in the maintenance section in the treadmill guide Note Be careful not to pinch any wires while assembling the masts YOU ARE FINISHED ASSEMBLY STEP 3 A Open hardware bag 3 B Pull lead wire through right console mast After pulling the lead wire through the mast the top of the console cable should be located at the top of the mast Detach and discard the lead wire C With...

Page 6: ...ON section in the treadmill guide has instructions for the following LOCATION OF THE TREADMILL Using the SAFETY KEY FOLDING the treadmill MOVING the treadmill LEVELING the treadmill TENSIONING THE RUNNING BELT CENTERING THE RUNNING BELT Using the HEART RATE function T202 T203 CT7 1 OM rev1 4 indd 10 11 8 5 10 8 32 AM ...

Page 7: ...n key press to turn fan on and off O Fan personal workout fan P Speakers music plays through speakers when your cd mp3 player is connected to the console Q Audio in jack plug your cd mp3 player into the console using the included audio adaptor cable R Audio out headphone jack plug your headphones into this jack to listen to your music through the headphones Note when headphones are plugged into th...

Page 8: ...rsonal workout fan P Speakers music plays through speakers when your cd mp3 player is connected to the console Q Audio in jack plug your cd mp3 player into the console using the included audio adaptor cable R Audio out headphone jack plug your headphones into this jack to listen to your music through the headphones Note when headphones are plugged into the headphone jack the sound will no longer c...

Page 9: ...uring workout M Enter used to confirm target and workout settings N Fan key press to turn fan on and off O Fan personal workout fan P Speakers music plays through speakers when your cd mp3 player is connected to the console Q Audio in jack plug your cd mp3 player into the console using the included audio adaptor cable R Audio out headphone jack plug your headphones into this jack to listen to your...

Page 10: ...ve two options to start your workout A Quick start up Simply press the go START key to begin working out Time distance and calories will all count up from zero OR B Select a target and workout 1 Select GUEST USER 1 or USER 2 using ARROW keys and press ENTER 2 Select a target using the select target key 3 Adjust the target settings using the arrow keys 4 Press enter to advance 5 Select a workout us...

Page 11: ...ies Allows user to set a target based on the number of calories they would like to burn Calories target can range from 20 980 calories CALORIES will count down TIME and DISTANCE will count up from zero NO TARGET Allows user to select a workout profile that has no specified time distance or calorie target TIME DISTANCE and CALORIES will all count up from zero Using custom workouts T203 only 1 Selec...

Page 12: ...ep towards achieving your fitness goals Goal center is innovative new software integrated into your treadmill console that will allow you to track your fitness goals over time without the need for paper journals or logs Read further to learn about how goal center can help motivate you to enhance your performance Goal center setup 1 Select user 1 or user 2 using the or keys and press enter 2 Press ...

Page 13: ...com nikeplus for more information Before syncing your Apple device to your computer you must first create a free Nike Plus account at www nikerunning com and download the latest iTunes software www apple com itunes GETTING STARTED 1 Before connecting your Apple device to the treadmill you must first turn on Nike Plus on the device 2 Dock your Apple device and wait for authentication to complete Th...

Page 14: ...you can adjust your volume and song settings using the iPod control keys on the treadmill console NOTE If you don t want to use the speakers you can plug your headphones into the audio out jack at the bottom of the console Replace the rubber plug into the bottom of the docking station when the station is not in use NOTE iPod audio will not play through speakers if audio adaptor cable is plugged in...

Page 15: ...soever nature in connection with the purchase use repair or maintenance of the equipment Horizon Fitness does not provide monetary or other compensation for any such repairs or replacement parts SERVICE RETURNS In home service is available within 150 miles of the nearest authorized Service Provider Mileage beyond 150 miles from an authorized service center is the responsibility of the consumer All...

Page 16: ...user des bruits irritants Pour éviter les dommages au tapis roulant relire les instructions d assemblage et prendre les mesures correctives qui s imposent Avant de continuer trouvez le numéro de série du tapis roulant qui est situé sur un autocollant code barres blanc sur le stabilisateur d avant et entrez le dans l espace ci dessous INSCRIRE LE NUMÉRO DE SÉRIE ET LE MODÈLE DANS LES CASES CI DESSO...

Page 17: ...TOUT EXERCICE À L USAGE DU CLIENT SEULEMENT ADVERTENCIA AVERTISSEMENT OUTILS INCLUS F F Clé à manche en T de 6 mm F F Clé à manche en L de 5 mm F F Clé à manche en T de 4 mm PIÈCES INCLUSES F F 1 ensemble console F F 2 montants de console F F 2 supports de montants de console F F 4 sacs de visserie F F 1 clé de sécurité F F 1 câble adaptateur audio F F 1 bouteille de lubrifiant au silicone pour 2 ...

Page 18: ...15 mm Quantité 4 RONDELLE PLATE D 15 mm Quantité 4 CONTENU DU SACHET DE VISSERIE 2 ÉTAPE 1 DE L ASSEMBLAGE A Couper les bandes de cerclage jaunes et relever la plate forme jusqu à ce que la pédale de verrouillage s enclenche Enlever tout objet qui se trouve sous la plate forme B Ouvrir le sachet de visserie 1 C Fixer les SUPPORTS DE MONTANTS DE CONSOLE aux MONTANTS DE CONSOLE avec 8 BOULONS A BOUL...

Page 19: ...t la première utilisation il faut lubrifier la plate forme en suivant les instructions dans la section ENTRETIEN du GUIDE DU TAPIS ROULANT Remarque Veiller à ne pincer aucun des câbles lors de l assemblage des montants MONTANT DE CONSOLE DROIT CÂBLE DE LA CONSOLE FIL DE GUIDAGE BÂTI PLATE FORME BOULONS B RONDELLES ÉLASTIQUES C RONDELLES PLATES D ÉTAPE 3 DE L ASSEMBLAGE A Ouvrir le sachet de visser...

Page 20: ...E du guide du tapis roulant comporte des instructions relatives à ce qui suit EMPLACEMENT DU TAPIS ROULANT Utilisation de la CLÉ DE SÉCURITÉ PLIAGE du tapis roulant DÉPLACEMENT du tapis roulant MISE À NIVEAU du tapis roulant TENSIONNEMENT DE LA BANDE CENTRAGE DE LA BANDE Utilisation du CARDIO FRÉQUENCEMÈTRE T202 T203 CT7 1 OM rev1 4 indd 38 39 8 5 10 8 32 AM ...

Page 21: ...dement l inclinaison voulue K TOUCHES DE RÉGLAGE RAPIDE DE LA VITESSE Servent à atteindre plus rapidement la vitesse voulue L CHANGE DISPLAYS CHANGEMENT D AFFICHAGE Appuyer sur cette touche pour changer les paramètres d affichage pendant une séance d entraînement M ENTER VALIDATION Cette touche sert à confirmer l objectif et les réglages d exercice N TOUCHE FAN VENTILATEUR Appuyer sur cette touche...

Page 22: ...inaison voulue K TOUCHES DE RÉGLAGE RAPIDE DE LA VITESSE Servent à atteindre plus rapidement la vitesse voulue L CHANGE DISPLAYS CHANGEMENT D AFFICHAGE Appuyer sur cette touche pour changer les paramètres d affichage pendant une séance d entraînement M ENTER VALIDATION Cette touche sert à confirmer l objectif et les réglages d exercice N FAN KEY Appuyer sur cette touche pour actionner ou arrêter l...

Page 23: ...ts incréments de 0 1 mi h J TOUCHES DE RÉGLAGE RAPIDE DE L INCLINAISON Servent à atteindre plus rapidement l inclinaison voulue K TOUCHES DE RÉGLAGE RAPIDE DE LA VITESSE Servent à atteindre plus rapidement la vitesse voulue L CHANGE DISPLAYS CHANGEMENT D AFFICHAGE Appuyer sur cette touche pour changer les paramètres d affichage pendant une séance d entraînement M ENTER VALIDATION Cette touche sert...

Page 24: ...É UTILISATEUR 1 ou UTILISATEUR 2 à l aide des touches FLÉCHÉES et appuyer sur la touche ENTER 2 Choisir un OBJECTIF à l aide de la touche SELECT TARGET 3 Ajuster les réglages de l OBJECTIF l aide des touches FLÉCHÉES 4 Appuyer sur la touche ENTER pour passer au réglage suivant 5 Choisir un EXERCICE à l aide de la touche SELECT WORKOUT 6 Appuyer sur la touche START pour commencer à s exercer REMARQ...

Page 25: ...raîne un changement correspondant de la vitesse et de l inclinaison dans chacun des segments du programme 3 HILLS COLLINES Simule la course en montée et en descente pour accroître l endurance en augmentant et en réduisant l inclinaison Segment Échauffement 1 2 3 4 5 6 7 8 Les segments 1 8 se répètent jusqu à ce que l objectif fixé soit atteint Durée 4 00 min 30 s 30 s 30 s 30 s 30 s 30 s 30 s 30 s...

Page 26: ...ixer un nouvel objectif VISUALISATION DES PROGRÈS VERS LA CONCRÉTISATION D UN OBJECTIF Lorsqu on entre dans le profil d utilisateur on peut visualiser les progrès vers la concrétisation de son objectif en appuyant sur la touche GOAL CENTER La console fait défiler la durée restante la distance ou les calories selon l objectif choisi et fait aussi défiler la durée restante pour atteindre cet objecti...

Page 27: ... synchroniser le dispositif Apple à l ordinateur on doit créer un compte gratuit Nike Plus à www nikerunning com et télécharger le logiciel iTunes le plus récent www apple com itunes POUR COMMENCER 1 Avant de connecter le dispositif Apple au tapis roulant on doit mettre sous tension ou activer Nike Plus sur le dispositif 2 Connecter le dispositif Apple et attendre que l authentification ait lieu C...

Page 28: ...la console du tapis roulant REMARQUE Si on ne veut pas utiliser les haut parleurs on peut brancher les écouter a la prise de sortie audio à la partie inférieure de la console Replacer le bouchon de caoutchouc à la partie inférieure du socle de synchronisation lorsque le socle n est pas utilisé REMARQUE L audio de l iPod n est pas diffusée par les haut parleurs si le câble de raccordement audio est...

Page 29: ...l entretien de l équipement Horizon Fitness ne consent aucune compensation monétaire ou autre pour de telles réparations ou le coût des pièces de rechange y compris notamment les cotisations d organismes sportifs pertes de temps de travail visites de diagnostic visites d entretien ou frais de transport Les équipements utilisés à des fins commerciales ou à toutes autres fins que celles d une famill...

Page 30: ...rritantes Para evitar daaños a la caminadora es necesario repasar las instrucciones de ensamblaje y hacer las correcciones necesarias Antes de seguir adelante busque el número de serie de su caminadora que está colocada cerca del interruptor de encendido y apagado y del cable de corriente y escríbalo en el espacio disponible a continuación ESCRIBA EL NÚMERO DE SERIE Y EL NOMBRE DE MODELO EN LAS SI...

Page 31: ...N DEL RODILLO POSTERIOR POSTE DE LA CONSOLA MECANISMO DE BLOQUEO ACCIONADO CON EL PIE BAJO LA PLATAFORMA HERRAMIENTAS INCLUIDAS F F Llave en T de 6 mm F F Llave en L de 5 mm F F Llave en T de 4 mm PIEZAS INCLUIDAS F F 1 conjunto de consola F F 2 postes de la consola F F 2 ménsulas de los postes de la consola F F 4 bolsas de tornillería F F 1 llave de seguridad F F 1 cable adaptador de audio F F 1 ...

Page 32: ...ANISMO DE BLOQUEO ACCIONADO POR EL PIE TORNILLOS B ARANDELAS ELÁSTICAS C ARANDELAS PLANAS D PASO 1 DE ENSAMBLAJE A Corte el enfajillado amarillo y levante la plataforma hacia arriba hasta que se enganche el mecanismo de bloqueo accionado por el pie Retire todo lo que haya debajo de la plataforma B Abra la bolsa de tornillería 1 C Instale las MÉNSULAS DE LOS POSTES DE LA CONSOLA en los POSTES DE LA...

Page 33: ...cciones en la sección de Mantenimiento en la GUÍA DE LA CAMINADORA NOTA Tenga cuidado de no pellizcar algún cable al ensamblar los postes FIN DEL ENSAMBLAJE PASO 3 DE ENSAMBLAJE A Abra la bolsa de tornillería 3 B Meta el alambre de alimentación del cable por el poste derecho de la consola Una vez que haya pasado todo el alambre de alimentación del cable a través del poste la punta superior del cab...

Page 34: ...ía de la caminadora contiene instrucciones para lo siguiente DÓNDE COLOCAR SU CAMINADORA USO DE LA LLAVE DE SEGURIDAD PARA LEVANTAR LA CAMINADORA PARA MOVER LA CAMINADORA PARA NIVELAR LA CAMINADORA PARA TENSAR LA BANDA PARA CORRER PARA CENTRAR LA BANDA PARA CORRER PARA USAR LA FUNCIÓN DE RITMO CARDÍACO T202 T203 CT7 1 OM rev1 4 indd 66 67 8 5 10 8 32 AM ...

Page 35: ...rápidas de velocidad Se usan para llegar a la velocidad deseada más rápidamente L CHANGE DISPLAY Cambio de información Oprima para cambiar la información en la pantalla durante la sesión de ejercicio M ENTER Se usa para confirmar los valores meta y de sesión de ejercicio N FAN tecla de ventilador Oprima para encender o apagar el ventilador O Ventilador Ventilador personal para la sesión de ejercic...

Page 36: ... velocidad deseada más rápidamente L CHANGE DISPLAY Cambio de información Oprima para cambiar la información en la pantalla durante la sesión de ejercicio M ENTER Se usa para confirmar los valores meta y de sesión de ejercicio N FAN tecla de ventilador Oprima para encender o apagar el ventilador O Ventilador Ventilador personal para la sesión de ejercicio P Bocinas Escuche música por las bocinas c...

Page 37: ...Se usan para llegar a la inclinación deseada más rápidamente K Teclas rápidas de velocidad Se usan para llegar a la velocidad deseada más rápidamente L CHANGE DISPLAY Cambio de información Oprima para cambiar la información en la pantalla durante la sesión de ejercicio M ENTER Se usa para confirmar los valores meta y de sesión de ejercicio N FAN tecla de ventilador Oprima para encender o apagar el...

Page 38: ...itado USER 1 usuario 1 o USER 2 usuario 2 por medio de las teclas de FLECHAS y oprima ENTER 2 Seleccione una meta por medio de la tecla SELECT TARGET 3 Regule los valores de su meta por medio de las teclas de flechas 4 Oprima ENTER para seguir adelante 5 Seleccione una sesión de ejercicio por medio de la tecla SELECT WORKOUT 6 Oprima la tecla de inicio START para que dé inicio la sesión de ejercic...

Page 39: ...cta la intensidad del programa lo que hace que cambie la velocidad y la inclinación de acuerdo a cada uno de los segmentos del programa 3 HILLS COLINAS Al aumentar o disminuir la inclinación simula subir y bajar colinas para mejorar la resistencia o el aguante Segmento Calentamiento 1 2 3 4 5 6 7 8 Los segmentos del 1 al 8 se repiten hasta que se llega a la meta Tiempo 4 00 min 30 seg 30 seg 30 se...

Page 40: ... de usuario puede observar su progreso para llegar a la meta que se haya propuesto con sólo oprimir la tecla GOAL CENTER La consola circula para indicar el tiempo la distancia o las calorías restantes de acuerdo a la meta seleccionada y también le indica el tiempo restante para llegar a dicha meta NOTA Para que los datos de las sesiones de ejercicio se acumulen para alcanzar la meta de un usuario ...

Page 41: ...ra más información Antes de sincronizar su dispositivo Apple a su computadora primero debe crear una cuenta Nike Plus en www nikerunning com y descargar el software más reciente de iTunes www apple com itunes PARA EMPEZAR 1 Antes de conectar su dispositivo Apple a la caminadora primero debe encender o activar gratis Nike Plus en el dispositivo 2 Conecte su dispositivo Apple a la base de conexión y...

Page 42: ...base El iPhone debe estar en el modo de avión Airplane Mode para poder usarlo en la base de conexión PARA USAR LA BASE DE CONEXIÓN DE iPOD EL iPOD NO ESTÁ INCLUIDO 1 Retire el tapón de goma de la parte inferior de la base de conexión 2 Conecte su iPod emparejando el pasador de conexión de la base de conexión en la caminadora con el conector de su iPod NOTA por favor espere por lo menos 10 segundos...

Page 43: ...izon Fitness no ofrece compensación monetaria ni de otro tipo por dichas reparaciones ni costos de reemplazo de piezas incluso pero sin limitarse a cuotas de membresía en gimnasios tiempo perdido de trabajo o labores servicio de diagnóstico servicio de mantenimiento o transporte El equipo al que se le dé uso con propósitos comerciales o cualquier otro propósito que no sea en el hogar de una sola f...

Page 44: ...86 87 T202 T203 CT7 1 OM rev1 4 indd 86 87 8 5 10 8 32 AM ...

Page 45: ...n Fitness tient à ce qu on lui signale tout problème d utilisation afin de pouvoir y remédier Remarque Lire la section Dépannage du guide du tapis roulant avant de contacter le service de soutien technique à la clientèle Pour plus ample information sur le produit visiter notre site Web Si tiene problemas durante el ensamblaje o si le faltan piezas NO DEVUELVA ESTE APARATO AL VENDEDOR MINORISTA Par...

Reviews: