


– 5 –
Z-Wave Troubleshooting
•
Cannot add new device
Make sure the Z-Wave device is within range of the VAM. You
may need to move the device closer to the VAM. Refer to the Z-
Wave device Instruction Guide for proper range.
•
Device is within proper range but still is not included
1. At the VAM:
a. Click the
Automation
button from the “Home” screen and
then click the
Z-Wave Setup
button to display the “Z-Wave
Device Management”
screen.
b. If the device does not appear on the screen, click the
Z-
Wave Remove Device
button.
2. At the Z-Wave device, press the
Function Key
. The screen
will display a message “
Device Removed
”.
3. At the VAM, Include device again.
•
Highlighted device will not delete
When deleting a device, if the selected device remains on
the screen, highlight the device name and click the
Removed Failed Device
button.
Compatible Z-Wave Devices
Z-Wave devices may vary; follow the instructions in the User
Guide for your specific device. Refer to the table below for some
of the compatible devices.
Door Locks
Yale Real Living Push Button Lever Lock
Yale Real Living Touchscreen Lever Lock
Yale Real Living Push Button Deadbolt Lock
Yale Real Living Touchscreen Deadbolt Lock
Schalge Link Deadbolt Lock
Schlage Link Lever Lock
Kwikset Smartcode Lever lock
Kwikset Smartcode Deadbolt Lock
Thermostats
Honeywell ECC
Wayne Dalton Zwave thermostat
Trane Zwave Thermostat
Appliance
HomeManageable Appliance Module
Wayne Dalton Small Appliance Module
GE Wireless Lighting Control Plug In Appliance Module
Lights
Leviton/ Switches
Leviton/ Dimmers
Leviton/ Plug in Modules
GE Wireless Lighting Control Dimmers
GE Wireless Lighting Control Switches
GE Wireless Lighting Control Plug in Lamp Modules
Not all Z-wave devices have been tested and some features may
produce unpredictable results
.
Using VAM as a Secondary Controller
VAM can be used as a secondary controller when connected to
another Z-Wave network.
1. Remove any Z-Wave devices previously included in VAM.
Click
Automation
>
Z-Wave Setup
to display the Z–Wave
Management screen, then click
Z-Wave Default
and select
Yes
.
2. Press the Z-Wave Primary button to switch VAM to secondary
controller. The Z-Wave Primary icon changes to Z-Wave
Secondary accordingly.
3. Start the inclusion process at the other network’s primary
controller (see controller’s manual), then click the
Add
Device
button in VAM’s Z-Wave Management screen to add (include)
VAM to the controller. To remove (exclude) VAM from the
primary controller, start the exclusion process at the other
network’s primary controller, then click the
Remove Device
button in VAM.
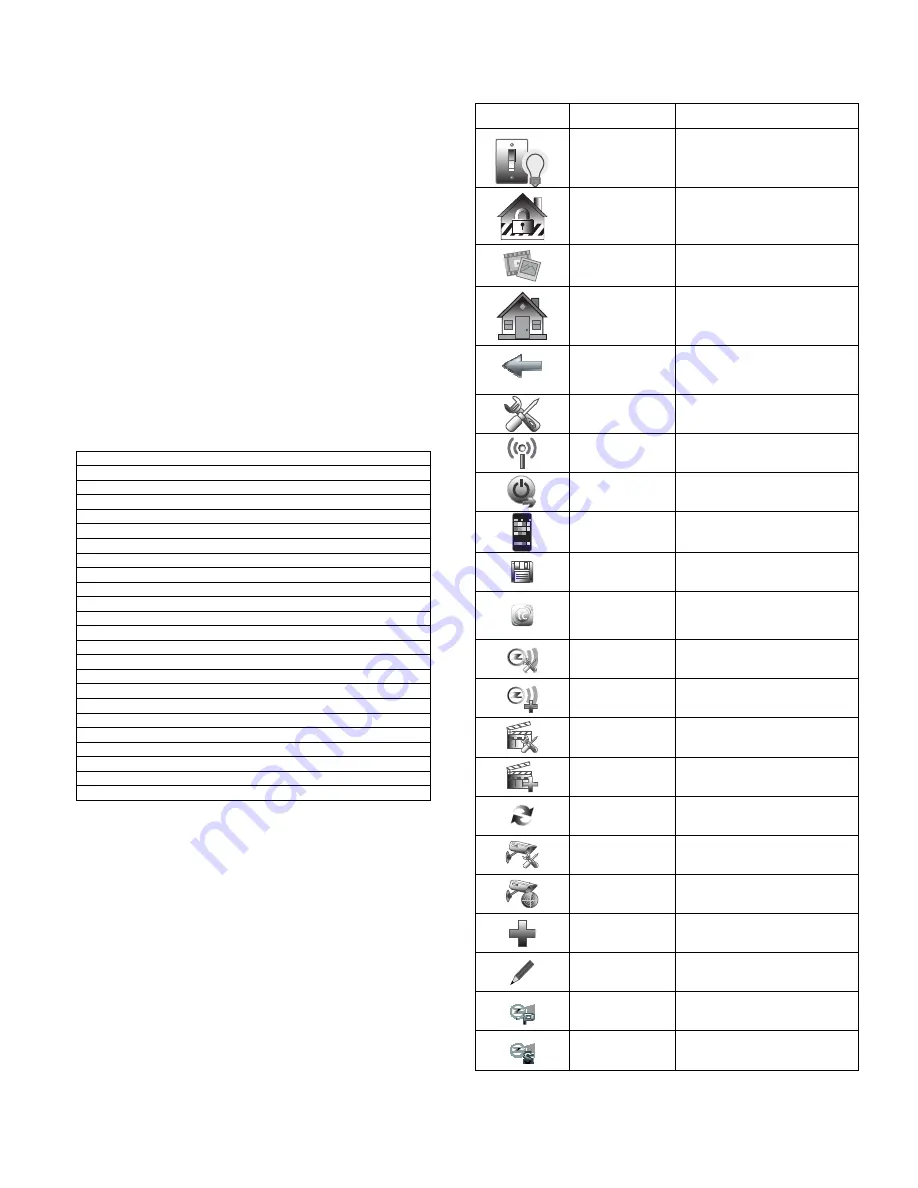
Navigation & Menu Icons
To aid in the navigation through the VAM WIFI screens, a set
of user-friendly icons has been provided.
ICON
ICON TITLE
FUNCTION
"Automation”
Accesses the Z-Wave setup,
Scene setup, and Room setup
screens.
"Security”
Accesses the "Security" screen.
“Multi-Media”
Accesses the Camera fetaures.
“Home”
Returns you to the "Home"
screen.
“Back”
Reverts to the last screen
viewed.
“Setup”
Accesses the Setup menus
.
Set Home
Router
Accesses the “Set Home
Router” screen
Exit
Exits the VAM menu
Switch Theme
Switch between normal and
mobile view
Save
used to save options
TC Enable
used when enabled Z-Wave
devices for Total Connect
usage
Z-Wave Setup
Accesses the Z-Wave
management screen
Z-Wave
Enroll/Add
Add a Z-Wave device
Scene Setup
Accesses the scene setup
menu
Add Scene
Add a scene
Refresh
used to refresh the page
Camera Setup
accesses the camera setup
menu
Camera
Discover
used to “discover Wi-Fi
cameras
Add
add a camera
Edit
edit a device name
Z-Wave Primary
indicates primary controller
Z-Wave
Secondary
indicates secondary controller