Honeywell T8621A User Manual Download Page 2

2

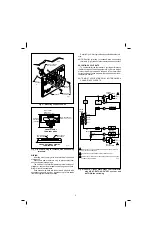
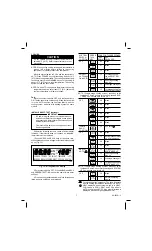
Fig. 2—Mounting subbase on wall.

Fig. 3—Restrict wiring to recessed area surrounding

terminals.

WIRING

All wiring must comply with local electrical codes and

ordinances.

Disconnect power before wiring to prevent electrical

shock or equipment damage.

The shape of the terminal barrier permits insertion of

straight or conventional wraparound wiring connections.
Either method is acceptable.

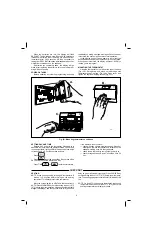
Push excess wire back into the hole, and plug hole with

nonhardening caulk, putty or insulation to prevent drafts
from affecting thermostat operation.

Refer to Figs. 4-9 for typical hookups of subbase thermo-

stat.

NOTE: Restrict all wiring to recessed area surrounding

terminals (Fig.3) to assure thermostat/subbase contact.

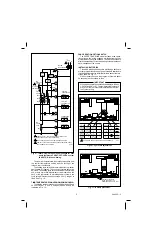
ADJUSTING CYCLE RATE

To custom-tailor the thermostat’s cycling performance

to different types of heating equipment, cycle rate adjust-
ment screws are provided on the back of the thermostat.
Correct setting of these screws will provide optimum room
temperature control.

NOTE: MOST APPLICATIONS WILL NOT REQUIRE A

CHANGE IN CYCLE RATE.

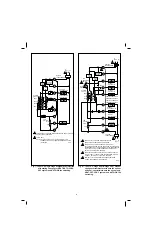
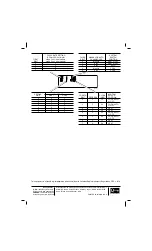
Fig. 4—T8621A 1-stage heat/1-stage cool thermostat

with HEAT-AUTO-COOL-OFF system and
AUTO-ON fan switching.

WIRES THROUGH
WALL OPENING

WALL 

WALL
ANCHORS
(2)

SUBBASE

MOUNTING
HOLES

MOUNTING
SCREWS (2)

M846

FOR STRAIGHT
INSERTION –
STRIP 5/16 in. (8 mm)

FOR WRAPAROUND –
STRIP 7/16 in. (11 mm)

RESTRICT
WIRING TO
THIS AREA  

KEEP WIRING BELOW
THIS SURFACE

TOP SURFACE
OF SUBBASE

FRONT VIEW OF

TERMINAL AREA

CROSS-SECTIONAL VIEW OF

TERMINAL AREA

M847

M1574

HEATING
TRANSFORMER

R

C

W1

HEAT RELAY

COOLING
TRANSFORMER

Y1

G

RC

COOLING 
CONTACTOR

FAN RELAY

HIGH
LIMIT

L1
(HOT)

L2

HEAT

AUTO

OFF

SYSTEM
SWITCH

AUTO

ON

FAN
SWITCH

1

POWER SUPPLY.  PROVIDE DISCONNECT MEANS AND OVERLOAD
PROTECTION AS REQUIRED.

FOR SINGLE TRANSFORMER SYSTEM JUMPER R AND RC.

NOMINAL 24 Vac POWER MUST BE PRESENT BETWEEN R AND C FOR 
THERMOSTAT OPERATION.

COOL

H

POWER
SUPPLY

2

1

C

L1
(HOT)

L2

1

2

3

2

3

Summary of Contents for T8621A

Page 1: ...surface Thread wires through the center opening of the subbase Then mount the subbase using two screws provided Gently tighten screws level top surface of subbase then securely tighten screws WHEN INSTALLING THIS PRODUCT 1 Read these instructions carefully Failure to follow them could damage the product or cause a hazardous condition 2 Check the ratings on the product to make sure the product is s...

Page 2: ...rews are provided on the back of the thermostat Correct setting of these screws will provide optimum room temperature control NOTE MOST APPLICATIONS WILL NOT REQUIRE A CHANGE IN CYCLE RATE Fig 4 T8621A 1 stage heat 1 stage cool thermostat with HEAT AUTO COOL OFF system and AUTO ON fan switching WIRES THROUGH WALL OPENING WALL WALL ANCHORS 2 SUBBASE MOUNTING HOLES MOUNTING SCREWS 2 M846 FOR STRAIGH...

Page 3: ... SUPPLY 2 1 C2 C1 L1 HOT L2 1 2 1 POWER SUPPLY PROVIDE DISCONNECT MEANS AND OVERLOAD PROTECTION AS REQUIRED FOR SINGLE TRANSFORMER SYSTEM JUMPER R AND RC NOMINAL 24 Vac POWER MUST BE PRESENT BETWEEN R AND C FOR THERMOSTAT OPERATION 2 3 3 HIGH LIMIT M1575 SYSTEM TRANSFORMER R C W1 W2 Y2 Y1 G RC FAN RELAY HIGH LIMIT HIGH LIMIT L1 HOT L2 HEAT AUTO COOL SYSTEM SWITCH AUTO ON FAN SWITCH POWER SUPPLY PR...

Page 4: ...3 4 1 2 3 POWER SUPPLY PROVIDE DISCONNECT MEANS AND OVERLOAD PROTECTION AS REQUIRED FOR GAS OR OIL APPLICATIONS OR ELECTRIC HEAT APPLICATIONS WHERE THE FAN OPERATION IS CONTROLLED INDEPENDENTLY OF THE THERMOSTAT AUTO FAN OPERATES WITH Y1 ONLY TWO TRANSFORMERS MAY BE USED SET SWITCH TO NONELECTRIC POSITION SYSTEM SWITCH FAN SWITCH AUTO ON OFF HEAT COOL STAGE 1 HEAT RELAY STAGE 2 HEAT RELAY STAGE 2 ...

Page 5: ...poweroutage Batteriesare included with thermostat Install batteries in back of thermo stat as shown in Fig 11 Without battery backup the program will remain about 30 seconds in event of power loss IMPORTANT When batteries are first installed the display will flash 1 00 PM and 32 or 0 The temperature display will stay at 32 or 0 until the thermostat is powered from the system wiring Fig 11 Battery ...

Page 6: ...l system power is on check voltage between R and C should be 24 to 30 Vac SETTING DAY AND TIME Restore 24 V power to the thermostat When power is applied to the thermostat the display will read 1 00 PM and roomtemperature Itwillgooffforafewseconds thenbegin to flash on and off Set present day and time Press Press to set the current day Each press of the DAY key advances the display one day Press T...

Page 7: ...ng setting is changed thermostat will wait up to 5 minutes before turning on the cooling equipment This delay protects the compressor Move the system switch to COOL and the fan switch to AUTO Press COOLER key until the setting is about 10 F 6 C below room temperature The cooling equipment and fan should start Press WARMER key until the setting is about 10 F 6 C above room temperature The cooling e...

Page 8: ...y MN 55422 4386 Spain Taiwan United Kingdom U S A CANADA 740 Ellesmere Road Scarborough Ontario M1P 2V9 PRINTED IN TAIWAN R O C QUALITY IS KEY CYCLE RATE SETTING CPH at 50 on time for FIRST stage 1 on 1 heat models DIGIT stage 2 on 2 heat models 0 1 1 3 2 9 3 6 SYSTEM THIRD MANUAL OR AUTO SWITCH DIGIT CHANGEOVER POSITION 0 Manual HEAT or OFF 1 Auto HEAT or OFF 3 Auto AUTO 4 Manual COOL 5 Auto COOL...

Reviews: