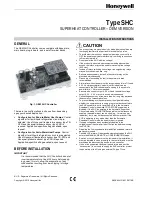


OEM SHC CONTROLLER – INSTALLATION INSTRUCTIONS
MU1B-0441GE51 R0710B
2
Approvals, Certifications, and Standards
Approvals and Certifications
•
CE-approved according to IEC60730
•
No hazardous substances according RoHS 2002/95/EC
•
Waste disposal according Waste Electrical and Electronic
Equipment Guideline WEEE 2002/96/EEC
Classification according to EN60730-1
Environmental conditions: For use in home (residential,
commercial, and light-industrial)
and industrial environments
Pollution degree:
2
Insulation class:
3
Protection against vibration: 5g as per IEC 60068-2-6
(10 … 500 Hz) (applicable for
wall mounting, only)
Protection against shock:
50g as per IEC 60068-2-27
(applicable for wall mounting,
only)
Classification according to EN60529
(Degree of Protection Provided by Enclosures)
IP00
Ambient Environmental Limits
Operating temperature:
-25 … +60 °C at 5…90% r.H.
Storage temperature:
-25 … +70 °C at 5…90% r.H.
Temperature Control Accuracy
Superheat temperature:
< 1.0 K
Minimum stable signal:
< 2.0 K
Weight
Without screw terminals:
220 g
With screw terminals:
290 g
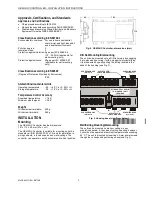
INSTALLATION
Mounting
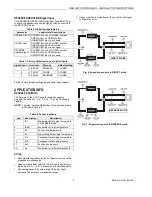
The OEM SHC Controller has the dimensions:
181 x 110 x 40 mm (W x L x H).
The OEM SHC Controller is suitable for mounting on both a
standard rail (DIN EN 50022-35 x 7,5) and for installation in
wiring cabinets, in fuse boxes, and on walls/ceilings. The
controller can operate in both horizontal and vertical position.
181
40
110
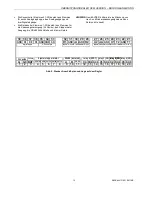
Fig. 2. OEM SHC Controller, dimensions (mm)
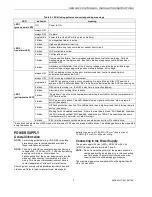
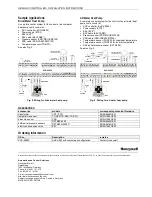
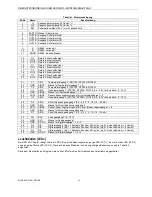
DIN Rail Mounting/Dismounting
The unit can be mounted onto a DIN rail simply by snapping
it into place and securing it with a stopper to prevent sliding.
It is dismounted by gently pulling the stirrup located in the
base of the housing (see Fig. 3).
SCREWING NOSE
(oval hole)
SCREWING NOSE
(oval hole)
SCREWING NOSE
(oval hole)
EYELETS FOR
CABLE BINDERS
EYELETS FOR
CABLE BINDERS
SCREWING NOSE
(round hole)
STIRRUP; PULL DOWN
TO DISMOUNT UNIT
FROM RAIL
Fig. 3. Housing base (view from below)
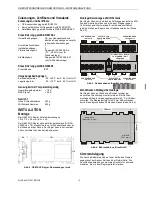
Wall/Ceiling Mounting/Dismounting
The unit can be mounted on walls or ceilings in any
orientation desired. In the case of ceiling mounting, however,
it should not be operated at ambient temperatures exceeding
45 °C. The unit is mounted by inserting 3.5-mm dowel screws
through the corresponding screwing noses (see Fig. 4).