6
ENGLISH
FIRST TIME OF USE
1.
Read through all the instructions before
starting to use the quartz heater.
2.
Unpack the quartz heater and the supply cord.
Remove all the packing materials and dispose
of them in an environmentally friendly way.
WALL MOUNTING
1.
In the switching unit (fuse box) switch off the
power in the room in which you wish to install
the quartz heater.
2.
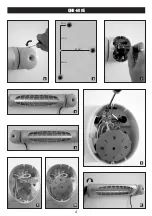
Unscrew the cross-head screw at the top of the
cover plate (6) and remove the cover plate (6)
from the controller (5) (Fig. 4). Then take the
panel with the switches out of the switch box.
3.
The quartz heater can be mounted on the wall
with the controller (5) either on the left or on
the right (Fig. 5). Depending on which side the
controller is to be, drill three holes of 5 mm
diameter in the wall. Observe the spacing as
shown in Fig. 6, or use the controller (5) itself
or the included stencil to mark the positions of
the holes on the wall with a pencil (Fig. 7).
4.
Push the three included plugs into the three
drill holes. Hold the controller (5) on the drill
holes and push the supply cord sideways
through the semicircular opening of the
controller so that the supply cord is hanging
downwards.
5.
Fix the quartz heater horizontally on the wall
with the three included screws (Fig. 8), using a
screwdriver or electric screwdriver at least
9 cm long. Make sure that the supply cord is
not detached or damaged during mounting.
6.
Make sure that the cord is threaded through
the duct to the right or left (depending on
whether the controller was mounted left or
right), next to the switch box and through the
slit under the duct through the casing of the
controller to the outside (Fig. 9).
7.
Replace the panel with the switches onto the
switch box (Fig. 10) and replace the cover plate
(6) on the controller (5). Tighten the screws
with the cross-head screwdriver. Make sure
that the quartz heater is fixed securely to the
wall and cannot fall off.
OPERATING INSTRUCTIONS
1.
Make sure that the switch (3) is in Position 0
(OFF). Insert the power plug into the power
socket. Do not touch the supply cord with
wet hands.
2.
Make sure that the quartz heater is not
covered up and that no objects have got into
the quartz heater.
3.
Swivel the quartz heater to the desired angle
(Fig. 11). Make sure that the quartz heater is
switched off and has cooled down for at least
15 minutes before you touch and swivel it.
4.
Pull the cord of the quartz heater to Position I
(ON). Heating stage 1 is shown on the display.
5.
When the quartz heater is no longer needed,
pull the cord of the quartz heater to position 0
(OFF) and disconnect the power plug from the
power socket.
CLEANING AND STORAGE
Cleaning
1.
We recommend that you clean the quartz
heater at least once a month.
2.
Switch the quartz heater to Position 0 (OFF),
disconnect the power plug from the power
socket and allow the quartz heater to cool off
for at least 15 minutes.
3.
Clean the outer surfaces of the quartz heater
only with a soft, dry cloth. Do not use water or
other cleaning agents.
Storage
1.
Take the quartz heater off the wall and clean it
as described under “cleaning”.
2.
Store the quartz heater in a cool, dry place,
preferably packed in the original cardboard
box.
CONDITION OF PURCHASE
As condition of purchase the purchaser assumes res-
ponsibility for the correct use and care of this quartz
heater according to these operating instructions. The
purchaser or user must himself or herself decide
when and for how long the quartz heater is to be in
operation.
WARNING: IF PROBLEMS ARISE WITH THE
QUARTZ HEATER, PLEASE OBSERVE THE
INSTRUCTIONS IN THE GUARANTEE CON-
DITIONS. DO NOT ATTEMPT TO OPEN OR
REPAIR THE QUARTZ HEATER YOURSELF,
AS THIS COULD LEAD TO TERMINATION
OF THE GUARANTEE AND CAUSE DAMA-
GE TO PERSONS AND PROPERTY.
Technical modifications reserved.
Summary of Contents for QHB-600E
Page 3: ...3 QHB 600E 3 1 2 20 cm 180cm 20cm 30cm 5 6 2 3 4 1 ...
Page 4: ...4 QHB 600E 4 5 5 8 9 10 11 6 7 47mm 42mm 50mm 9mm ...
Page 53: ...53 EΛΛHNIKA ...
Page 54: ...54 EΛΛHNIKA ...
Page 55: ...55 EΛΛHNIKA ...
Page 56: ...56 ...
Page 57: ...57 ...
Page 58: ...58 ...
Page 59: ...59 ...
Page 60: ......
Page 61: ......

