5
ENGLISH
11.
Always disconnect the supply cord at the wall
plug before removing the quartz heater,
touching, moving, cleaning or when not in use.
Do not tug at the supply cord to unplug the
appliance. Allow the quartz heater to cool off
for at least 15 minutes before you handle,
move, or clean it.
12.
Do not use the quartz heater anywhere near
easily inflammable gases or materials such
as solvents, vanishes, glues etc. The quartz
heater must not be operated in rooms contai-
ning burnable floorings such as wood or PVC.
13.
Before starting to use the quartz heater you
must remove the packaging materials from the
heating rods.
14.
Do not use the quartz heater in any kind of
vehicle (e.g. builders’ trailer, lifts, elevators,
caravans, automobiles, cabins) or similar
enclosed spaces.
15.
Keep the quartz heater clean. Make sure that
no objects have got into the quartz heater. Do
not cover up the quartz heater. This can lead
to overheating, fire and electric shock.
16.
Do not immerse the quartz heater in water or
other liquids and do not pour water or other
liquids over or into the quartz heater.
17.
Clean the quartz heater regularly and follow
the cleaning instructions.
18.
If the power supply cord (4) of the quartz
heater is damaged, it must be repaired by a
workshop approved by the manufacturer,
because special tools are needed. The supply
cord must be rubber-coated, Type H05-RRF,
with a diameter of at least 3 x 0.75 mm
2
.
19.
Do not operate the quartz heater if it is
damaged, seems to be faulty, or does not work
properly. Disconnect the plug from the power
socket.
PARTS IDENTIFICATION
1
Shielded heating rod
2
Display switch stage
3
Switch with cord
4
Supply cord and plug
5
Controller
6
Controller cover plate
IMPORTANT SAFETY INFORMATION
Read through all the instructions before starting to
use the quartz heater. Keep this manual carefully
for future reference.
1.
Install the quartz heater where the quartz hea-
ter and the cord are inaccessible to children.
2.
Do not use the quartz heater outdoors.
3.
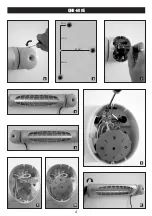
The quartz heater must be mounted horizon-
tally on the wall. It must not be used as a
ceiling heater and must be mounted on the
wall in a horizontal position (Fig. 2). Mount the
quartz heater only onto heatproof surfaces and
never on wood, plastic or other inflammable
surfaces. The minimum distance from the
ceiling, floor and walls must be observed as
described in Fig. 1. Do not operate the quartz
heater when it is not mounted, or if it is not
correctly, horizontally mounted on the wall.
4.
For mounting in bathrooms the quartz heater
must be mounted in a location which is inac-
cessible to people taking a shower or bath. A
safety distance of at least 60 cm from wet
areas such as showers, washbasins, sinks,
bathtubs etc. must be observed. A distance of
120 cm from permanent water output sources
is compulsory. Under no circumstances may
the quartz heater be installed in zones 0, 1 or
2, as shown in Fig. 3.
5.
The local safety regulations of the region must
be observed during mounting.
6.
The quartz heater is equipped with a swivel
mechanism of 45°. Please make sure that the
boundary values are observed and that an
adequate distance of at least 100 cm from all
easily burnable materials such as furniture,
cushions, bedding, paper, clothing, curtains
etc. is maintained in the radiation area.
7.
Persons must keep at least 100 cm away from
the quartz heater. Warning: The quartz heater
gets hot during use.
8.
Completely unwind the supply cord. An incom-
pletely unwound or drawn-out supply cord can
cause to overheating or fire. Make sure that the
supply cord does not touch the quartz heater.
The supply cord must not run above or below
the swivelling heating element.
9.
Do not use an extension supply cord or an infi-
nitely variable speed controller. This can lead
to overheating, fire or an electric shock.
10.
Connect the quartz heater only to a single-
phase, earthed plug with the voltage as shown
on the rating plate.
Summary of Contents for QHB-600E
Page 3: ...3 QHB 600E 3 1 2 20 cm 180cm 20cm 30cm 5 6 2 3 4 1 ...
Page 4: ...4 QHB 600E 4 5 5 8 9 10 11 6 7 47mm 42mm 50mm 9mm ...
Page 53: ...53 EΛΛHNIKA ...
Page 54: ...54 EΛΛHNIKA ...
Page 55: ...55 EΛΛHNIKA ...
Page 56: ...56 ...
Page 57: ...57 ...
Page 58: ...58 ...
Page 59: ...59 ...
Page 60: ......
Page 61: ......

