background image

Document 800-04763 Rev B

15

08/09

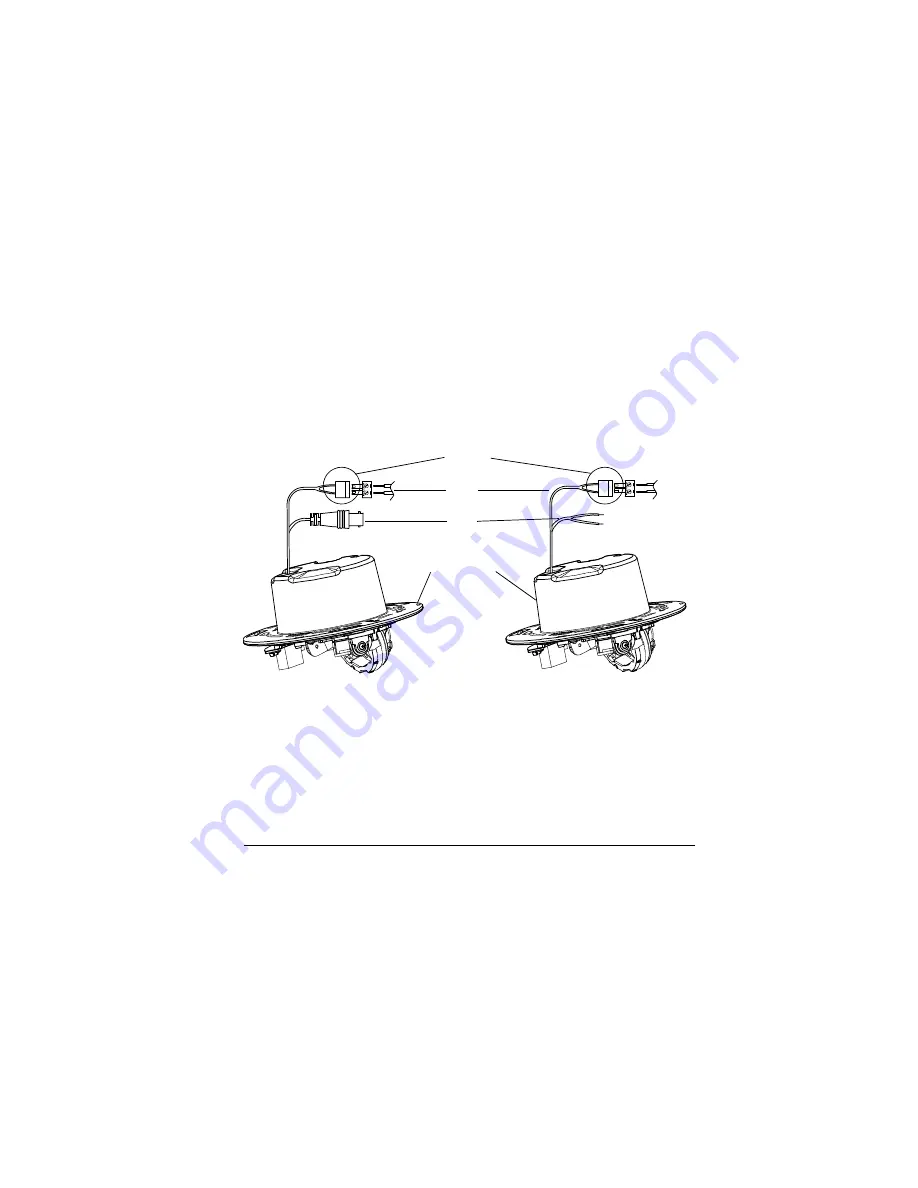
Cable Options

The HD5 is shipped with two wiring configurations for the video 
connection: BNC or UTP (twisted pair). To connect the power, attach the 
green connector terminal to the two bare wires.

1. Connect the BNC or UTP video connection.

The yellow wire is the positive connection.
The gray wire is the negative connection.

2. Connect the camera power (12VDC or 24VAC).

Power

Video

BNC

UTP

Green 

connector 

terminal

Camera base

yellow=positive

gray=negative 

Summary of Contents for HD5 Series

Page 1: ...Document 800 04763 Rev B 08 09 User Guide HD5 Pendant or Ceiling Mount Fixed Dome Camera ...

Page 2: ...ions Issue Date Revisions A 07 09 New document to replace 800 03526 Rev A changed the DIP switch settings for configuring a 540 TVL camera B 08 09 New Revision created to include the missing Table of Contents ...

Page 3: ...ns and procedures Read Instructions All the safety and operating instructions should be read before the equipment is operated Retain Instructions The safety and operating instructions should be retained for future reference Cleaning Do not use liquid aerosol cleaners Use a damp soft cloth Attachments Never add any attachments and or equipment without the approval of the manufacturer as such additi...

Page 4: ...yourself Refer all servicing to qualified service personnel Field Installation This installation should be made by a qualified service person and should conform to all local codes Explanation of Graphical Symbols RISK OF ELECTRIC SHOCK DO NOT OPEN CAUTION TO REDUCE THE RISK OF ELECTRIC SHOCK DO NOT REMOVE THE COVER NO USER SERVICEABLE PARTS INSIDE REFER SERVICING TO QUALIFIED SERVICE PERSONNEL THI...

Page 5: ...frequency energy and if not installed and used in accordance with the instruction manual may cause harmful interference to radio communications Operation of this equipment in a residential area is likely to cause harmful interference in which case the user will be required to correct the interference at his own expense Caution Changes or modifications not expressly approved by the party responsibl...

Page 6: ...upplied with this guide is compliant with the essential protection requirements of the EMC directive 2004 108 EC and the Low Voltage Directive LVD 2006 95 EC conforming to the requirements of standards EN 55022 for emissions EN 50130 4 for immunity and EN60065 for Electrical Equipment safety ...

Page 7: ...dant Dome 20 Installing with a Back Box ceiling or wall mount 22 Setting Up the Camera 24 Connecting a Spot Monitor 24 Adjusting the Field of View and Focus 25 Adjusting the Field of View FOV 25 Focusing the Lens 26 Configuring the Camera 27 Configuring a 540 TVL Camera 28 Configuring a WDR Camera 30 Configuring a DNR Camera 41 Installing the Turret 50 Attaching the Safety Lanyard 51 Installing th...

Page 8: ...8 ...

Page 9: ...The HD5 series includes the following features Easy dome installation into a standard 4 x 4 x 2 1 8 electrical box Black or white trim ring finishes available Simple installation and maintenance Adjustable camera mount included with camera lens NTSC and PAL versions ETL EMC and EU CE certified Vari focal lenses available Auto iris lenses 2 7 13 5 mm or 5 50 mm or Manual iris lenses 2 7 13 5 mm or ...

Page 10: ...re three camera models HD5CH HD5U or HD5SD two connection format choices Coaxial or UTP four lens choices four lower dome choices and two video format choices NTSC or PAL The part number of your camera indicates what choices have been made ...

Page 11: ...rmat Connection Format Model HD5CH NTSC COAX 540 TVL HD5CHTP NTSC UTP 540 TVL HD5CHX PAL COAX 540 TVL HD5CHTPX PAL UTP 540 TVL HD5U NTSC COAX WDR HD5UTP NTSC UTP WDR HD5UX PAL COAX WDR HD5UTPX PAL UTP WDR HD5SD NTSC COAX DNR HD5SDTP NTSC UTP DNR HD5SDX PAL COAX DNR HD5SDTPX PAL UTP DNR ...

Page 12: ...e black trim ring HD5CWH Clear dome white trim ring HD5TBL Smoked dome black trim ring HD5TWH Smoked dome white trim ring Lens Model Description HLD27V13DNL 2 7 13 5 mm DC HLM27V13DN 2 7 13 5 mm Manual HLD5V50F13L 5 50 mm DC HLM5V50F13 5 50 mm Manual ...

Page 13: ...er BNC or UTP Look for the DIP switches if you are installing a 540 TVL camera You will use the dip switches later when you are configuring the camera Note Wide Dynamic Range WDR and Digital Noise Reduction DNR cameras are programmable Therefore the joystick on the gimbal is operational See Configuring a WDR Camera on page 30 and Configuring a DNR Camera on page 41 Camera Type C Hi Res U WDR S DNR...

Page 14: ...and adjust position focus iris the lens or with some models before you can access the DIP switches or joystick for configuring the camera Caution Always handle the bottom housing from its outside surface The bubble surface can be cleaned with a non abrasive glass cleaner Turret Gimbal Camera base ...

Page 15: ...ed pair To connect the power attach the green connector terminal to the two bare wires 1 Connect the BNC or UTP video connection The yellow wire is the positive connection The gray wire is the negative connection 2 Connect the camera power 12VDC or 24VAC Power Video BNC UTP Green connector terminal Camera base yellow positive gray negative ...

Page 16: ...See note on page 17 Pendant Dome Installing the lens see Installing the Lens on page 17 Installing the mount see Installing without a Back Box on page 19 see Installing with a Back Box ceiling or wall mount on page 22 see Installing a Pendant Dome on page 20 Making the connections see step 3 on page 22 see Cable Options on page 15 Positioning the camera Adjusting the Field of View FOV on page 25 A...

Page 17: ...is 2 7 13 5 mm Manual or Auto Iris 5 50 mm Installing an Auto Iris lens involves an extra step which is to connect the lens control cable See step 3 Configuring the camera See note To configure a 540 TVL camera see Configuring a 540 TVL Camera on page 28 To configure a WDR camera see Configuring a WDR Camera on page 30 To configure a DNR camera see Configuring a DNR Camera on page 41 Installing th...

Page 18: ...rew the lens into the lens mount 3 If you have the Auto Iris lens insert the lens control cable into the lens control connector Lens mount Auto Iris lens control connector Caution Ensure that the lens is screwed all the way into the mount If it is not secured it could become loose when you are adjusting the zoom and focus ...

Page 19: ...in additional space to contain the coiled wires Contact Honeywell Customer Service to order the Back Box Extender Kit see the back cover for contact information Please follow the installation instructions included with that kit 1 Peel off the backing paper of the round template found in packing box then affix the mounting template to the mounting surface 2 Pre drill at least three holes around the...

Page 20: ... the mounting screws then rotating the camera mount counter clockwise to lock into place 8 Tighten the mounting screws to secure the HD5 Installing a Pendant Dome A pendant kit is available for the HD5 as an optional mounting choice Contact Honeywell Customer Service to order see the back cover for contact information These installation instructions assume the mount for the fixed camera dome has a...

Page 21: ...MOVE THE SCREWS 2 Connect either the BNC or UTP video cable and the power cable 3 Secure the camera mounting plate onto the top dome by fitting the mounting plate key slots large key slots over the three Phillips head screws then rotating the mounting plate so that the screw heads are in the small end of the key holes 4 Tighten the three Phillips head screws Top dome 1 2 3 Mounting plate ...

Page 22: ...ou might require a Back Box Extender Kit to gain additional space to contain the coiled wires Contact Honeywell Customer Service to order see the back cover for contact information Note If the back box is already installed go to step 7 on page 23 1 Cut a 4 x 4 hole in the ceiling using the square template found in packing box 2 Attach the winged bracket to the back box Note This step may already b...

Page 23: ...the ceiling Note The gimbal position might prevent access to the mounting screws 7 Secure the housing base to the back box by fitting the large ends of the keyhole slots in the mounting plate over the two mounting screws supplied with back box and then rotating the mounting base until the screw heads are in the small end of the keyhole slots See below Tighten the mounting screws Mounting screws Ke...

Page 24: ...must connect a spot monitor to the camera and remove the lens cap Connecting a Spot Monitor Connect the second video cable supplied in the Accessories package to the output connector and to the spot monitor Note If you have an HD5U and the picture is scrambled check the PAL NTSC switch and set it to your preferred format NTSC PAL Switch ...

Page 25: ...s ring on the lens to adjust the focus Note You will need to rotate the lower dome and place it in front of the camera lens to properly adjust the camera Adjusting the Field of View FOV Caution Do not turn the lens more than 360 as this might cause the internal cables to twist and disconnect or break A Legend A Pan rotation 360 B Tilt rotation 90 C Horizontal rotation 360 D Pan rotation setscrew E...

Page 26: ...make your adjustments Retighten the control levers when you have finished with your adjustments Twist the pin and then slide to adjust the focal length to Near or Far Twist the pin and then rotate the focus ring to adjust for Wide or Telephoto Manual 5 50 mm lens shown ...

Page 27: ...he lower dome in front of the lens to simulate the conditions when the dome has been installed Configuring the Camera The cameras are configured in different ways Configuring a 540 TVL Camera on page 28 Configuring a WDR Camera on page 30 Configuring a DNR Camera on page 41 ...

Page 28: ...C operation only Picture Brightness Use the LEVEL Adjustment Pot B to adjust the iris level Turn the adjustment pot towards L low to make the picture darker Turn the adjustment pot towards H high to make the picture brighter Adjust the DIP Switches Set the DIP switches to activate or deactivate the functions as described in the table below Note In the camera configuration table that follows the de...

Page 29: ...justment 1 DC Top AES Bottom DC Drive Lens with cable Automatic Electronic Shutter Manual 2 AWB Top ATW Bottom Automatic White Balance Autotracing White Balance 3 BLC ON OFF Backlight Control On Off 4 AGC ON OFF Automatic Gain Control On Off 5 Not used But DIP switch is in the bottom position 1 2 3 4 5 6 7 8 Off Bottom On Top A H L B ...

Page 30: ...rless On Off 7 LL ON OFF Line Lock On Off 8 Not used But DIP switch is in the bottom position Control Function Definition Press down on the joystick and hold for 2 seconds to access the MAIN MENU Press down on the joystick to enter a screen or select a menu option Move horizontally to and between menus and options Move vertically to and between menus and options indicates submenus Joystick Right L...

Page 31: ... press the joystick To save your changes select SAVE EXIT and then press the joystick Your settings remain in effect when power is turned off then on again When no buttons are pressed the menu display turns off automatically after 5 minutes Select a menu then press the middle button to enter the submenu Change the status using the arrows MENU CAMERA SETUP VIEWING WDR PRESETS DAY NIGHT SETUP VERSIO...

Page 32: ...amming DIG SLOW SHUTTER SYNC MODE AGC WHITE BALANCE AI THOLD FLIP ID DISPLAY SHARPNESS BRIGHTNESS RESOLUTION COLOR ADJ PRESETS FLUORESCENT D N CONTROL NIGHT MODE NO YES SAVE EXIT EXIT W O SAVE MENU CAMERA VIEWING WDR PRESETS RESTORE SETUP DEFAULTS Menu FW Rev VERSION EXIT DAY NIGHT SETUP INFO ...

Page 33: ...hutter mode options are SHUT PRI Priority to select the sensitivity LIMIT from 0 to 60 26 is the default or the sensitivity THRESHOLD from 22 to 34 22 is the default GAIN PRI Priority to adjust the noise LIMIT in the image from 0 to 60 26 is the default or adjust the gain THRESHOLD from 28 to 42 28 is the default MANUAL to manually set the sensitivity LIMIT the sensitivity from 0 to 60 26 is the d...

Page 34: ...e from 0 dB to 36 dB WHITE BALANCE Opens the WHITE BALANCE menu where you set how the camera tracks to accept different lighting conditions within the color range of 2000K to 11000K ATW Normal ATW Desat The ATW Normal default and ATW Desat options open the WHITE BALANCE LIMITS screen where you set the Low and High white balance limits 2100K to 8800K while observing the video monitor ATW Desat is u...

Page 35: ...hting exists or color lighting temperature exceeds the range of the camera A significant part of the scene contains a single color or a completely red or blue background ATW Xtnd Automatic Tracking White Balance Extended Range Continuously monitors the color temperature while an internal micro controller sets the white balance Select this mode when the scene illumination varies between indoor scen...

Page 36: ...e observing the video monitor adjust the level from 0 to 100 5 is the default WB BIAS to adjust the level from 2K to 2K 0 is the default AI THOLD Adjust the Automatic Iris AI threshold from 42 to 60 default is 18 When using a manual iris lens set the AI threshold to 42 recommended The AI threshold is factory set to 18 for all WDR presets ADVANCED WHITE BALANCE MGNTA CTRL OFF WB BIAS 2K 0 2K PREVIO...

Page 37: ... move to the next character When you are satisfied press or and move the cursor to another item ID POSITION Select where you want the Camera ID to appear on the monitor screen Select from the list UP LEFT UP CENTER UP RIGHT DOWN LEFT DOWN RIGHT SHARPNESS Select the level of sharpness of the image Choices are NORMAL default SHARP SOFT BRIGHTNESS While observing the video monitor move the cursor to ...

Page 38: ... the default RESOLUTION Select the camera resolution Choices are NORMAL default HIGH COLOR ADJ While observing the video monitor move the cursor to adjust the color saturation from 8 to 8 0 is the default WDR PRESETS INDOOR LOADING DOCK GAMING LICENSE PLATE OUTDOOR CUSTOM ATM LOBBY MENU WDR PRESETS MENU CAMERA SETUP VIEWING WDR PRESETS INDOOR DAY NIGHT SETUP VERSION RESTORE DEFAULTS EXIT SAVE EXIT...

Page 39: ...ter feature compensates for excessive light levels by automatically adjusting the shutter speed of the camera Select from HIGHLIGHTS for optimum exposure of bright areas of the scene SHADOWS for optimum exposure of dark areas of the scene WDR Preset Area of Interest WDR Exposure INDOOR Full scene Wide Highlights LOADING DOCK Center scene Wide Highlights GAMING Full scene spot glare Medium Highligh...

Page 40: ...fault or OFF camera stays in color mode This setting is dependent on the AGC setting See AGC on page 34 NIGHT MODE The NIGHT MODE screen determines whether monochrome B W or color is present in the video Options are B W suppresses all color including color burst present in the video B W CLR default B W with color burst COLOR the camera never switches to B W in night mode DAY NIGHT SETUP D N CONTRO...

Page 41: ...the camera Figure 3 Camera Controller RT DN LF Legend Description 1 Video test monitor output connector 2 Camera OSD control four position plus center push Press this control To do this UP DOWN Select a new item LEFT RIGHT Select a menu item SETUP MENU CENTER PUSH Enter SETUP MENU access a submenu 1 2 ...

Page 42: ... VIDEO MANUAL FLK FLICKERLESS ESC MANUAL ATW MANUAL AWC OFF LOW MIDDLE HIGH OFF LOW MIDDLE HIGH with AGC in OFF mode OFF AUTO with LENS in MANUAL mode or SHUTTER in FLX mode CAMERA ID DAY NIGHT SYNC MOTION DET PRIVACY MIRROR SHARPNESS RESET MENU OFF LOW MIDDLE HIGH SHUTTER WHITE BAL BACKLIGHT AGC DNR SENS UP SPECIAL LENS ...

Page 43: ... the brightness level on screen Not available in DC lens mode WHITE BAL White Balance ATW MANUAL AWC Controls color on the screen Select ATW Auto Tracing White Balance when the color temp is 2400 K 12000 K for example under a fluorescent light or outdoors MANUAL mode allows you to increase or decrease the red or blue factor on the screen AWC Auto White Balance Control automatically adjusts the whi...

Page 44: ...el reduces noise but may introduce video artifacts DNR is deactivated if AGC is turned off SENS UP Sensitivity Up OFF AUTO Automatically provides a clear image under low light conditions You can control the maximum low light magnification from 2x to 128x Increasing magnification may cause noise distortion EXIT Exits the SETUP menu and returns to video monitoring Menu Item Option Description ...

Page 45: ...ulse of your camera with other equipment to reduce the effect of picture roll on the monitor Select L L Line Lock mode to adjust the phase from 0 to 359 MOTION DET OFF ON Detects moving objects on screen and displays MOTION DETECTED along with the number of movements counted Allows you to select the area on screen you want to observe see Motion Detection Setup PRIVACY OFF ON Allows you to mask up ...

Page 46: ...elect a character then press SETUP MENU to accept it The character is saved and the title cursor at the bottom of the screen moves to the next position Use the symbols to go backward or forward in the title name number to make changes Select CLR to delete the entire title and start again 2 Repeat step 1 until your camera title is complete 3 Select POS to position the camera title on the screen Sel...

Page 47: ... SPECIAL menu select SYNC then press SETUP MENU SYNC CONTROL SYNC INT L L RETURN Menu Item Description INTERNAL When line lock is not required LINELOCK Adjust the vertical phase VPH VPH 000 359 factory default is 0 RETURN Press MENU to return to the SETUP menu ...

Page 48: ...ss SET to Return Menu Item Option Description AREA SEL AREA 1 AREA 2 AREA 3 AREA 4 Select which of the four motion detection grids top left top right bottom left bottom right you would like to modify AREA STATE ON OFF Choose whether to activate or deactivate the selected grid TOP DOWN LEFT RIGHT Press LEFT or RIGHT control to alter the dimensions of the selected grid ...

Page 49: ...Item Description AREA SEL AREA 1 AREA 2 AREA 3 AREA 4 Select which of the four masking grids top left top right bottom left bottom right you would like to modify AREA STATE ON OFF Choose whether to activate or deactivate the selected grid AREA TONE Press LEFT or RIGHT menu control to change the shade of the masking grids TOP DOWN LEFT RIGHT Press LEFT or RIGHT menu control to alter the dimensions ...

Page 50: ...ew of the camera see Adjusting the Field of View FOV on page 25 focussed the lens see Focusing the Lens on page 26 and configured the camera see Configuring the Camera on page 27 Reinstall the turret inner dome liner onto the gimbal Note Please ensure that both sides of the turret are snapped into place ...

Page 51: ...Document 800 04763 Rev B 51 08 09 Attaching the Safety Lanyard Slip the looped end of the safety lanyard on the lower dome onto the safety lanyard hook on the dome mount Lanyard hook ...

Page 52: ...ottom dome is tight 2 Align the locking tabs on the bottom dome with the mounting slots on the camera base 3 Push the bottom dome over the camera base until the bottom dome is flush with the ceiling 4 Rotate the bottom dome clockwise as viewed from the bottom dome until the locking tab clicks into place Locking tabs 3 Mounting slots 3 Note Illustration shows back box which is not supplied ...

Page 53: ... the bottom dome clockwise as viewed from the bottom dome to lock in place Note The locking tab on the top dome and the slot on the bottom dome must be aligned so the tab is to the right of the slot When you rotate the bottom dome the locking tab falls into place in the slot Locking tab Locking tab slot Turret inner dome liner ...

Page 54: ...Sensor 1 3 in Interline Transfer CCD 1 3 in WDR digital image device 1 3 in Interline Transfer CCD Number of Pixels HxV 768 H x 494 V 752 H x 582 V 720 H x 540 V 768 H x 494 V 752 H x 582 V Dynamic Range N S 102 dB typical 120 dB max N S Minimum Illumination 0 6 lux F1 3 0 4 lux F1 3 0 3 lux F1 5 Color 0 03 lux F1 5 B W Sens Up Horizontal Resolution 540 TV lines Lens Type 2 7 mm 13 5 mm Auto Manua...

Page 55: ... Iris Control Direct Drive DC Auto Iris only White Balance Selectable ATW AWB ATW AWB ATW Xtnd Manual ATW AWC Manual Line Lock Phase Adjust Adjustable line lock vertical phase Adjustable Pots See Configuring a 540 TVL Camera on page 28 Adjustable line lock vertical phase OSD See Configuring a WDR Camera on page 30 Adjustable line lock vertical phase OSD See Configuring a DNR Camera on page 41 AI A...

Page 56: ...o 131 F 25 C to 55 C Humidity 5 to 95 non condensing Mechanical Specifications Dimensions See diagrams below Weight 0 88 pounds 0 4 kg Housing Construction PCABS Polycarbonate Acrylonitrile Butadiene Styrene blend Video Output BNC connector or UTP connector Power Input 12 inch tinned leads BNC or twisted wires UTP Regulatory Emissions FCC CE EN55022 540 TVL WDR DNR NTSC PAL NTSC PAL NTSC PAL ...

Page 57: ...Document 800 04763 Rev B 57 08 09 Immunity CE EN50130 4 Safety NRTL EU LVD 2006 95 EC CAN UL60065 Environmental Indoor only 540 TVL WDR DNR NTSC PAL NTSC PAL NTSC PAL ...

Page 58: ...58 Dimensions Ceiling Mount 6 65 168 84 mm 1 88 47 66 mm 3 19 81 06 mm 3 79 96 31 mm ...

Page 59: ...Document 800 04763 Rev B 59 08 09 Pendant 3 19 81 06 mm 6 46 164 00 mm 1 59 40 39 mm 1 25 31 75 mm ...

Page 60: ...60 ...

Page 61: ...ier Parc de Haute Technologie 3 7 re Georges Besse 92160 Antony France www honeywell com security fr 33 0 1 40 96 20 50 Honeywell Video Systems Group N Europe Ampèrestraat 41 1446 TR Purmerend The Netherlands www honeywell com security nl 31 299 410 200 Honeywell Systems Group Deutschland Johannes Mauthe Straße 14 D 72458 Albstadt Germany www honeywell com security de 49 74 31 8 01 0 Honeywell Sec...

Page 62: ...t written permission from Honeywell The information in this publication is believed to be accurate in all respects However Honeywell cannot assume responsibility for any consequences resulting from the use thereof The information contained herein is subject to change without notice Revisions or new editions to this publication may be issued to incorporate such changes Document 800 04763 Rev B 08 0...

Reviews: