


3-7
GX120K1•GX160K1•GX200
MAINTENANCE
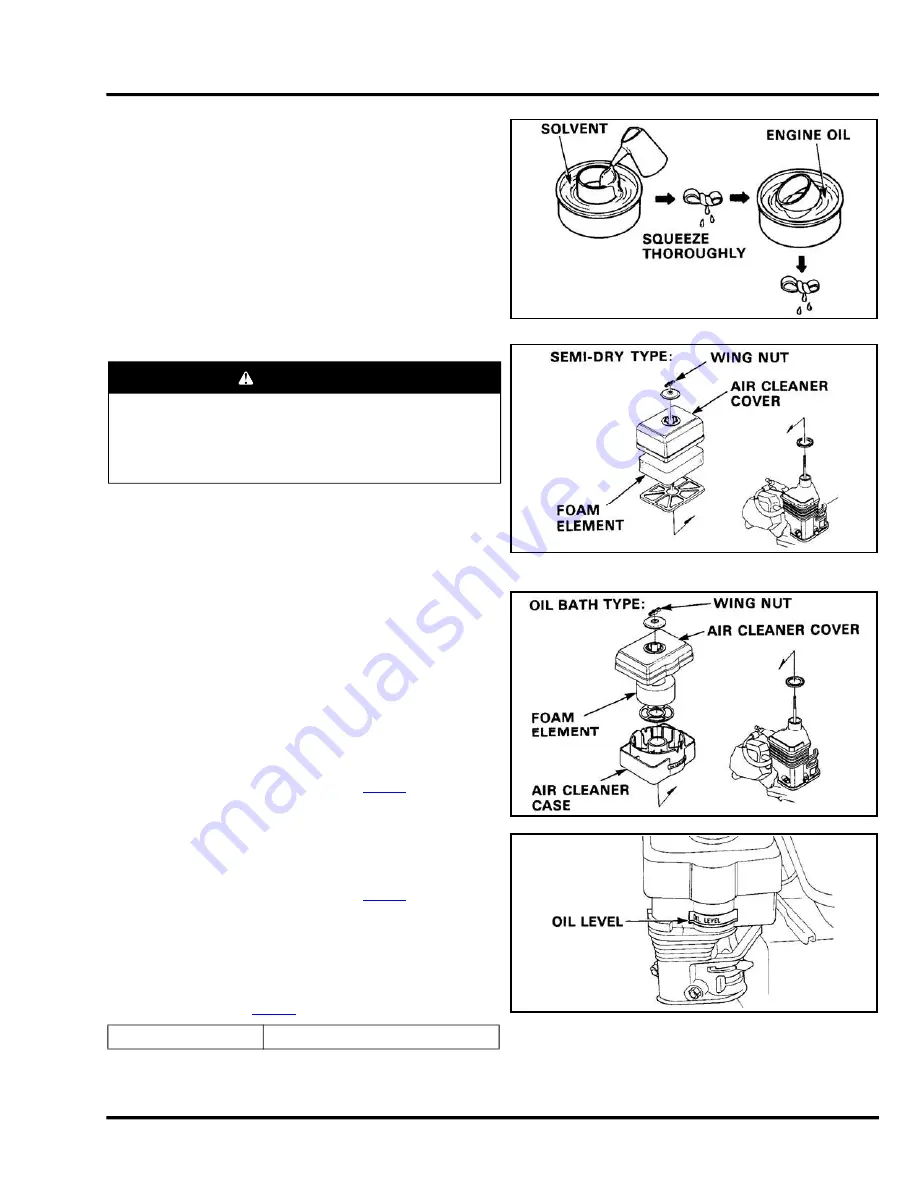
• If you are using a container filled with solvent, immerse the
filter and agitate it. Do not use a brush to clean the filter.
5.Shake excess solvent out the filter, and use compressed air
(30 PSI or less) to dry it further. Direct the compressed air at
the inside of the filter.
Let the filter dry completely, for 24 hours if possible. A wet filter
will restrict air flow.
6.Shine a light through the elements, and inspect them carefully.
Reinstall the elements if they are free of holes and tears.
If the air filter still affects engine performance, replace it with a
new one.
Note:
The engine will run poorly when the air cleaner needs
maintenance. If it runs better without the air cleaner than it
does with the elements, or if the length of time between
needed cleanings keeps getting shorter, replace the elements.
Under extremely dusty conditions such as volcanic ash, silt,
etc., the system may need daily maintenance.
Semi-dry type:
1.Remove the wing nut, air cleaner cover, and foam element.
Carefully check the element for holes or tears, and replace if
damaged.
2.Clean, wash, and oil the foam element
(P. 3-6)
.
Oil bath type:
1.Remove the wing nut, air cleaner cover, and foam element.
Carefully check the element for holes or tears, and replace if
damaged.
2.Clean, wash, and oil the foam element
(P. 3-6)
.
3.Empty the oil from the air cleaner case, and wash out any
accumulated dirt with non flammable or high flash point
solvent. Dry the case.
4.Fill the air cleaner case to the level mark with the same oil that
is recommended for the engine (see engine oil
recommendation on
(P. 3-3)
).
Note:
Do not overfill the air cleaner case. An excessive oil level will
saturate the foam element and restrict air flow.
CAUTION
• Carefully check both elements for holes or tears and
replace as required. Damaged elements will allow dirt to
pass into the engine; causing rapid wear. Always clean the
filter housing and air passages before installing clean
elements.
Air cleaner oil capacity
60 cc (2.0 US oz, 2.1 Imp oz)
gx120k1_gx160k1_gx200
Summary of Contents for GX120K1
Page 14: ...1 9 GX120K1 GX160K1 GX200 SPECIFICATIONS GX160K1 GX160U1 GX160UT1 gx120k1_gx160k1_gx200 ...
Page 15: ...1 10 SPECIFICATIONS GX120K1 GX160K1 GX200 GX200 GX200U GX200UT gx120k1_gx160k1_gx200 ...
Page 19: ...1 14 SPECIFICATIONS GX120K1 GX160K1 GX200 GX160K1 Unit mm in gx120k1_gx160k1_gx200 ...
Page 67: ...4 4 AIR CLEANER MUFFLER GX120K1 GX160K1 GX200 Rammer type P 3 6 P 3 6 gx120k1_gx160k1_gx200 ...
Page 69: ...4 6 AIR CLEANER MUFFLER GX120K1 GX160K1 GX200 Rammer type gx120k1_gx160k1_gx200 ...
Page 71: ...5 2 RECOIL STARTER FAN COVER GX120K1 GX160K1 GX200 GX200 gx120k1_gx160k1_gx200 ...
Page 80: ...6 1 6 CARBURETOR 1 CARBURETOR 6 2 gx120k1_gx160k1_gx200 ...
Page 81: ...6 2 CARBURETOR GX120K1 GX160K1 GX200 1 CARBURETOR REMOVAL INSTALLATION gx120k1_gx160k1_gx200 ...
Page 82: ...6 3 GX120K1 GX160K1 GX200 CARBURETOR Rammer type gx120k1_gx160k1_gx200 ...
Page 101: ...9 1 9 CYLINDER HEAD VALVES 1 CYLINDER HEAD VALVES 9 2 gx120k1_gx160k1_gx200 ...
Page 120: ...11 1 11 GOVERNOR OIL LEVEL SWITCH 1 GOVERNOR OIL LEVEL SWITCH 11 2 gx120k1_gx160k1_gx200 ...