HomeSeer HS-FLS100+ Manual Download Page 3


Wiring up the HS-


8.  Screw the threaded arm of HS- into the mounting base. For typical 

wall installation, HS- should be located at the bottom of the mounting 
base. 

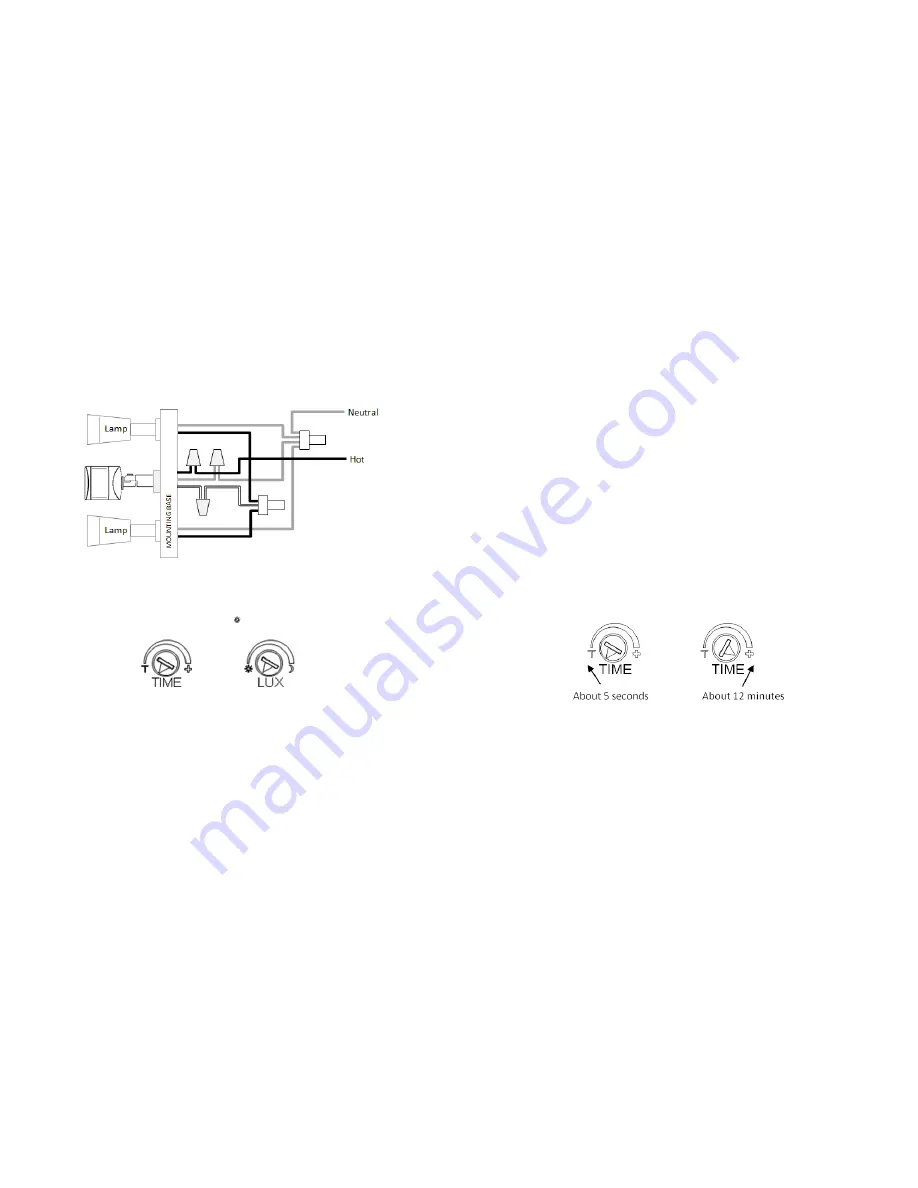
9.  Connect up the wiring  as in the diagram below,  using wire nuts to join the 

wires. If replacing an old motion sensor, simply follow the same wiring color as 
the old motion sensor. 


10.  Route the power leads through the rubber gasket to get ready for wall mount. 

Ensure the rubber gasket is facing the same direction as it was before. 

11.  When completed, turn the knobs of Time-Off on the unit to “T” mark, and turn 

the knob of Lux on the unit to the “   ” mark. 


Assembling back the floodlight


12.  Connect back the mains wire as before. Tuck the wire nuts and excess cable 

neatly inside the junction box. 

13.  Screw the lighting floodlight  back  into position using its mounting screws. 

Place the rubber rings back into their positions. 

14.  Insert the lamps removed earlier back into the bulb holders, adjust the lamp 

direction if necessary. 

15.  Reinstate the power supply to the floodlight and switch on the wall switch, if 

installed.  The floodlight will turn on for around 5  seconds  for warm up  and 
then turn off. It is now in ‘Test Mode’. 
 

Walk Test 

The user can perform a walk test to ensure the PIR detector’s range falls within 
the desired area of coverage.


1.  Walk through its  PIR Detector coverage area. The floodlight turns on when 

you move and turns off after approximately 5 seconds. Wait for the floodlight 
to turn off before the next test. 

2.  When you are satisfied with the coverage area you can now set the desired 

Time period and Lux level. 


Time and Lux adjustment 


You can set desired Time period and Lux level through;   
(i) the Z-Wave controller after connecting to a Z-Wave network (see next section) 
or, 
(ii) manually adjusting the knobs on the unit  if not connected to a Z-Wave 
network. The following section describes the steps for manual setting. 
 
(1) Time adjustment 

Time-off knob controls how long the floodlight  will stay on after the motion is 
detected. Turning the knob towards the + sign increases the time (up to about 
12  minutes) or towards the T decreases it  (down to about 8  seconds).  The 
recommended setting is around  midpoint  of the scale giving  approximately 5 
minutes. 

 
(2)  Lux level adjustment 

The LUX knob sets the threshold of ambient brightness level that will activate 
the motion sensor. The  knob  can be adjusted between T (always  trigger 
regardless of light level) and the moon symbol (trigger only when dark). The 
adjustable Lux range is about 30 - 200 Lux. 


Summary of Contents for HS-FLS100+

Page 1: ...e controller when motion is sensed and when the LUX level changes Likewise the smart hub or home controller can send Z Wave commands back to the HS FLS100 to turn floodlights ON and OFF This added functionality provides a very high level of flexibility not typically available in conventional motion activated floodlights Smart Sensor Mode HS FLS100 can be installed and used simply as an outdoor mot...

Page 2: ...tart early during the day WARNING TURN OFF POWER BY REMOVING POWER FUSE OR TURNING OFF CIRCUIT BREAKER BEFORE INSTALLATION Taking down the existing floodlight 1 With mains supply turned off if possible remove the lamps from the bulb holders of the existing floodlight to avoid any damage during the installation 2 Carefully detach the floodlight from the wall by removing its mounting screws Keep all...

Page 3: ...n turn off It is now in Test Mode Walk Test The user can perform a walk test to ensure the PIR detector s range falls within the desired area of coverage 1 Walk through its PIR Detector coverage area The floodlight turns on when you move and turns off after approximately 5 seconds Wait for the floodlight to turn off before the next test 2 When you are satisfied with the coverage area you can now s...

Page 4: ... QR code label on the back of the unit on the insert card inside the packaging 6 Turn on the floodlight using the Z Wave controller to check if the auto inclusion is working properly If Auto Inclusion fails refer to the Troubleshooting section regarding Manual Inclusion Note HS FLS100 supports the latest S2 security o ffered by Z Wave certified controllers If your controller supports S2 please refe...

Page 5: ...ler Icon User Icon Slave Always ON Z Wave Plus node Sensor Notification Device Type Home Security Sensor Notification Device Type Home Security Association Command Class Group Max Node 1 1 2 4 Version Protocol Library 3 Slave_Enhance_232_Library Protocol Version 5 3 6 71 03 Firmware Version xVy x 1 y 1 means 1V1 Hardware Version 1 Manufacturer Manufacturer ID Product Type Product ID 0x0060 Everspr...

Page 6: ...ux level measured Tolerance of 30 lux Level above 250 will be read back as 250 Sensor Type Precision Scale Size Sensor Value 0x03 0 1 2 250 Command Classes The module supports Command Classes including COMMAND_CLASS_ZWAVEPLUS_INFO_V2 COMMAND_CLASS_ASSOCIATION_V2 COMMAND_CLASS_ASSOCIATION_GRP_INFO COMMAND_CLASS_TRANSPORT_SERVICE_V2 COMMAND_CLASS_VERSION_V2 COMMAND_CLASS_MANUFACTURER_SPECIFIC_V2 COM...

Page 7: ...ion is complete 2 Press the Link button 3 times within 1 5 seconds to put the unit into inclusion mode Exclusion 1 Put the Z Wave Controller into exclusion mode 2 Press the Link button 3 times within 1 5 seconds to put the unit into exclusion mode Factory Reset This procedure should only be used when the controller is inoperable 1 Press the Link button 3 times within 1 5 seconds to put the unit in...

Page 8: ...the following two conditions 1 This device may not cause harmful interference and 2 this device must accept any interference received including interference that may cause undesired operation FCC Caution Any changes or modifications not expressly approved by the party responsible for compliance could void the user s authority to operate this equipment This transmitter must not be co located or ope...

Reviews: