HomeSeer HS-FLS100+ Manual Download Page 2


IMPORTANT 

Installation must be performed by skilled technicians who are informed 
about the standards and technical requirements of the appliance and its 
proper installation. 
Check your local codes as they apply to your situation. If the house wiring is of 
aluminum, consult with an electrician about proper wiring methods. 

 
Before proceeding with the installation, TURN OFF THE POWER TO THE 
LIGHTING CIRCUIT AT THE CIRCUIT BREAKER OR FUSE BOX TO AVOID 
ELECTRICAL SHOCK.


SAFETY PRECAUTION 


DO NOT install when it is raining.


Isolate the power supply before installation. 


Ensure that local Wiring and Building regulations are complied with. 


The unit is supplied with a pre-wired supply cable this must be used and must 
not be removed. 


Total lighting load to HS- not exceed: 


-


300W incandescent @ AC120V   


- 100W LED @ AC120V with 0.8 pF Driver


Installation & Wiring instructions 

 
Note: As with any outdoor installation work it is always recommended to start early 
during the day. 


WARNING: TURN OFF POWER BY REMOVING POWER FUSE OR TURNING 
OFF CIRCUIT BREAKER BEFORE INSTALLATION. 


Taking down the existing floodlight 

1.  With  mains supply  turned off,  if possible  remove the lamps  from the bulb 

holders of the existing floodlight to avoid any damage during the installation. 

2.  Carefully detach the floodlight from the wall by removing its mounting screws. 

Keep all parts for reuse later, including any  rubber rings.  Take note the 
direction of the rubber gasket as it needs to be reassembled later in the same 
way. 


3.  Disconnect the mains wire from the floodlight by untwisting the wire nuts. 
4.  When  done, place the floodlight on a table to prepare for wiring the 

HS-. 
 

Removing old motion sensor   

(Skip this section if the existing floodlight has no motion sensor)


5.  Locate the wires coming from the old motion sensor, usually colored  black, 

white and red. 


6.  Disconnect the wires of the motion sensor by cutting it if necessary. 
7.  Remove the old  motion sensor from the mounting base by twisting its 

threaded arm counter clockwise. 
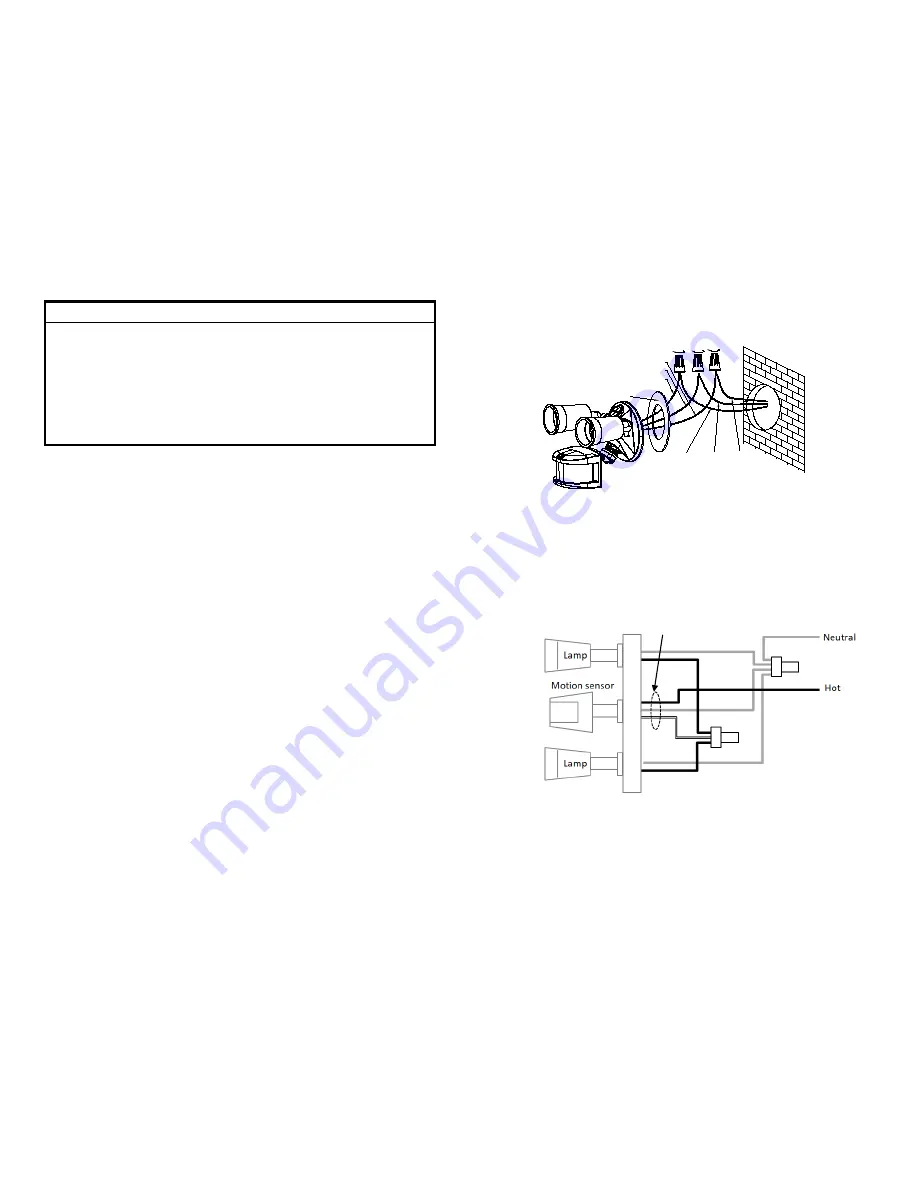
Yellow/Green

Black

White

Earth

GASKET

Live

Neutral

Cut here 

RED 

BLACK 

WHITE 

Summary of Contents for HS-FLS100+

Page 1: ...e controller when motion is sensed and when the LUX level changes Likewise the smart hub or home controller can send Z Wave commands back to the HS FLS100 to turn floodlights ON and OFF This added functionality provides a very high level of flexibility not typically available in conventional motion activated floodlights Smart Sensor Mode HS FLS100 can be installed and used simply as an outdoor mot...

Page 2: ...tart early during the day WARNING TURN OFF POWER BY REMOVING POWER FUSE OR TURNING OFF CIRCUIT BREAKER BEFORE INSTALLATION Taking down the existing floodlight 1 With mains supply turned off if possible remove the lamps from the bulb holders of the existing floodlight to avoid any damage during the installation 2 Carefully detach the floodlight from the wall by removing its mounting screws Keep all...

Page 3: ...n turn off It is now in Test Mode Walk Test The user can perform a walk test to ensure the PIR detector s range falls within the desired area of coverage 1 Walk through its PIR Detector coverage area The floodlight turns on when you move and turns off after approximately 5 seconds Wait for the floodlight to turn off before the next test 2 When you are satisfied with the coverage area you can now s...

Page 4: ... QR code label on the back of the unit on the insert card inside the packaging 6 Turn on the floodlight using the Z Wave controller to check if the auto inclusion is working properly If Auto Inclusion fails refer to the Troubleshooting section regarding Manual Inclusion Note HS FLS100 supports the latest S2 security o ffered by Z Wave certified controllers If your controller supports S2 please refe...

Page 5: ...ler Icon User Icon Slave Always ON Z Wave Plus node Sensor Notification Device Type Home Security Sensor Notification Device Type Home Security Association Command Class Group Max Node 1 1 2 4 Version Protocol Library 3 Slave_Enhance_232_Library Protocol Version 5 3 6 71 03 Firmware Version xVy x 1 y 1 means 1V1 Hardware Version 1 Manufacturer Manufacturer ID Product Type Product ID 0x0060 Everspr...

Page 6: ...ux level measured Tolerance of 30 lux Level above 250 will be read back as 250 Sensor Type Precision Scale Size Sensor Value 0x03 0 1 2 250 Command Classes The module supports Command Classes including COMMAND_CLASS_ZWAVEPLUS_INFO_V2 COMMAND_CLASS_ASSOCIATION_V2 COMMAND_CLASS_ASSOCIATION_GRP_INFO COMMAND_CLASS_TRANSPORT_SERVICE_V2 COMMAND_CLASS_VERSION_V2 COMMAND_CLASS_MANUFACTURER_SPECIFIC_V2 COM...

Page 7: ...ion is complete 2 Press the Link button 3 times within 1 5 seconds to put the unit into inclusion mode Exclusion 1 Put the Z Wave Controller into exclusion mode 2 Press the Link button 3 times within 1 5 seconds to put the unit into exclusion mode Factory Reset This procedure should only be used when the controller is inoperable 1 Press the Link button 3 times within 1 5 seconds to put the unit in...

Page 8: ...the following two conditions 1 This device may not cause harmful interference and 2 this device must accept any interference received including interference that may cause undesired operation FCC Caution Any changes or modifications not expressly approved by the party responsible for compliance could void the user s authority to operate this equipment This transmitter must not be co located or ope...

Reviews: