background image

6

Care and Cleaning 


Installation (continued)

6

7

Installing the fixture

Installing the bulb

Installing the glass

Install Max 100 watt Type A bulb (not included)
into the socket of the fixture (A).

To clean the fixture, turn off the power, wait for it to cool, and wipe it with a clean, soft cloth.

Once connections of wires are completed, 
carefully tuck wires and wire nuts (AA) into the 
electrical box making sure no bare wire (on the 
black and white) is visible at the wire nuts (AA). 
Position hole in fixture (A) over nipple and secure
in place with star washer (CC) and cap nut (DD).

Remove spinner nut (EE) and support 
bracket (FF) from the socket. Position 
glass (B) on the lamp and secure with 
spinner nut (EE) and support bracket (FF).

CC

DD

A

A

B

A

Bulb

EE

FF

B

Nipple

Summary of Contents for TATUM W772A01BK

Page 1: ...HOMEDEPOT COM HOMEDECORATORS THANK YOU TATUM 1 LIGHT MATTE BLACK VANITY WITH FLAT OPAL GLASS We appreciate the trust and confidence you have placed in Home Decorators Collection through the purchase of this light fixture We strive to continually create quality products designed to enhance your home Visit us online to see our full line of products available for your home improvement needs Thank you...

Page 2: ...remises This warranty is void in the case of alteration accident abuse or operation not in accordance with the operation assembly instructions Do not remove the CSA label from the fixture as this will void the warranty Contact the Customer Service Team at 1 800 986 3460 or visit www homedepot com homedecorators Table of Contents Turn off the electrical power before starting installation of this li...

Page 3: ... 1 1 1 DD Wire nut II Black wire Ground wire 1 White wire AA BB CC Please contact 1 800 986 3460 for further assistance PLANNING INSTALLATION TOOLS REQUIRED Adjustable wrench Safety goggles Phillips screwdriver HARDWARE INCLUDED NOTE Hardware not shown to actual size GG DD HH EE FF II EE 1 Star washer FF 1 GG 1 HH 1 Cap nut Spinner nut Support bracket WWW HOMEDEPOT COM HOMEDECORATORS ...

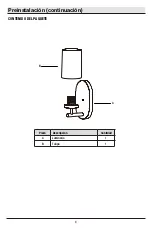
Page 4: ...4 Pre Installation continued PACKAGE CONTENTS A Part Description Quantity A Fixture 1 1 B B Glass ...

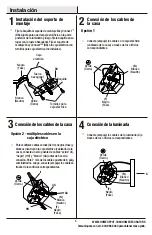
Page 5: ... the correct inserts GG Option 1 Option 2 multiple electrical box wires Green Ground L Black Live N White Neutral A AA Green Ground II 2 Installing the mounting bracket BB Connect push electrical wires from the electric box house wiring into the correct inserts Attach nipple to Easy Connect mounting bracket BB Adjust so it will clear hole in back of fixture and then lock nipple in place with hex n...

Page 6: ...a clean soft cloth Once connections of wires are completed carefully tuck wires and wire nuts AA into the electrical box making sure no bare wire on the black and white is visible at the wire nuts AA Position hole in fixture A over nipple and secure in place with star washer CC and cap nut DD Remove spinner nut EE and support bracket FF from the socket Position glass B on the lamp and secure with ...

Page 7: ...ing parts Before returning to the store call Home Decorators Collection Customer Service 8 a m 6 p m EST Monday Friday 9 a m 6 p m EST Saturday 1 800 986 3460 WWW HOMEDEPOT COM HOMEDECORATORS Retain this manual for future use ...

Page 8: ...este Sábados de 9 a m a 6 p m hora del este GUÍA DE USO Y CUIDADO GRACIAS LÁMPARA DE TOCADOR TATUM DE 1 LUZ EN NEGRO MATE CON TULIPAS DE VIDRIO PLANO OPAL Agradecemos que haya confiado en Home Decorators Collection para la compra de esta luminaria Nos esforzamos continuamente por diseñar productos de calidad para mejorar su hogar Visite nuestra página web y vea nuestra línea completa de productos ...

Page 9: ... Comuníquese con el equipo de atención al cliente al 1 800 986 3460 o visite www homedepot com homedecorators LO QUE NO CUBRE Tabla de contenidos 2 Información de seguridad 2 Garantía 2 Lo que cubre 2 Lo que no cubre 2 Tabla de contenidos Garantía Preinstalación 3 Instalación 5 Cuidado y limpieza 6 Información de seguridad Interrumpa el suministro de energía eléctrica antes de comenzar a instalar ...

Page 10: ...lar y usar la luminaria ANTES DE LA INSTALACIÓN HERRAMIENTAS NECESARIAS Llave inglesa ajustable Gafas protectoras Destornillador Phillips ACCESORIOS INCLUIDOS Pieza Descripción Cantidad Empalme plástico Soporte de montaje Easy Connect Arandela de estrella Tuerca ciega Tuerca Spinner Soporte de sujeción AA BB CC DD Cable blanco Cable negro Cable de tierra EE FF Comuníquese con el 1 800 986 3460 par...

Page 11: ...4 A A 1 1 B B Preinstalación continuación Pieza Descripción Cantidad Luminaria Tulipa CONTENIDO DEL PAQUETE ...

Page 12: ...taje Easy Connect BB a la caja eléctrica con tornillos para caja eléctrica no incluidos Conecte empuje los cables a la caja eléctrica cableado de la casa a través de los orificios correspondientes Conexión de los cables de la casa Conexión de la luminaria Opción 1 Para múltiples cables verdes tierra negros fase y blancos neutro en la caja eléctrica cableado de la casa conecte un solo puente de cab...

Page 13: ...bre la boquilla y asegúrelo en el lugar con una arandela de estrella CC y una tuerca ciega DD Utilice bombillas tipo A de 100 vatios como máximo no incluidas en el portalámpara de la luminaria A Para limpiar la luminaria corte el suministro de energía espere a que se enfríe y límpiela con un paño limpio y suave Quite la tuerca EE y el soporte de sujeción FF de la base del enchufe Coloque las tulip...

Page 14: ...ve este manual para futura referencia Preguntas problemas piezas faltantes Antes de volver a la tienda llame al servicio de atención al cliente de Home Decorators Collection Lunes a viernes 8 a m a 6 p m hora del este Sábados de 9 a m a 6 p m hora del este ...

Reviews: