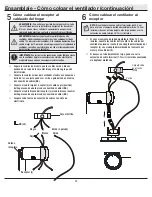
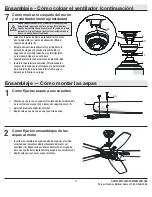
background image

11

HOMEDEPOT.COM/HOMEDECORATORS

Please contact 1-800-986-3460 for further assistance.

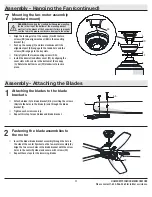
Assembly - Attaching the Blades

Attaching the blades to the blade 
brackets

1


Attach a blade (G) to blade bracket (E) by inserting the screws 
(AA) into the holes in the blade (G) and through the blade 
bracket (F).


Tighten each screw securely.


Repeat this step for each blade and blade bracket.

Fastening the blade assemblies to 
the motor

2


Insert the blade/ blade bracket assembly through the hole in 
the side of the center flywheel on the fan-motor assembly (E). 
Align the two screw holes in the blade bracket with the screw 
holes in the center flywheel and secure with screws (CC).


Repeat these steps for the remaining blades.

G

F

AA

CC

F

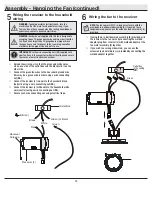
Assembly - Hanging the Fan (continued)

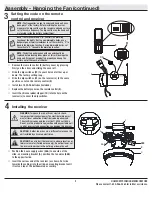
Mounting the fan-motor assembly 
(standard mount)


Align the locking slots of the canopy (C) with the two 
screws (DD) and alignment post (KK) in the mounting 
bracket (A).


Push up the canopy (C) and turn clockwise until the 
alignment post (KK) engage to the round hole and the 
screws (DD) engage to the key slots.


Firmly tighten the two mounting screws (DD).


Install the decorative bottom cover (FF) by aligning the 
cover slots with screws in the bottom of the canopy 
(C). Rotate the bottom cover (FF) clockwise to lock in 
place.

7

WARNING:

 When using the standard ball/downrod mounting, 

the tab in the ring at the bottom of the mounting bracket 

must rest in the groove of the hanger ball. Failure to properly 

seat the tab in the groove could cause damage to the wiring.

C

A

DD

FF

B

E

KK

Summary of Contents for 1002 264 701

Page 1: ...ality products designed to enhance your home Visit us online to see our full line of products available for your home improvement needs Thank you for choosing Home Decorators Collection Item 1002 264 701 Model 51714 UL Model 60 SUDE SUDLER RIDGE 60 INCH CEILING FAN To view an instructional video on how to install this product 1 Go to www homedepot com and enter either the Item or Model number foun...

Page 2: ... spliced conductors should be turned upward and pushed carefully up into the outlet box The wires should be spread apart with the grounded conductor and the equipment grounding conductor on one side of the outlet box 10 All setscrews must be checked and retightened where necessary before installation WARNING To reduce the risk of personal injury do not bend the blade brackets also referred to as f...

Page 3: ... the warranty invalid There is no other express warranty Home Decorators Collection hereby disclaims any and all warranties including but not limited to those of merchantability and fitness for a particular purpose to the extent permitted by law The duration of any implied warranty which cannot be disclaimed is limited to the time period as specified in the express warranty Some states do not allo...

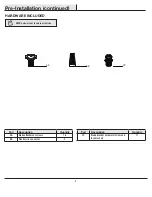
Page 4: ... AA Blade attachment screws 16 BB Plastic wire connector 3 Pre Installation continued HARDWARE INCLUDED NOTE Hardware not shown to actual size Part Description Quantity CC Blade bracket hardware screw and lock washer 11 AA BB CC ...

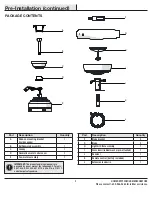
Page 5: ...t Description Quantity F Blade bracket 5 G Blade 5 H Light kit fitter assembly 1 I Glass bowl rubber washer pre attached 1 J Receiver 1 K Remote control battery included 1 L Extension lead wire 1 IMPORTANT This product and or components are governed by one or more of the following U S Patents 5 947 436 5 988 580 6 010 110 6 046 416 6 210 117 and other patents pending Pre Installation continued PAC...

Page 6: ...Use the appropriate fasteners and materials The outlet box and its bracing must be able to fully support the weight of the moving fan at least 35 lbs Do not use a plastic outlet box The illustrations below show three different ways to mount the outlet box If the canopy C touches the ball downrod assembly B then remove the decorative canopy bottom cover and turn the canopy C 180 before attaching th...

Page 7: ...locks Loosen the two canopy screws DD located in the bottom of the mounting bracket A and turn the canopy counterclockwise to remove the mounting bracket A from canopy C Assembling the fan Loosen but do not remove the setscrew GG on the collar II on top of the fan motor assembly E Install the downrod B by inserting it into the motor collar II and turning it clockwise until it is tight Re tighten t...

Page 8: ... outlet box Securely tighten the two mounting screws JJ Carefully lift the fan motor assembly E up to the slide on mounting bracket A Seat the hanger ball portion of the ball downrod assembly B in the mounting bracket socket Ensure that the tab on the slide on mounting bracket A socket is properly seated in the groove in the hanger ball 1 2 WARNING To reduce the risk of fire electric shock or othe...

Page 9: ... silicone rubber stopper OO into the hole on the receiver J to cover the dip switches K J ZZ 1 2 3 4 ON D O 1 2 3 4 ON DIP 1 2 3 4 ON D O 1 2 3 4 ON OO NOTE The battery will weaken with age and should be replaced before leaking takes place as this will damage the hand unit Dispose of used battery properly and keep the battery out of the reach of children 4 Installing the receiver Position the hous...

Page 10: ...cting nut BB Connect the receiver J white wire to the household white wire neutral using a wire connecting nut BB Secure each wire connecting nut using electrical tape WARNING To avoid possible electrical shock turn the electricity off at the main fuse box before wiring If you feel you do not have enough electrical wiring knowledge or experience contact a licensed electrician Wiring the fan to the...

Page 11: ...CC Repeat these steps for the remaining blades G F AA CC F Assembly Hanging the Fan continued Mounting the fan motor assembly standard mount Align the locking slots of the canopy C with the two screws DD and alignment post KK in the mounting bracket A Push up the canopy C and turn clockwise until the alignment post KK engage to the round hole and the screws DD engage to the key slots Firmly tighte...

Page 12: ...moved in step 1 Make sure all the screws are firmly tightened CAUTION To reduce the risk of electric shock disconnect the electrical supply circuit to the fan before installing the light fixture Installing the glass bowl 2 Remove the finial nut RR and the hex nut NN from the threaded nipple of the light kit fitter assembly H Position the glass bowl I over the threaded nipple Re install the hex nut...

Page 13: ...t on a lower setting without affecting your comfort A Warm weather B Cool weather 1 Power ON OFF Press and release the button to turn the fan and light on or off Press and hold the button for 5 seconds to use the walk away time delay this will active the light for 30 seconds the light will be activated at 50 brightness 2 Fan Speed LEDs on the fan speed button will illuminate to the corresponding s...

Page 14: ... blade arm screws are secure Most fan wobble problems are caused when blade levels are unequal Check this level by selecting a point on the ceiling above the tip of one of the blades Measure from a point on the center of each blade to the point on the ceiling Rotate the fan until the next blade is positioned for measurement Repeat for each blade Any measure ment deviation should be within 1 8 Run ...

Page 15: ...ular installation If this equipment does cause harmful interference to radio or television reception which can be determined by turning the equipment off and on the user is encouraged to try to correct the interference by one or more of the following measures Reorient or relocate the receiving antenna Increase the separation between the equipment and receiver Connect the equipment into an outlet o...

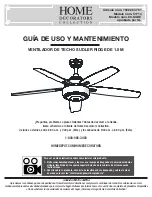
Page 16: ...ar tu hogar Visítanos por Internet para ver nuestra línea completa de productos disponibles a fin de satisfacer tus necesidades de mejoras del hogar Gracias por elegir Home Decorators Collection Artículo núm 1002 264 701 Modelo núm 51714 Modelo núm 60 SUDE aprobado por UL VENTILADOR DE TECHO SUDLER RIDGE DE 1 5 M Para ver un video instructivo sobre cómo instalar este producto 1 Visita www homedepo...

Page 17: ...cuidado en la caja eléctrica Los cables deben estar separados con el cable a tierra y el conductor a tierra del equipo a un lado de la caja eléctrica 10 Todos los tornillos de fijación tienen que ser verificados y ajustados donde sea necesario antes de la instalación ADVERTENCIA Para reducir el riesgo de lesiones personales no dobles los soportes de las aspas también llamados bridas durante el ens...

Page 18: ...a otra garantía expresa Por este medio Home Decorators Collection queda exento de todas y cada una de las garantías incluyendo pero sin limitarse a aquellas de comercialización e idoneidad para determinado propósito en el alcance permitido por la ley La duración de cualquier garantía implícita que no pueda eximirse está limitada al período especificado en la garantía explícita Algunos estados no p...

Page 19: ...ar las aspas 16 BB Conector plástico para cables 3 Preinstalación continuación HERRAJES INCLUIDOS NOTA Los herrajes no se muestran en tamaño real Pieza Descripción Cantidad CC Herrajes para montaje de aspas tornillo y arandela de seguridad 11 AA BB CC ...

Page 20: ...cripción Cantidad F Soporte de aspa 5 G Aspa 5 H Ensamblaje del soporte del kit de luces 1 I Tazón de vidrio arandela de goma preinstalada 1 J Receptor 1 K Control remoto incluye batería 1 L Extensión de cable terminal 1 IMPORTANTE Este producto o sus componentes están protegidos por una o más de las siguientes patentes de los EE UU 5 947 436 5 988 580 6 010 110 6 046 416 6 210 117 así como otras ...

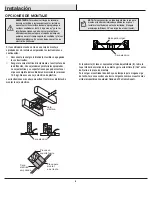
Page 21: ...ropiados La caja eléctrica y su soporte tienen que poder sostener el peso completo del ventilador en movimiento al menos 15 9 kg No uses una caja eléctrica de plástico Las ilustraciones más abajo muestran tres formas distintas de montar la caja eléctrica Si la cubierta C toca el conjunto del tubo bajante bola B retira la tapa inferior decorativa de la cubierta y gira esta última C 180º antes de fi...

Page 22: ... ubicados en la parte inferior del soporte de montaje A y gira la cubierta hacia la izquierda para quitar el soporte de montaje A de la cubierta C Cómo ensamblar el ventilador Afloja sin quitarlo el tornillo de fijación GG del collarín II ubicado en la parte superior del conjunto del motor y el ventilador E Instala el tubo bajante B insertándolo en el collarín del motor II y girándolo hacia la der...

Page 23: ...rmemente los dos tornillos de montaje JJ Con cuidado levanta el conjunto del motor y el ventilador E hasta el soporte de montaje deslizante A Coloca la bola de soporte del conjunto de tubo bajante bola B en el soporte de montaje Asegúrate de que la pestaña en el casquillo del soporte de montaje deslizante A encaje bien dentro de la ranura de la bola de soporte 1 2 ADVERTENCIA Para reducir el riesg...

Page 24: ...la cubierta de la batería en el control remoto K Inserta el tapón de goma de silicona OO en el orificio del receptor J para cubrir los interruptores K J ZZ 1 2 3 4 ON D O 1 2 3 4 ON DIP 1 2 3 4 ON D O 1 2 3 4 ON OO NOTA La batería se debilitará con el tiempo y deberá ser reemplazada antes de que se produzca alguna fuga ya que esto dañará la unidad de mano Mantén la batería fuera del alcance de los...

Page 25: ...de cables BB Conecta el cable blanco del receptor J al cable blanco neutro del hogar usando una tuerca de conexión de cables BB Asegura cada tuerca de conexión de cables con cinta de electricista ADVERTENCIA Para evitar una posible descarga eléctrica corta la electricidad de la caja de fusibles principal antes de cablear Si crees que no tienes suficiente conocimiento o experiencia sobre cableado e...

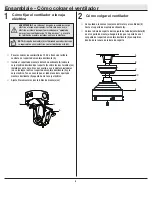
Page 26: ...gar el ventilador continuación Cómo montar el conjunto del motor y el ventilador montaje estándar Alinea las ranuras de cierre de la cubierta C con los dos tornillos DD y el poste de alineación KK del soporte de montaje A Empuja hacia arriba la cubierta C y gírala hacia la derecha hasta que el poste de alineación KK se enganche en el orificio redondo y los tornillos DD en las ranuras tipo ojo de c...

Page 27: ...llo LL que retiraste en el paso 1 Asegúrate de que todos los tornillos están firmemente apretados PRECAUCIÓN Para disminuir el riesgo de descarga eléctrica desconecta el circuito eléctrico del ventilador antes de instalar la lámpara Cómo instalar el tazón de vidrio 2 Retira la tuerca de remate RR y la tuerca hexagonal NN de la boquilla roscada del ensamblaje del soporte del kit de luces H Coloca e...

Page 28: ...ido y apagado ON OFF Presiona y suelta el botón para encender o apagar el ventilador y la luz Mantén presionado el botón durante 5 segundos para usar el temporizador inmediato esto encenderá las luces durante 30 segundos las luces se encenderán al 50 de su brillo 2 Velocidad del ventilador Las luces LED en el botón de velocidad del ventilador indicarán la velocidad correspondiente Oprime y suelta ...

Page 29: ...scila Verifica que todas las aspas y los tornillos de sus brazos estén bien ajustados La mayoría de los problemas de oscilación del ventilador se deben a que las aspas no están al mismo nivel Verifica este nivel seleccionando un punto en el techo sobre la punta de una de las aspas Mide desde un punto en el centro de cada aspa al punto en el techo Gira el ventilador hasta que la próxima aspa quede ...

Page 30: ...urrirá interferencia en una instalación particular Si este equipo causa interferencia que perjudica la recepción de radio o televisión lo cual puede determinarse encendiendo y apagando el equipo se recomienda al usuario que trate de corregir la interferencia tomando una o más de las siguientes medidas Reorientar o reubicar la antena receptora Incrementar la distancia entre los equipos y el recepto...

Reviews: