Setting up and connection
DH-Series | Version 1.01
11
7.2 Setting up of the Planer
The machine is delivered in a box and is already largely
assembled. Only a few parts have to be assembled after
delivery.
- Install the planner exactly according to these in-
structions.
- Only use the parts included in the scope of delivery.
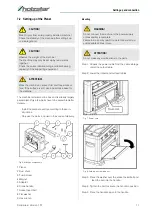
Fig. 6: Machine components
1 Planer
2 Dust chute
3 Tumb screw
4 Magnet
5 Adapter
6 Crank handle
7 Socket head bolt
8 Flat washer
9 Hex wrench
Mounting
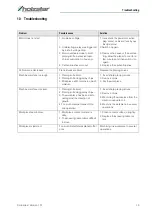
Step 1: Unpack the power cable from the cable storage
under the output table.
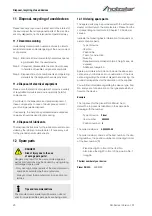
Step 2: Lower the infeed and outfeed tables.
Fig. 7: Power cord
Fig. 8: Folding the side table out
Step 3: Place the washer over the socket head bolt and
feed the bolt into the handle..
Step 4: Tighten the bolt to secure the handle in position.
Step 5: Place the handle cap onto the handle.
CAUTION!
Risk of injury from an improperly installed machine!
Check the stability of the machine after setting it up
on stable ground.
CAUTION!
Observe the weight of the machine!
The machine may only be set up by two persons
together.
Check the correct dimensioning and load-bearing
capacity of the supporting equipment.
ATTENTION!
Place the machine on a level, firm and free work sur-
face. If the surface is soft, use a board as a base for
the machine.
WARNING!
Do not connect the machine to the power supply
until assembly is complete.
Failure to do so may result in unintentional start-up
and possible serious injury.
ATTENTION!
Do not make any modifications to the parts.
Netzkabel


