background image

3

www.holsteinhousewares.com

9. 

Do NOT put any stress on the power cord where it connects to the 
product, as the power cord could fray and break.

10. 

Do NOT operate the product if it malfunctions, or if it is dropped or 
damaged. 

11. 

This product has NO user-serviceable parts. Do NOT attempt to examine 
or repair this product yourself. ONLY qualified and approved service 
personnel should perform servicing.

12. 

This product is intended for HOUSEHOLD and INTERIOR USE ONLY and 
cannot be used for any other purpose. This item is NOT a toy.

13. 

Keep the product out of the reach of children and pets. This product is 
NOT intended to be used by children and strict supervision is necessary 
when used near children.

14. 

Do NOT leave the product unattended while it is in use. 

15. 

Do NOT use any attachments or accessories that are not recommended 
or sold and approved by the manufacturer for this product. 

16. 

Always operate the product on a dry, flat, stable, heat-resistant surface 
to avoid accidents. 

17. 

Do NOT move the product while it is in use.  Always let it cool before 
moving, relocating, servicing, or cleaning it.

18. 

Do NOT let cord hang over the edge of a table or counter.

19. 

Use an oven mitt when opening and closing the lid when in use for 
safety.

Summary of Contents for HF-09041R

Page 1: ...NUAL ANTES DE USAR EL ARTEFACTO Y GUÁRDELO PARA REFERENCIA READ THIS MANUAL BEFORE USING THE PRODUCT AND SAVE FOR FUTURE REFERENCE THIS MANUAL IS FOR USE WITH ALL ITEMS WITH THE MODEL NUMBER ESTE MANUAL DE USUARIO APLICA PARA TODOS LOS PRODUCTOS CON EL NÚMERO DE MODELO HF 09041R ...

Page 2: ...with your hands wet 5 Do NOT operate the product if the power cord is cut damaged or if the wires are exposed 6 Keep the power cord and product AWAY from heated surfaces including stovetops burners or heated ovens 7 Do NOT immerse in or expose the base power cord or plug to water or any other liquids NEVER use this product near water or wet surfaces 8 To disconnect the product from an electrical o...

Page 3: ... is NOT a toy 13 Keep the product out of the reach of children and pets This product is NOT intended to be used by children and strict supervision is necessary when used near children 14 Do NOT leave the product unattended while it is in use 15 Do NOT use any attachments or accessories that are not recommended or sold and approved by the manufacturer for this product 16 Always operate the product ...

Page 4: ... should be at least as great as the electrical rating of the appliance 2 The longer cord should be arranged so that it will not drape over the countertop or tabletop where it can be tripped over snagged or pulled on unintentionally by children or the user DO NOT OPERATE APPLIANCE IF THE POWER CORD SHOWS ANY DAMAGE OR IF APPLIANCE WORKS INTEMITTENTLY OR STOPS WORKING ENTIRELY ADDITIONAL SAFEGUARDS ...

Page 5: ... product and all parts Remove all packaging materials including any stickers or labels 2 Read these instructions carefully 3 Clean the interior surface of the product with a damp cloth Wipe dry with a soft cloth immediately Do not use abrasive materials Wipe down the exterior with a soft dry cloth 4 NEVER IMMERSE PRODUCT OR CORD IN WATER OR ANY OTHER LIQUID 5 Position the product on a stable dry f...

Page 6: ...hen plug the electrical cord into the outlet carefully on a separate outlet from other appliances to prevent the circuit from being overloaded 6 Close the lid and pre heat 7 The red and green indicator lights will turn on as soon as you connect the appliance The green indicator light will turn off when the appliance reaches the maximum operating temperature The appliance is ready to cook as soon a...

Page 7: ...at and then place the next batch when ready Note Cooking time may vary between batches 13 As soon as you are finished cooking unplug the product and allow it to cool Proper maintenance will ensure years of service of your product Clean the product after every use following these steps This product contains no user serviceable parts and requires little maintenance 1 WARNING Unplug the product and a...

Page 8: ...at indicated on the appliance 120V 60Hz 750W 1 After following the steps of cleaning and maintenance collect the power cord and place in the cord storage 2 Store the appliance in a dry and clean place STORAGE SPECIFICATIONS CAUTION DO NOT IMMERSE THE PRODUCT THE POWER CORD OR PLUG INTO WATER OR ANY LIQUIDS ...

Page 9: ...9 www holsteinhousewares com PARTS LID LATCH UPPER NON STICK COATED PLATE BOTTOM NON STICK COATED PLATE NON SLIP BASE ...

Page 10: ...o cook for 7 10 minutes or until fully cooked 6 Remove waffles with a wooden heat resistant plastic or silicone spatula 7 Repeat steps 1 6 for subsequent batches RECIPE NOTIFICATION The recipe servings are subject to the quality of the ingredients the cooking conditions and the amount of batter used per waffle among other variables Please note that the serving size varies per recipe ...

Page 11: ...lways coat the non stick surface with a small amount of vegetable oil This can be done with a paper towel or with a non stick cooking oil spray Wipe off any excess oil It is recommended to periodically do this after use to maintain the quality of the non stick coating Do not use left over waffle mix The results are better when you cook waffles right after you have prepared the batter Let the waffl...

Page 12: ...es Raspberry Lemon Waffles Chocolate Waffles Red Velvet Waffles Cinnamon Sugar Waffles Blueberry Waffles Caramel Waffles Shortcake Waffles Coconut Waffles Peaches and cream Waffles Cookies and cream Waffles Recipes ...

Page 13: ......

Page 14: ...s add in butter milk egg and vanilla Mix well together Pour into your maker Bake for 7 10 minutes Serve with butter cream frosting Enjoy 3 4 cup sugar 1 1 2cups flour Pinch of salt 1 2 tbsp baking powder 1 2 cup melted butter 1 2 cup milk 1 egg 2 tsp vanilla Ingredients Steps ...

Page 15: ...15 www holsteinhousewares com ...

Page 16: ...the vanilla and egg Slowly add in the flour baking soda baking powder salt and milk Mix until smooth Follow the steps to baking in your maker Bake for 7 10 minutes Prepare the frosting by whipping the cream and 3tbs brown sugar in a small bowl Then mash your raspberries and add them to your cream 3 4 tsp baking powder 1 4 tsp baking soda 1 2 tsp salt 1 cup milk 3 4 cup heavy cream 1 cup raspberrie...

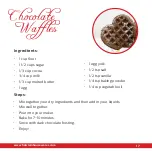
Page 17: ...ed butter 1 egg Ingredients Steps Mix together your dry ingredients and then add in your liquids Mix well together Pour into your maker Bake for 7 10 minutes Serve with dark chocolate frosting Enjoy Chocolate Waffles 1 egg yolk 1 2 tsp salt 1 2 tsp vanilla 1 4 tsp baking powder 1 4 cup vegetable oil ...

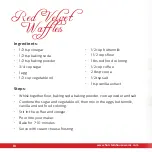
Page 18: ... flour baking soda baking powder cocoa powder and salt Combine the sugar and vegetable oil then mix in the eggs buttermilk vanilla and red food coloring Stir in the coffee and vinegar Pour into your maker Bake for 7 10 minutes Serve with cream cheese frosting 1 2 cup buttermilk 1 1 2 cups flour 1 tbs red food coloring 1 2 cup coffee 2 tbsp cocoa 1 2 tsp salt 1 tsp vanilla extract ...

Page 19: ...19 www holsteinhousewares com ...

Page 20: ...arge egg 1 2 cup butter milk 2 tbsp butter melted 1 tbsp powdered cinnamon Ingredients Steps Mix your drive ingredients together Add in the rest of your ingredients Prepare your waffles Enjoy as is with whipped cream or dip in dark chocolate and sprinkles Cinnamon Sugar Waffles ...

Page 21: ...ents Steps Mix your dry ingredients together in a large bowl Then pour in the remainder excluding the blue berries Mix until smooth Then fold in your blueberries Follow the steps to baking in your maker Bake for 7 10 minutes Top with cream and blueberries Blueberry Waffles 1 tsp vanilla 1 egg 1 3 cup buttermilk 3 4 cup blueberries ...

Page 22: ...ps flour 3 tsp baking powder Ingredients Steps Beat the butter and sugar together Add in the eggs and caramel syrup Mix together the dry ingredients and add into your egg mixture Pour into your maker Bake for 7 10 minutes Serve with butter cream frosting 1 2tsp salt 3 4 cup milk 1 tsp vanilla extract ...

Page 23: ...23 www holsteinhousewares com ...

Page 24: ... 1 2 stick of butter softened 1 2 cup flour 1 tsp vanilla extract 1 egg 2 tsp sugar 1 2 cup milk Ingredients Steps Mix all you ingredients in a large bowl together Pour into your maker Bake for 7 10 minutes Serve with whipped cream and strawberries ...

Page 25: ...eam 1 tsp vanilla extract 5 cups shredded coconut 1 cup powder sugar Ingredients Steps Prepare the yellow cake recipe Pour into your maker Bake for 7 10 minutes In a bowl mix sour cream vanilla and coconut together Add sugar and mix thoroughly Spread the coconut mixture over the waffle ...

Page 26: ... blend the lemon juice and peach together until pureed Beat in the butter and sugar Add your eggs and vanilla Slowly add your dry ingredients and blend until smooth Follow the steps to baking in your maker Bake for 7 10 minutes Serve with cream and peaches 1 1 2 cup flour 1 2tsp salt 1 1 2 tsp cinnamon 1 tsp baking powder 2 tbs cream Peaches Cream Waffles ...

Page 27: ...ies Cream Waffles 1 package white cake mix 1 1 4 cup water 1 3 cup vegetable oil 3 eggs 1 cup oreo cookie crumbs Ingredients Steps Mix together your ingredients Pour into your maker Bake for 7 10 minutes Serve with butter cream frosting ...

Page 28: ...s superficies calientes Utilice un guante de cocina y las asas o las perillas ATENCIÓN La superficie se calienta durante su uso 4 NO conectar desconectar el artefacto del tomacorriente con las manos mojadas 5 NO utilice el artefacto si el cordón eléctrico está roto dañado o si los cables están expuestos 6 Mantenga el cordón eléctrico y el artefacto alejado de superficies calientes incluyendo estuf...

Page 29: ...acto no es un juguete 13 Mantenga el artefacto fuera del alcance de niños y mascotas Este artefacto no está destinado a ser utilizado por niños y una estricta supervisión es necesaria cuando se utiliza cerca de niños 14 NO deje el artefacto desatendido mientras está en uso 15 NO utilice ningún accesorio que no está recomendado o vendido y aprobado por el fabricante de este artefacto 16 Siempre ope...

Page 30: ...n largo Pueden usarse cables de extensión más largos si se toman las precauciones necesarias en su uso Si se usa cable de extensión 1 Las características eléctricas del cable de extensión deben ser iguales o superiores a las del artefacto 2 El cable debe colocarse de forma que no cuelgue para evitar que se pueda tropezar enredarse o tirar de él accidentalmente especialmente por niños INSTRUCCIONES...

Page 31: ...loque el artefacto en un lugar estable seco y resistente al calor 6 Desenrolle el cordón eléctrico 7 Utilice este artefacto en una toma de corriente separada y el circuito de otros aparatos para evitar la sobrecarga del circuito ENCHUFE POLARIZADO Este electrodoméstico tiene un enchufe polarizado una pata del enchufe es más ancha que la otra Para reducir el riesgo de descarga eléctrica este enchuf...

Page 32: ...de que sea un tomacorriente separado de otros artefactos para evitar que el circuito se sobrecargue 6 Cierre la tapa y deje precalentar 7 La luz indicadora roja y la luz indicadora verde se encenderán al conectar el artefacto La luz indicadora verde se apagara tan pronto como el artefacto alcance la temperatura máxima de funcionamiento El artefacto estará listo para usar cuando la luz verde se apa...

Page 33: ...13 Tan pronto como haya terminado de cocinar desconecte el artefacto y deje que se enfríe LIMPIEZA Y MANTENIMIENTO El mantenimiento adecuado asegurará muchos años con su artefacto Limpie el artefacto después de cada uso Este artefacto no contiene piezas reparables por el usuario y requiere poco mantenimiento ADVERTENCIA Desenchufe el artefacto y déjelo enfriar antes de limpiarlo 1 Limpie las super...

Page 34: ...el voltaje de la red doméstica corresponda con la indicada en el artefacto 1 Luego de seguir los pasos de limpieza y mantenimiento recoja el cordón eléctrico y coloque en el guarda cables 2 Guarde el artefacto en un lugar seco y limpio PRECAUCIÓN NO SUMERJA EL ARTEFACTO O EL CABLE O EL ENCHUFE EN AGUA U OTROS LÍQUIDOS ...

Page 35: ...35 www holsteinhousewares com PARTES PESTILLO TAPA PLACA SUPERIOR CON CAPA ANTIADHERENTE PLACA INFERIOR CON CAPA ANTIADHERENTE PATAS ANTIRESBALANTES ...

Page 36: ...mpie el exceso de aceite Se recomienda hacer periódicamente este paso después de cada uso para mantener la cali dad de la capa antiadherente No utilice mezcla vieja Los resultados son mejores cuando utiliza mez cla recién hecha Deje enfriar los waffles por unos minutos y disfrute tibios y frescos Usa una paleta de madera si quieres cocinar waffles en paletas NOTIFICACION SOBRE RECETAS Los resultad...

Page 37: ...apa y vierta la mezcla sobre la horma de la placa inferior 4 Baje la tapa del artefacto y cierre el broche de seguridad 5 Deje cocinar de 7 10 minutos o hasta que esté completamente cocido 6 Retire los waffles con una espátula de madera plástico o silicona resistente al calor 7 Repita pasos del 1 6 para las siguientes tandas ...

Page 38: ...e Vainilla Waffles de Frambuesa y Limón Waffles de Chocolate Waffles de Red Velvet Waffles de Canela y Azúcar Waffles de Arandano Waffles de Caramelo Waffles de Fresa Waffles de Coco Waffles de Melocotón Waffles de Cookies and Cream Recetas ...

Page 39: ...39 www holsteinhousewares com ...

Page 40: ...2 taza de harina Una pizca de sal 1 2 cucharada de polvo para hornear 1 2 taza de mantequilla derretida 1 2 taza de leche 1 huevo 2 cucharadita de vainilla Mezcle los ingredientes secos y luego añada los líquidos Siga los pasos de hacer waffles Sirva con glaceado de chocolate blanco Disfrute ...

Page 41: ......

Page 42: ...illa y el huevo Poco a poco agregue la harina el bicarbonato de sodio polvo de hornear la sal y la leche Mezcle hasta que quede suave Siga los pasos para la cocción en su máquina hornear durante 7 10 minutos Preparar el glaseado batiendo la crema y 3 cucharadas de azúcar moreno en un tazón pequeño Luego triturar sus frambuesas y añadirlos a su crema 1 4 cucharadita de bicarbonato de sodio 1 2 cuch...

Page 43: ... de huevo Mezcle los ingredientes secos y luego añadir los líquidos Mezclar bien juntos Vierta la mezcla en su máquina Hornear durante 7 10 minutos Sirva con glaseado de chocolate negro Waffles de Chocolate 1 3 taza de mantequilla blanda 1 2 cucharadita de sal 1 4 cucharadita de polvo para hornear 1 2 cucharadita de vainilla ...

Page 44: ...ato de sodio polvo de hornear el cacao en polvo y la sal Combine el azúcar y el aceite vegetal luego se mezcla en los huevos la mantequilla la vainilla y el colorante alimentario rojo Agregue el café y el vinagre Vierta la mezcla en su máquina Hornear durante 7 10 minutos Sirva con glaseado de queso crema 1 huevos 1 2 taza de suero de leche 1 cucharaditas de extracto de vainilla 1 cucharadita de c...

Page 45: ...45 www holsteinhousewares com ...

Page 46: ...1 huevo grande 1 2 taza de leche de mantequilla 2 cucharadas de mantequilla derretida 1 cucharada de canela en polvo Mezclar los ingredientes Añadir en el resto de los ingredientes Prepara tus waffles Sirva con crema batida o salsa de chocolate negro y rocía con un poco de canela Waffles de Canela y Azúcar ...

Page 47: ...odio 5 cucharadas de mantequilla 2 3 de azúcar 1 cucharadita de vainilla Mezcle los ingredientes secos en un tazón grande A continuación vierta en el resto excluyendo los arandanos Mezcle hasta que quede suave Agregue los arándanos Siga los pasos para la cocción en su máquina Hornear durante 7 10 minutos Cubrir con crema y arándanos 1 huevo 1 3 taza de suero 3 4 de taza de arándanos ...

Page 48: ...de polvo para hornear 1 2 cucharadita de sal 3 4 de taza de leche Extracto de vainilla 1 cucharadita Batir la mantequilla y el azúcar Añadir los huevos y jarabe de caramelo Mezcle los ingredientes secos y añadir a su mezcla de huevo Vierta la mezcla en su máquina Hornear durante 7 10 minutos Servir con crema de mantequilla glaseado Waffles de Caramelo ...

Page 49: ...49 www holsteinhousewares com ...

Page 50: ... derretida 1 2 taza de harina Extracto de vainilla 1 cucharadita 1 huevo 2 cucharadita azucar 1 2 taza de leche Mezclar todos ustedes ingredientes en un tazón grande Vierta la mezcla en su máquina Hornear durante 7 10 minutos Servir con crema batida y fresas Waffles de Fresa ...

Page 51: ...e extracto de vainilla 5 tazas de coco rallado 1 taza azúcar en polvo Prepare la mezcla de la caja para pasteles Vierta la mezcla en su máquina Hornear durante 7 10 minutos En un tazón mezcle la crema agria la vainilla y el coco juntos Añadir el azúcar y mezclar bien Extienda la mezcla de coco sobre el waffle Waffles de Coco ...

Page 52: ...huevos 1 1 3 cucharadita de vainilla En un bol mezcle el jugo de limón y melocotón hasta hacerlos puré Batir la mantequilla y el azúcar Añadir los huevos y la vainilla Poco a poco agregue los ingredientes secos Mezcle hasta que quede suave Siga los pasos para hacer waffles Hornear durante 7 10 minutos Servir con crema y melocotones Waffles de Melocot ón ...

Page 53: ... mezcla para pastel de vainilla 1 1 4 taza de agua 1 3 taza de aceite vegetal 3 huevos 1 taza de migajas de galletas oreo Ingredientes Pasos Mezcle los ingredientes Vierta la mezcla en su máquina Hornear durante 7 10 minutos Servir con glaseado de crema de mantequilla ...

Page 54: ... TIME PERIOD SPECIFIED HEREIN OR TO THE EXTENT PERMITTED BY LAW ANY AND ALL IMPLIED WARRANTIES ARE EX CLUDED LIABILITIES FOR CONSEQUENTIAL DAMAGES UNDER ANY AND ALL WAR RANTIES ARE EXCLUDED TO THE EXTENT SUCH EXCLUSION IS PERMITTED BY LAW This warranty is valid for the original retail purchaser from the date of initial retail purchase and is not transferable Purchaser must present the original sal...

Page 55: ...od hurricanes and tornadoes HOLSTEIN HOUSEWARES shall not be liable for any incidental or consequential damages caused by the breach of any express or implied warranty Except to the extent prohibited by applicable law any implied warranty of merchantability or fitness for a particular purpose is limited in duration to the duration of the above warranty Some states provinces or jurisdictions do not...

Page 56: ...CLUY ENDO LA DE COMERCIALIZACIÓN Y APTITUD PARA UN PROPÓSITO PARTICULAR Y CUALQUIER GARANTÍA SE LIMITA AL PERIODO DE TIEMPO ESPECIFICADO EN LA PRESENTE O LA EXTENSIÓN PERMITIDA POR LA LEY TODAS LAS GARANTÍAS IM PLÍCITAS QUEDAN EXCLUIDAS RESPONSABILIDADES POR DAÑOS CONSECUENTES BAJO Y PARA TODAS LAS GARANTÍAS SE EXCLUYEN EN LA MEDIDA EN QUE DICHA EXCLUSIÓN SEA PERMITIDA POR LA LEY Esta garantía es ...

Page 57: ... HOLSTEIN HOUSEWARES o un centro de servicio autoriza do Además la garantía no cubre Actos de Dios tales como incendios inundaciones huracanes y tornados HOLSTEIN HOUSEWARES no será responsable por ningún daño incidental o con secuente causado por el incumplimiento de cualquier garantía expresa o implícita Salvo en la medida prohibida por la ley aplicable cualquier garantía implícita de comerciabi...

Page 58: ......

Page 59: ......

Page 60: ...N THE EXTENSION CORD NEVER MODIFY THE PLUG DO NOT ATTEMPT TO ALTER THIS MEASURE OF SAFETY IN ANY WAY ADVERTENCIA CHOQUE ELÉCTRICO ADVERTENCIA PARA REDUCIR EL RIESGO DE CHOQUE ELÉCTRICO NUNCA SUMERJA LA BASE EL CORDÓN ELÉCTRICO O EL ENCHUFE EN AGUA O EN NINGÚN OTRO LÍQUIDO ESTE ARTEFACTO ESTÁ EQUIPADO CON UN ENCHUFE POLARIZADO UNA PATA DEL ENCHUFE ES MÁS ANCHA QUE LA OTRA PARA REDUCIR EL RIESGO DE ...

Reviews: