background image


IF FURTHER ASSISTANCE IS REQUIRED: 
CONTACT STAR/HOLMAN FACTORY SERVICE TEAM AT 1-800-807-9054 

 12

LONG TERM CLEANING PROCEDURES (every 6 months) 

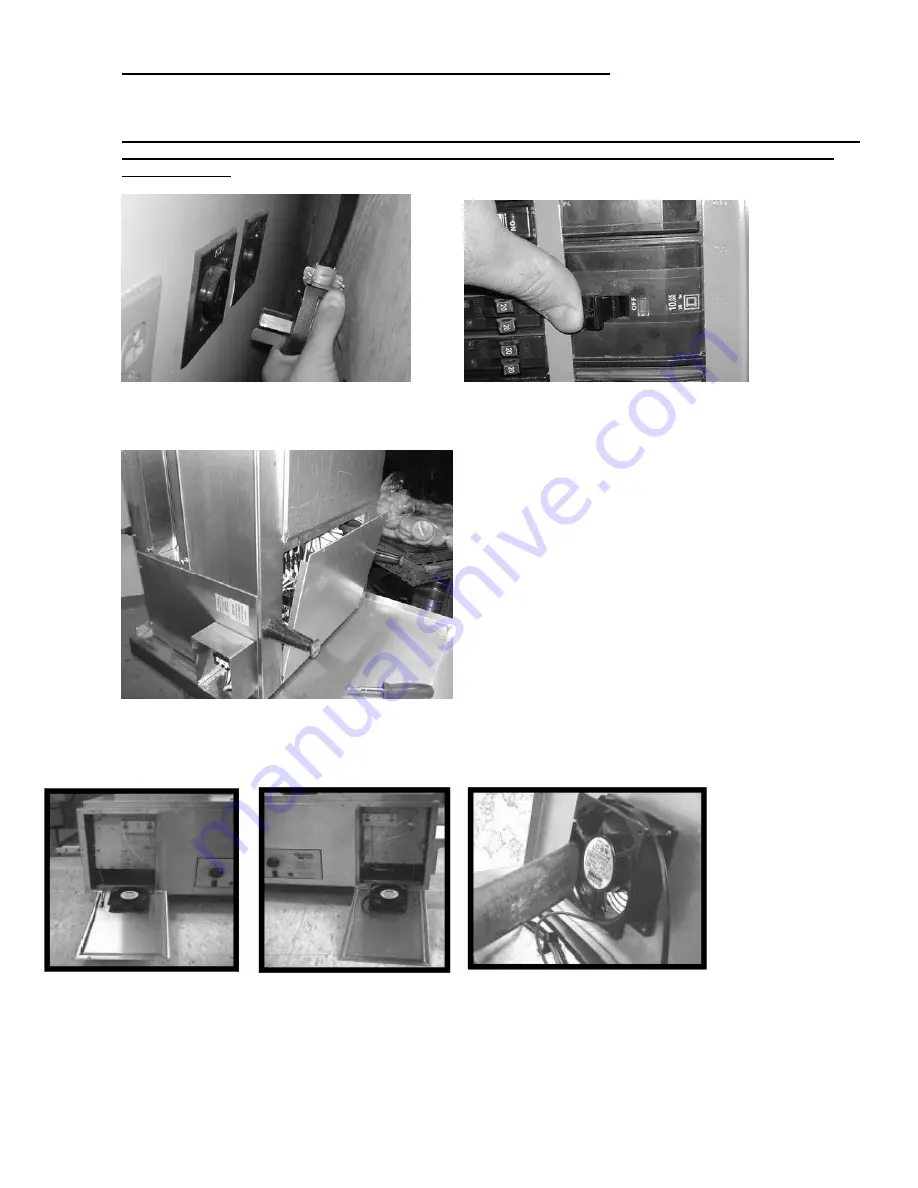
Turn power off and allow cooling fans to run until the control box is cooled off.  The fans are controlled by a 
thermostat in the control box. 

DISCONNECT UNIT FROM POWER SUPPLY OR TURN POWER OFF AT WALL BREAKER. BE SURE THE 
SANDWICH WARMER IS COMPLETELY COOLED BEFORE PERFORMING ANY OF THE FOLLOWING 
PROCEDURES. 


1.  With the power off, allow the unit to cool completely. Place Sandwich Warmer on non-extension end.  

Remove screws holding control box covers in place and remove. 


NOTE: 

TO PREVENT DAMAGE TO CONTROLS 
OR ELEMENTS, DO NOT SET THE 
MACHINE ON SIDE PANELS. 
TO PREVENT DAMAGE TO 
ACCESSORIES, REMOVE CRUMB 
TRAYS AND UNLOAD TRAY BEFORE 
LIFTING OVEN TO UPRIGHT POSITION 


2.  Remove screws holding control box covers in place and remove. 
3.  Using a vacuum, clean the inside of control box.  Wipe any buildup that cannot be vacuumed with a dry towel.  
4.  Replace control box covers and fasten with screws.  Put the machine back on its feet. 
5.  Remove side panels and vacuum compartments as performed under monthly cleaning procedures. 


Summary of Contents for qt14

Page 1: ...ND INSTALLATION 1 2 OPERATION 3 BASIC CLEANING PROCEDURES 3 4 TROUGLESHOOTING 5 6 PREVENTATIVE MAINTENANCE SCHEDULED CLEANING DAILY CLEANING 7 8 WEEKLY BELT CLEANING 9 MONTHLY CLEANING 10 11 LONG TERM...

Page 2: ...performance and reliability as well as jeopardize the Underwriter Laboratory s safety certification Please have a qualified electrician wire your vent hood to a separate circuit Misconception My conv...

Page 3: ...f these pads 3 Install unit in its operating position The load unload ends must be at least 6 from any vertical combustible surfaces Allow sufficient space for operating personnel Have an electrician...

Page 4: ...the Master On Off switch to the OFF position and call the Holman Cooking Equipment Factory Service Team at 1 800 807 9054 8 The unload tray has a key hole slot on the end of the tray that will slide...

Page 5: ...me parts of the machine will still be warm Refer to the Troubleshooting section if the machine is not performing as expected BASIC CLEANING PROCEDURES Preventive maintenance for your Holman oven consi...

Page 6: ...cloth daily Do not spray cleaning fluids into the air intake This may result in component failure 5 Carefully remove and clean the Neo ceram window daily Remove the thumbscrews securing the window ri...

Page 7: ...by pushing the button in the center of the switch that is located beneath the unload tray THE HEAT LIMIT SWITCH CAN BE ACTIVATED IF THERE IS NOT A PROPER AMOUNT OF AIR FLOW BEING GENERATED BY THE COOL...

Page 8: ...rockets or chain Realign any loose sprockets and re tighten the setscrews making sure the setscrews seat on the flats of the motor and drive shafts o If further assistance is required contact the Star...

Page 9: ...PPLY OR TURN POWER OFF AT WALL BREAKER BE SURE THE SANDWICH WARMER IS COMPLETELY COOLED BEFORE PERFORMING ANY OF THE FOLLOWING PROCEDURES 1 Remove the unload tray as shown below a For lightly soiled t...

Page 10: ...ng window by removing the six thumbscrews on the rear of the sandwich warmer Remove the window trim ring Then remove the window spacer Then carefully remove the Neo Ceram glass 7 Clean the Neo Ceram g...

Page 11: ...clean the exposed surface of Conveyor Belt by passing the brush or pad back and forth across the surface of the Conveyor Belt 3 When a section of Conveyor Belt is clean remove wire brush or abrasive...

Page 12: ...emove panel Drive chain is now exposed 2 Check drive chain tension a When properly adjusted chain will have about 1 8 play but will not sag b To adjust drive chain tension remove power supply side pan...

Page 13: ...nside of unit repeat for opposite side 5 Replace all panels when done CHECK THAT ALL WIRES DO NOT GET PINCHED AS THE PANELS ARE REPLACED ALSO CHECK ANY WIRES AROUND THE MOTOR TO MAKE SURE THEY DO NOT...

Page 14: ...w the unit to cool completely Place Sandwich Warmer on non extension end Remove screws holding control box covers in place and remove NOTE TO PREVENT DAMAGE TO CONTROLS OR ELEMENTS DO NOT SET THE MACH...

Page 15: ...instruction in daily cleaning 2 Remove screws holding front and rear panels Lift panels up and out to remove 3 Each heater tube has its own connection to a terminal block at the front and back of the...

Page 16: ...ough the body of the machine NOTE Top and bottom tubes are of different wattage ratings Make sure that the correct tubes are being replaced or toasting will be dramatically affected 10 When the heater...

Page 17: ...fan that needs replaced 2 Unplug the power supply cord Remove any wire ties holding the cord to the fan Disconnect the ground wire if present 3 Remove the four screws attaching the fan and grill to th...

Page 18: ...tor by loosening the setscrew and sliding the sprocket off 5 Disconnect the drive motor leads to the internal wiring The motor can be used in 208 or 240 volt ovens Note how the old motor is wired for...

Page 19: ...riveshaft to allow for chassis expansion 1 Unit must be cool 2 Do not adjust the sprocket on the driveshaft 3 Insert a 1 16 spacer drill bit etc between the driveshaft sprocket and the washer that is...

Page 20: ...y does not apply to the non stick properties of such materials This warranty does not apply to Special Products but to regular catalog items only Star s warranty on Special Products is six 6 months on...

Page 21: ......

Page 22: ...VE A BAKE TO QUIZN OS STAND ARDS AT CLOSE Q TURN POWER OFF FAN OPERA TES UNTIL UNIT COOLS 16 8 38 11 9 5 2 10 3 6 22 24 33 34 20 23 44 47 18 15 37 32 4 14 49 35 31 29 28 27 51 46 39 17 50 48 21 40 41...

Page 23: ...402631 1 WINDOW RETAINER OUTSIDE 17 GE 402344 2 CONTROL BOX COVER 18 GE101029 2 CRUMB TRAY 19 GE 402654 1 CRUMB TRAY LOWER 20 GE 100944 1 UNLOAD TRAY 21 GE 402610 1 CONVEYOR END GUARD 22 2P 115362 1...

Page 24: ...LONG 41 2B 200620 3 CONVEYOR BELT SINGLE SPACE CLIP 42 2P 200785 2 BEARING SPRING LOADED 43 2P 200766 2 SPRING BEARING 44 GE 101254 1 DRIVE SHAFT ASSY W SPROCKETS 45 GE 101255 1 IDLER SHAFT ASSY W SP...

Page 25: ...7 9054 20 DETAIL OF RESISTOR DIODE TERMINAL BLOCK 47 OHM DIODE WIRING DIAGRAM 020514A QT14 W POT SPEED CONTROL THREE PHASE DELTA SOURCE 250 OHM POT PART OF GE 135702 WHT BLK BLK WHT RED RED BLK WHT WH...

Page 26: ...ING DIAGRAM 020513A QT14 W POT SPEED CONTROL SINGLE PHASE 208 220 240 PUR YEL BLU ORN ORN BLU YEL BLK BLK WHT WHT BLK WHT WHT WHT BLK BLK WHT BLK BLK BLU YEL BLK PUR WHT WHT BLK BLK RED MOLDED FAN COR...

Page 27: ...PART OF GE 135702 MODEL QT14 380 220 60 3 phase 15 TUBE SERIES THIS DRAWING CONTAINS INFORMATION CONFIDENTIAL TO STAR MFG INT L INC NO REPRODUCTION OR DISCLOSURE OF ITS CONTENTS IS PERMITTED STAR MAN...

Page 28: ...STAR MANUFACTURING 10 Sunnen Drive St Louis MO 63143 U S A 800 807 9054 314 781 2777 Parts Service 800 807 9054 www star mfg com...

Reviews: