BA_PH_245-20_EN_15-22.docx
42
14
Milling Fences
14.1
Placing and Aligning the Milling Fence
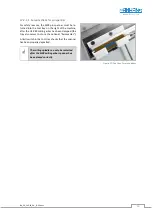
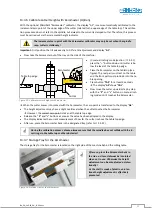
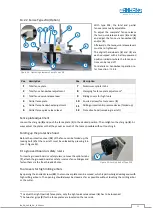
Figure 27: Locking bolts and detent holes
In order to place the fence on the table top and to align it
parallel without the need for further tools, all fence types
are equipped with a dovetail receptacle (
S
) on the under-
side and two spring-mounted centring pins (
Z
).
On the machine table surface there is the locking pin (
A
),
which serves as a counterpart to the dovetail receptacle
(
S
), and the two holes (
B
) into which the two above-men-
tioned centring pins (
Z
) can engage.
Increased risk of accidents due to the high weight of the fence! Lifting and placing the fence
should be done by at least two people or with a suitable hoist (e.g. an indoor crane)!
•
Danger of crushing hands and fingers between fence and machine table!
•
Wear protective gloves when lifting or placing the fence.
•
Acute risk of injury to the feet from the fence falling down!
•
Wear safety shoes with steel toecaps.
Placing and aligning the fence on the machine table is identical for both fence types (216 and optionally 204).
However, the position of the centring pins (
Z
) is (seen from the front) on the right side of the fence for type 216
and on the left side for types 204 (see
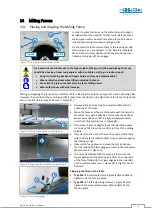
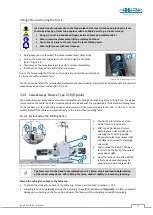
Figure 28: Move centrally over milling spindle
•
Remove dirt and chips from the machine table and the
underside of the fence.
•
Move the fence over the machine table with the help of a
second person, with a suitable hoist or with the optional
Swivel-away device so that it is approximately centred
over the milling spindle (see
•
Then move the fence slightly forward towards the opera-
tor's side so that its centre is a little in front of the milling
spindle.
•
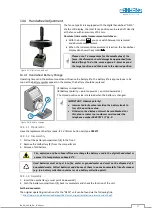
Now stand on the back of the machine and pull the fence
with the dovetail receptacle (
S
) as close as possible against
the locking pin (
A
).
•
Now set the fence down and move the rest by hand so
that the locking bolt (
A
) engages securely in the receptacle
(
S
) as shown in
•
To ensure parallelism with the machine table, turn the
fence slightly until the centring pins (
Z
) on the underside
of the fence (hidden in the view) engage in the holes (
B
)
on the machine table (see
Figure 30). A slight click can
be heard.
Clamping the fence on the table:
•
Type 216
→
Attach both clamping levers (
3
) and (
6
) and
tighten to fix the fence in place.
•
Type 204
→
Fit the clamping screws (
Figure 35) and
tighten both quick-release levers (
3
) and (
6
) to fix the
fence in place.
Figure 29: Align dovetail receptacle to locking pin
Figure 30: Lock and engage
A
Typ 216
Typ 204
B
B
A
A
S
S
A

