13
WARRANTY INFORMATION
Hogtunes speakers are warranted for a period of 20 years to the original pur-
chaser. Hogtunes Amplifiers are warranted for 1 year from original purchase date.
Proof of purchase is required for all warranty claims. All Warranty claims must
be made through the dealer this product was originally purchased from. Speak-
ers found to be defective during the warranty period will be repaired or replaced
(with a product deemed to be equivalent) at Hogtunes sole discretion. Amplifiers
will be repaired.
What Is Not Covered:
1) Any expense related to the removal or re-installation of Hogtunes products.
2) Repairs to these products performed by anyone other than Hogtunes.
3) Subsequent damage to any other components.
4) Any product purchased from a non-authorized Hogtunes dealer.
5) Damage to Hogtunes products due to an accident or collision.
6) Hogtunes Amplifiers with broken or removed “warranty void” stickers.
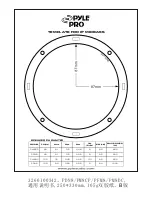
TECHNICAL SPECIFICATIONS
Hogtunes NCA-70.2 Amplifier
Rated Power at 2 Ohms:
70 Watts/Channel (@1% THD)
Actual Power at 2 Ohms:
77 Watts/Channel (@1% THD)
Actual Power at 4 Ohms:
> 50 Watts/Channel (@1% THD)
Efficiency:
>66%
Fuse:
15 amp
Hogtunes 702.2W Speakers
Power Handling:
75 Watts RMS / 150 Watts Peak
Frequency Response:
100hz-7Khz
Sensitivity :
94 db 1watt/1meter
Nominal Impedance:
2.0 Ohms
Harley-Davidson, Electra Glide, Road Glide, Street Glide, Ultra Classic, Tri Glide, CVO,
Screamin Eagle and Tour-Pak® are Trademarks, and/or Registered Trademarks of Harley-
Davidson, Inc., Milwaukee, Wisconsin, USA, and if Used or Implied are for Reference Only.
There is No Affiliation Between Harley-Davidson, Inc., and Hogtunes Inc.
Harman Kardon® is a Registered Trademark of Harmon International Industries Inc., and is
Used for Reference Only. There is No Affiliation Between Harman
International Industries Inc. and Hogtunes Inc.
Go to page 4 of this manual, and follow instructions on how to mount the
amplifier. When done, come back and start wiring the amp as per the instructions
below.
WIRING FOR ‘06-’10
CVO ULTRA CLASSIC
Step #1: Plug the 2 connectors of the main wire harness into “Power” and
“Audio Input” On the amplifier. Tighten (snug) the 2 small flathead
screws on the power connector to prevent it from backing out while
riding.
Step #2: Locate the harness with white/black wires, red/black wires and a
4-pin male blue plug, and plug it into the female blue plug which is
part of the input harness you just installed into the amp.
• On the
brake side of the bike
, near the fairing speaker locate
the Grey/Red and Green/black wires that have quick disconnects
joining them. These are NOT the wires directly on the speakers!
• When the quick disconnects get separated, a male and female
connector will be exposed on each side of the wire, the same style
as the connectors on the speakers. Take the green and black wires
from the Hogtunes amp (male connectors) and plug them into the
bikes Grey/Red and Green/Black wires (female connectors) at the
connectors you just unplugged.
• Take the red/black wires on the amps input harness (female
connectors) and plug them into the bikes Grey/Red and
Green/Black (male connectors)
• Each connector is pre-sized correctly and can only go in one way.
• On the
clutch side near the fairing speaker
, locate the
White/Orange wire, and Green/White wires and separate the
connectors same as the brake side. These are NOT the wires directly
on the speakers!
• Take the Hogtunes yellow and black wires (male connectors) and
plug them into the bikes White/Orange and Green/White wires
(female connectors)
14
INSTALLATION INSTRUCTIONS
IF USING THIS KIT ON A 2006-2010 CVO ULTRA CLASSIC