17
GB
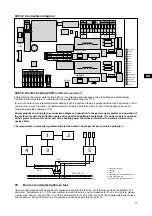
02.03.2 Connections diagram
KEYBOARD
2
3
4
5
6
7
8
9
10
11
1
12
13
14
15
16
3 5 4
11
13 14
16
10 15 7 6 8 9
2
K2 K1 GND 5V
GND SIG 5V
Sensor
K3
K4
K5
K6
D6
D5
D4
D3
D2
D1
LIGHT
L N
WATER
L L' N N L
N
L
230V~
PE
AIR
FUSE
LIGHT
EG.01A
FUSE
AIR PUMP
WATER PUMP
FUSE
SW4
keyboard type 6 keys 5 keys
SW3
main freq. set (SW2 - ON) 60Hz 50Hz
SW2
main freq. detect. manual auto
SW1
system mode EN.01 EN.02
SWITCH
ON
OFF
L
N
PE
L
/ƍ
N
N
L
main
1N AC
water
pump
blower
JUH\SLQN
YLROHWW
ZKLWH
EODFN
UHG
EURZQ
JUHHQ
\HOORZ
JUH\
SLQN
EOXH
\HOORZJUHHQ
ZKLWHJUHHQ
JUH\SLQN
EURZQJUHHQ
UHGEOXH
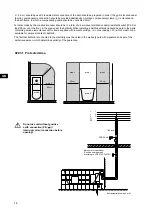
02.03.3 Electric heating 2 kW
(additional equipment)
Afters witching the electric water heater 2 kW on, the rotating water massage nozzle is switched on automatically.
The bath water temperature is maintained at the constant level of approx. 37°C.
In case of a version with integrated electric heating 2 kW the system is factory-equipped with an electric part and control
components. In such a situation a separate electric connection should be made for part of the heating power and it
should be protected separately 10 A.
Ensure polarity according to the connections diagram. Connection to the power supply system and operation of
the system only with the protection cable and connected equalizing of potentials. The power supply connection
of the system control unit and for part of the heating power should be protected with a common current trip
device 30mA.
The temperature is manually regulated with electric heater. The proper access should be predicted.
03
Run test and water-tightness test
Once you take steps described at point 02, please proceed with the test run. For this purpose clean the bathtub,
fi
ll it
with water (temperature 40 +/- 5
˚
C) until over
fl
ow level and then turn on whirl massage for 10 min. During this, please
monitor max. and min. speed. Then, turn off the whirl system for 15 min. After one hour, check water-tightness of pipes
and connectors. During next test run a disinfection must be done according to point 14.
L
N
PE
10 A
10 A
RCD 30mA
L
N
PE
PE N
L
230 V~ 50 Hz
1
2
3
4
5
1 - connection clamps
2 - steering
3 - heater
4 - connecting socket - temperature fuse
5 - PI 65 connection box
(to install by the construction team)
Summary of Contents for Laola II
Page 91: ...91 ...


