background image

CD DUPLICATOR 

Notice for CD 

The followings are notices for operations of CD with the DSR. 

Format 

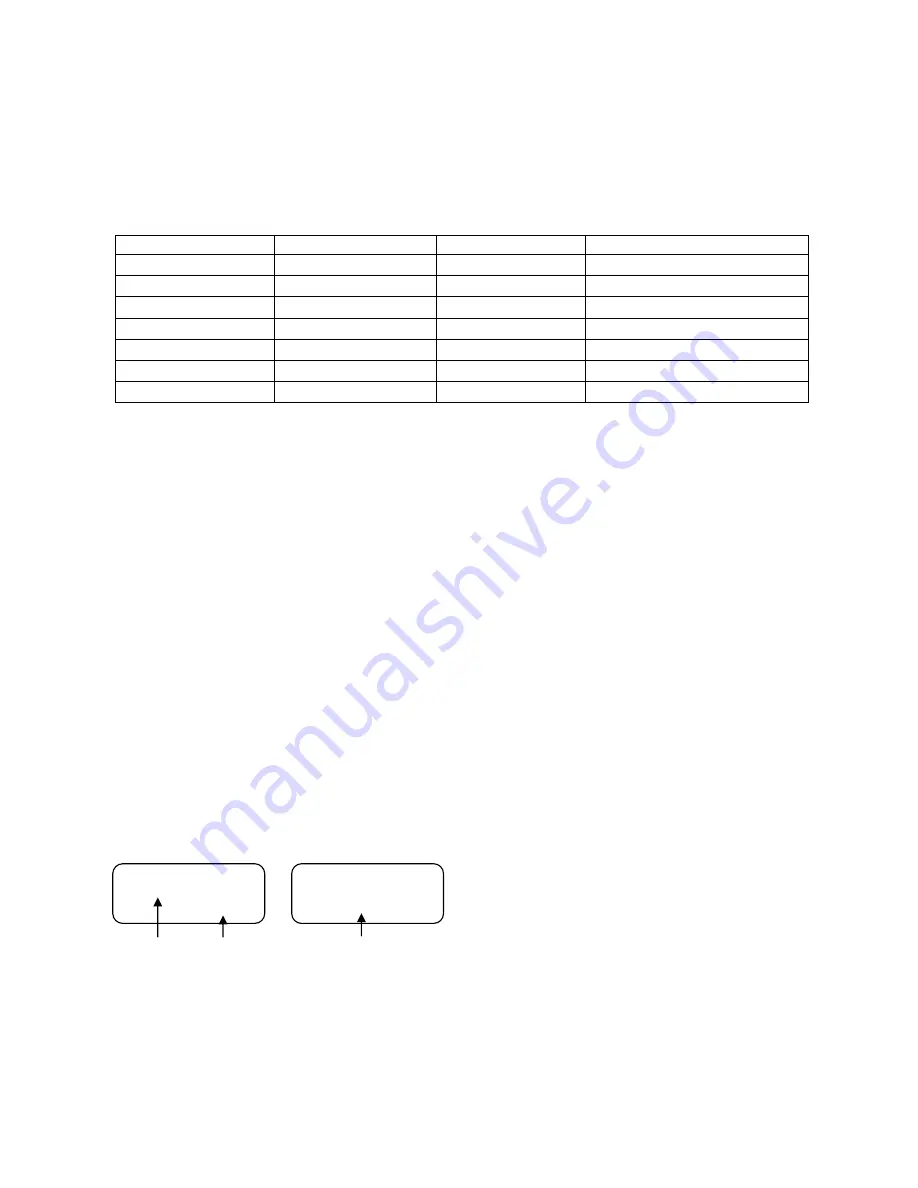
  Supported CD formats by DSR are as follows: 


COPY 

VERIFY 

READ CHECK (RD CHECK) 

CD-ROM mode 1 


CD-ROM mode 2 


CD-DA 


×


CD-ROM XA form 1 


CD-ROM XA form 2 


×


MIXED 


×


Multi Session 


 (*1) 


    *1 Cannot verify the multi session unless CD-ROM mode 1 or CD-ROM XA form 1. 


CD-DA 

  Due to the specification of writer installed in the DSR-4000dp, the ISRC and catalogue code do not support even if they are 

included in the master disc. 

Mode and master drive for CD 

  There are three modes for CD. 
  * COPY--------------------------------------- 

Copy the data from master drive to blank disc. 

  * VERIFY------------------------------------ 

Verify (compare) the data between master drive and target disc (s). 

  * RD CHECK-------------------------------- 

Check if the copied data can be read properly. 

  * COPY + V (copy + verify)--------------- 

Copy and Verify in a row. 

  * COPY + R (copy + read check)--------- 

Copy and Read Check in a row. 

 
  There are two kinds of master drive. 
  * CD------------------------------- 

 Disc inserted into the DVD-ROM drive is recognized as the master disc and read from this disc for 
every process. 

  * HD ------------------------------ 

 Internal HDD is the master drive. It is required to register the master data from disc in the 
DVD-ROM drive first. After the registry in HDD, the master disc is no longer necessary. 

 
  Mode & master is saved as the last process you executed. LCD displays the mode & master in the CD main screen. 
 

COPY START? 

(MEDIUM)


COPY START? 

(CD to CD) 


     Mode  Write speed       Master drive 
 
  In this chapter, it is assumed to set COPY mode and explained the following items. 
  * Copy from disc to disc (CDtoCD) 
  * Register the master disc (CDtoHD) 
  * Copy from HDD to disc (HDtoCD) 

 17

Summary of Contents for DSR-4000dp

Page 1: ...HOEI PRECISION DESKTOP CD DVD DUPLICATOR DSR 4000dp DSR 4000dp 5 MX DSR 4000dp 10 MX USER s MANUAL Rev 2 0 ...

Page 2: ...f the DSR 4000dp These specifications are subject to change without prior notice due to functional improvements DSR 4000dp User s Manual Copyright 2003 by HOEI SANGYO Co Ltd All Rights Reserved Reproduction or use without permission from HOEI SANGYO Co Ltd of any portion of this manual is prohibited and are in violation of applicable laws 2 ...

Page 3: ... the mater drive 22 Simulation copy SIMULATION 23 Setup of CD SETUP 24 Change and set each mode 24 Select the write speed WRITE SPEED 25 Display the drive inquiry string DRIVE INQUIRY 26 Display the firmware version F W VERSION 27 Disc Erase 28 Error during the process 29 DVD DUPLICATOR 30 Format 30 Media 30 Mode and master drive for DVD 30 Basic Operations for DVD 31 Copy from disc to disc DVDtoD...

Page 4: ... ID switch 50 Connect the cable 50 Power on and NETWORK READY 51 Operations of NETWORK 52 Distribute the master data from the master disc to the slave unit CD DVDtoNET 52 Distribute the master data from the master HD to the slave unit HDtoNET 53 Copy Verify after the master distribution 54 Display of SLAVE BUSY for the master distribution 54 Troubleshooting 55 Firmware 55 How to upgrade reload the...

Page 5: ... is shown See below B drive DVD RW writer has been installed LED The status of the drive B is shown See below C drive DVD RW writer has been installed LED The status of the drive C is shown See below D drive DVD RW writer has been installed LED The status of the drive D is shown See below Master DVD ROM reader Master read drive LED The status of the Master Read Drive is shown See below LED indicat...

Page 6: ... shown see below D drive DVD RW writer has been installed LED The status of the drive D is shown see below E drive DVD RW writer has been installed LED The status of the drive E is shown see below F drive DVD RW writer has been installed LED The status of the drive F is shown see below G drive DVD RW writer has been installed LED The status of the drive G is shown see below H drive DVD RW writer h...

Page 7: ...on Panel No Yes LCD Liquid Crystal Display No Switch Yes Switch LCD Liquid Crystal Display It shows status messages of the DSR Yes Switch To execute each selected mode menu No Switch To select each mode menu 7 ...

Page 8: ... switch for changing the input voltages AC115 230 USB Connector to connect with the PC use via USB2 0 NET IN Connector to connect master units together as a network feature Connect a cable from the NET OUT connector NET OUT Connector to connect master units together as a network feature Connect a cable to a next master unit NET ID Switch used for a network feature to select ID Be sure to use a too...

Page 9: ... a switch for changing the input voltages AC115 230 USB Connector to connect with the PC use via USB2 0 NET IN Connector to connect master units together as a network feature Connect a cable from the NET OUT connector NET OUT Connector to connect master units together as a network feature Connect a cable to a next master unit NET ID Switch used for a network feature to select ID Be sure to use a t...

Page 10: ...the power cord with a wet hand Be careful not to damage the power cord Inspect the power cord periodically In the event that the power cord is damaged contact the agent Be sure to use a tool such as the screwdriver to change the 115 230V Switch Do not use your finger or any part of your body Earth Be sure to each the DSR to prevent an accident due to electricity leakage For grounding use a 3P outl...

Page 11: ...sed to sunlight shut out the light by using a blind or curtain a dusty place a place where there is a lot of vibration near fire a place where the temperature and humidity change drastically near a heating device such as a heater a place where air from an air conditioner blows near a container filled with water such as a vase In winder at low humidity or in a place where static electricity is gene...

Page 12: ...thing within at least 5cm around the DSR Clear anything at least 20cm behind he DSR Securely place the rubber legs of the DSR on the desk or table Notes for using Do not hit it against anything Do not insert a foreign material e g metal chip in it Do not disassemble the housing or turn off the power while a process is being executed If a malfunction occurs during the process refer to Section 6 Err...

Page 13: ...cloth in water including a small amount of neutral detergent and squeezing it Do not use volatile chemicals such as benzene thinner and alcohol If they are used the surface of the housing might change in quality or shape Keep the inside of the DSR dry Do not use a bristle brush and a stiff cloth Transportation If the DSR is transported after unpacking pack it properly to protect it from shocks dur...

Page 14: ... Functions of Devices Introduction for details LCD Liquid crystal display It shows the status of the DSR in the normal mode In the panel setting mode the settings are shown on the screen Up to 32 characters 16 characters x 2 lines are shown on the LCD Switches Yes Switch It is used to execute a menu mode displayed on the LCD No Switch It is used to select a menu mode 14 ...

Page 15: ...itializing CD DUPLICATOR If the power is not properly turned on refer to Error message to take proper procedures Turning off the power 1 Make sure that the process has been completed in the DSR 2 Turn off the power If you want to turn on the power again after turning it off at least 5 seconds are required before turning in on again Do not turn the power off while the hard drive is processed Do not...

Page 16: ...You can use the DSR as a standalone DVD duplicator Please refer to Section 4 DVD DUPLICATOR DPM for General You can use the DSR with the DPM88 application Please refer to the DPM88 user manual UTILITY Utility menu of DSR You can select HDD FORMAT Display chart of Main menu Power on DSR 4000 Ver X XX HOEI CD DVD LX1 Section 3 CD DUPLICATOR Section 4 DVD DUPLICATOR Section 5 UTILITY YES YES YES N N ...

Page 17: ...ive and target disc s RD CHECK Check if the copied data can be read properly COPY V copy verify Copy and Verify in a row COPY R copy read check Copy and Read Check in a row There are two kinds of master drive CD Disc inserted into the DVD ROM drive is recognized as the master disc and read from this disc for every process HD Internal HDD is the master drive It is required to register the master da...

Page 18: ...inserted within 30 seconds the screen goes back to 1 The tray does not open if the master disc is already inserted before pressing the YES switch It would be the master disc 3 Tray s of target drive opens with the following message Insert the blank media and close the tray s If you do not want to insert the media to all target drives close the tray s as empty INSERT TARGET DISC Notice If any one o...

Page 19: ...disc to disc CDtoCD Press the NO switch to register the master data to HDD To CD DISC CD to CD 5 HD area for CD in DSR is displayed Select the HD area and press the YES button 1 No data yet registered in the area you select Press the YES button to register the master data To CD AREA1 CD to HD To CD AREA1 FREE Press the YES button to start registration Press the NO button to return REGISTRATION CD ...

Page 20: ... the NO button to return OVER WRITE Tray of DVD ROM drive opens with the following message Insert the master disc and close the tray INSERT MASTER DISC DSR analyzes the master CD and starts registration The master CD is ejected automatically once it completes REGIST 15 25 CD DA 40 ANALYZING MASTER Master data once registered in HDD is stored even after turning off DSR Refer to Notices for CD for t...

Page 21: ...ready registered data is displayed if you press the NO button twice Press the YES button if the data you want to copy is shown up HD CD AREA1 CD ROM 650G format capacity 4 Press the YES button if you want to copy from the HD area to CD R To DVD DISC HD to CD 5 Press the YES button to start copying COPY START HDtoCD Refer to Notices for CD for the supported CD formats If an error occurs refer to Er...

Page 22: ...utton to display the following screen DVD MASTER Copy from disc to disc CDtoCD If you press the YES button DSR asks you if you want to copy from disc to disc Press the YES button to start copying Refer to Copy from disc to disc CDtoCD for details TO DVD DISC CDtoCD Copy from HDD to disc HDtoCD If you press the NO button the HD area already registered data is displayed Select the HD area you want t...

Page 23: ...n goes back to 1 The tray does not open if the master disc is already inserted before pressing the YES switch It would be the master disc INSERT MASTER DISC 4 Tray s of target drive opens with the following message Insert the blank media and close the tray s If you do not want to insert the media to all target drives close the tray s as empty Notice If any one of target disc s is inserted within 3...

Page 24: ...between master drive and target disc s COPY V copy verify Copy and Verify in a row How to change the mode 1 In the CD main screen please the NO button three times to display the SETUP screen COPY START CD to CD COPY START FAST 2 Press the YES button to enter SETUP SETUP 3 MODE SELECT screen displays Current selected mode is displayed in the lower line Press the YES switch to enter MODE SELECT COPY...

Page 25: ...iting speed 1 In the CD main screen please the NO button three times to display the SETUP screen COPY START CDtoCD COPY START FAST 2 Press the YES button to enter SETUP SETUP 3 MODE SELECT screen displays Press the NO button to display the WRITE SPEED screen MODE SELECT COPY MODE 4 Press the YES button to change WRITE SPEED WRITE SPEED FAST 5 Press the NO switch to select speed you want Press the ...

Page 26: ...LECT COPY MODE 4 Press the YES button to display each drive inquiry string DRIVE INQUIRY 5 Model name and firmware version of HDD display Press the NO switch to display other drives inquiries HDD MAXTOR HDD 1 10 6 Model name and firmware version of DVD ROM drive display Press the NO switch to display another drive s inquiry READER PIONEER READER DVD ROM DVD 500M READER 1 0 7 Model name and firmwar...

Page 27: ...ess the YES button to display the firmware version Press the YES button F W VERSION 5 Firmware version of DSR itself displays Press the NO button to display the hardware version Press the YES button to return the screen 4 DSR 4000 Ver 2 02 6 Hardware version of DSR displays Press the NO button to display the total number of disc you copy Press the YES button to return the screen 4 H W INFO x24 111...

Page 28: ... the DVD main screen please the NO button three times to display the SETUP screen COPY START CDtoCD COPY START FAST 2 Press the NO button four times to display the erase screen Press the YES button DISC ERASE 3 The FULL ERASE screen displays Press the YES button to start FULL ERASE DSR confirms if you really want to erase press the YES button again to execute Press the NO button to QUICK ERASE FUL...

Page 29: ...e drive The status LED beside the drive with error flashes and DSR beeps How to see the error status After the process is completed the error code or message of drive with error is displayed automatically If more than one drive have the error the error code or message displays in a row How to cancel the error status Press the eject button of drive with error By removing an error medium beep error ...

Page 30: ...PY Copy the data from master drive to blank disc VERIFY Verify compare the data between master drive and target disc s COPY V copy verify Copy and Verify in a row There are two kinds of master drive DVD Disc inserted into the DVD ROM drive is recognized as the master disc and read from this disc for every process HD Internal HDD is the master drive It is required to register the master data from d...

Page 31: ... 30 seconds the screen goes back to 1 The tray does not open if the master disc is already inserted before pressing the YES switch It would be the master disc INSERT MASTER DISC 3 Tray s of target drive opens with the following message Insert the blank media and close the tray s If you do not want to insert the media to all target drives close the tray s as empty Notice If any one of target disc s...

Page 32: ...sc to disc DVDtoDVD Press the NO switch to register the master data to HDD To DVD DISC DVD to DVD 5 HD area for DVD in DSR is displayed Select the HD area and press the YES button 1 No data yet registered in the area you select Press the YES button to register the master data To DVD AREA1 DVD to HD To DVD AREA1 FREE Press the YES button to start registration Press the NO button to return REGISTRAT...

Page 33: ...O button to return OVER WRITE Tray of DVD ROM drive opens with the following message Insert the master disc and close the tray INSERT MASTER DISC DSR analyzes the master DVD and starts registration The master DVD is ejected automatically once it completes REGIST 4 10G VIDEO 20 ANALYZING MASTER Master data once registered in HDD is stored even after turning off DSR Refer to Notices for DVD for the ...

Page 34: ...dy registered data is displayed if you press the NO button twice Press the YES button if the data you want to copy is shown up HD DVD AREA1 DVD ROM 4 10G format capacity 4 Press the YES button if you want to copy from the HD area to DVD R To DVD DISC HD to DVD 5 Press the YES button to start copying COPY START HDtoDVD Refer to Notices for DVD for the supported DVD formats If an error occurs refer ...

Page 35: ...on to display the following screen DVD MASTER Copy from disc to disc DVDtoDVD If you press the YES button DSR asks you if you want to copy from disc to disc Press the YES button to start copying Refer to Copy from disc to disc DVDtoDVD for details TO DVD DISC DVDtoDVD Copy from HDD to disc HDtoDVD If you press the NO button the HD area already registered data is displayed Select the HD area you wa...

Page 36: ...n goes back to 1 The tray does not open if the master disc is already inserted before pressing the YES switch It would be the master disc INSERT MASTER DISC 4 Tray s of target drive opens with the following message Insert the blank media and close the tray s If you do not want to insert the media to all target drives close the tray s as empty Notice If any one of target disc s is inserted within 3...

Page 37: ... between master drive and target disc s COPY V copy verify Copy and Verify in a row How to change the mode 1 In the DVD main screen please the NO button three times to display the SETUP screen COPY START DVDtoDVD COPY START FAST 2 Press the YES button to enter SETUP SETUP 3 MODE SELECT screen displays Current selected mode is displayed in the lower line Press the YES switch to enter MODE SELECT CO...

Page 38: ...ing speed 1 In the DVD main screen please the NO button three times to display the SETUP screen COPY START DVD to DVD COPY START FAST 2 Press the YES button to enter SETUP SETUP 3 MODE SELECT screen displays Press the NO button to display the WRITE SPEED screen MODE SELECT COPY MODE 4 Press the YES button to change WRITE SPEED WRITE SPEED FAST 5 Press the NO switch to select speed you want Press t...

Page 39: ... SELECT COPY MODE 4 Press the YES button to display each drive inquiry string DRIVE INQUIRY 5 Model name and firmware version of HDD display Press the NO switch to display other drives inquiries HDD MAXTOR HDD 1 10 6 Model name and firmware version of DVD ROM drive display Press the NO switch to display another drive s inquiry READER PIONEER READER DVD ROM DVD 500M READER 1 0 7 Model name and firm...

Page 40: ...Press the YES button to display the firmware version Press the YES button F W VERSION 5 Firmware version of DSR itself displays Press the NO button to display the hardware version Press the YES button to return the screen 4 DSR 4000 Ver 1 01 6 Hardware version of DSR displays Press the NO button to display the total number of disc you copy Press the YES button to return the screen 4 H W INFO x24 1...

Page 41: ... the DVD main screen please the NO button three times to display the SETUP screen COPY START DVD to DVD COPY START FAST 2 Press the NO button four times to display the erase screen Press the YES button DISC ERASE 3 The FULL ERASE screen displays Press the YES button to start FULL ERASE DSR confirms if you really want to erase press the YES button again to execute Press the NO button to QUICK ERASE...

Page 42: ...e drive The status LED beside the drive with error flashes and DSR beeps How to see the error status After the process is completed the error code or message of drive with error is displayed automatically If more than one drive have the error the error code or message displays in a row How to cancel the error status Press the eject button of drive with error By removing an error medium beep error ...

Page 43: ... to use the same type model of media Error may be occurred during recording if you use different type model of media Media manufacturers we recommend to use are Taiyo Yuden Fuji Film Mitsubishi Chemical and TDK Necessary parts To use the PRV LX1 feature with DSR an USB2 0 cable is necessary to prepare Cable is not enclosed with PRV LX1 or DSR How to connect with PRV LX1 Connect the USB cable as th...

Page 44: ...ct the PRV LX1 function by pressing the NO button PRV LX1 5 Press the YES button to start up the program for PRV LX1 function Following screen is standby for the PRV LX1 function STANDBY OK To DVD 6 Power on the PRV LX1 7 Check if the DSR is properly recognized on the PRV LX1 How to shut down Here is the description how to end the PRV LX1 feature 1 Check if all process on the PRV LX1 and DSR have ...

Page 45: ...r to How to start in the previous pages 2 Open the tray of writer in DSR and load a blank disc 3 The status LED of DSR is lit once the blank disc is recognized by writer Press the YES button after checking all LED is lit 4 DSR is waiting to receive data from PRV LX1 Executing Writing to DVD 5 On the PRV LX1 select the image you want to record and duplicator as a recording drive then execute record...

Page 46: ...O To DVD AREA2 To HD To DVD AREA2 FREE display by turns EXIT screen displays if you press the NO button at the last HD area Press the YES button to return to the standby screen Press the NO button to return to the HD area 1 screen DSR can select a number of HD area in the HDD FORMAT of UTILITY menu Please refer to the chapter 6 HDD FORMAT in UTILITY for details 4 Select the HD area you want to reg...

Page 47: ...it as READY even after a blank DVD R RW is inserted Check the disc if you insert it a right side Error is occurred during recording to a DVD R RW disc Check if you use all the same DVD disc Check if the DVD disc is blank Check if you are not mixing DVD R and DVD RW discs Check if you are not using the DVD R or DVD RW disc to record DSR is supported only DVD R or DVD RW disc Recording time to a DVD...

Page 48: ...SION 3 The DVD DUPLICATOR screen appears after initializing DVD DUPLICATOR 4 Press the NO button to select the UTILITY screen UTILITY If you have already used other menu and DSR started from a different menu screen DVD DUPLICATOR or DPM88 press the NO button to select the UTILITY screen 5 The HDD FORMAT screen displays once you press the YES button to start UTILITY 48 ...

Page 49: ...t 1 1 Pattern 1 3 5 Pattern 2 2 5 Pattern 3 1 5 Pattern 4 6 4 Pattern 5 5 4 Pattern 6 4 4 Pattern 7 3 4 Pattern 8 2 4 Pattern 9 1 4 Pattern 10 7 3 Pattern 11 6 3 Pattern 12 5 3 Pattern 13 4 3 Pattern 14 3 3 Pattern 15 2 3 Pattern 16 1 3 Pattern 17 7 2 Pattern 18 6 2 Pattern 19 5 2 Pattern 20 4 2 Pattern 21 3 2 Pattern 22 2 2 Pattern 23 1 2 Pattern 24 9 1 Pattern 25 8 1 Pattern 26 7 1 Pattern 27 6 ...

Page 50: ...f Master unit 1 Slave unit 2 to 9 in order from the master unit Connect the cable Connect the 50pin half pitch cable from the NET OUT connector to the NET IN connector as follows while the DSR is turned off NET IN NET OUT 0 NET ID USB NET IN NET OUT 0 NET ID USB NET IN NET OUT 0 NET ID USB Slave unit NET ID 2 Slave unit NET ID 3 Master unit NET ID 1 Maximum number of DSR unit you can connect is ni...

Page 51: ...ve unit connected In this case two slave units are connected NETWORK CHECK 02 YES TO START For all slave unit s please wait until the LCD displays the following messages 2 Press the YES button of master unit Main screen is displayed NET SLAVE 0X NETWORK READY COPY START DVDtoDVD Displaying the same number as the NET ID If the main screen above is not displayed please press the YES button a few tim...

Page 52: ...e main screen COPY START DVDtoDVD COPY START FAST 2 The MASTER SELECT screen displays Press the YES button MASTER SELECT 3 Press the YES button to read the master disc from the reader of master unit DVD MASTER 4 Press the NO button until the upper line of screen displays To NET and press the YES button To DVD DISC DVD to DVD To NET DVD to NET 5 If there is any data already registered in the HD are...

Page 53: ... distribute the master data registered in the HD area 07 of master unit Press the NO button from the main screen COPY START HD 07 to DVD COPY START DVD VIDEO 3 8G COPY START FAST 2 The MASTER SELECT screen displays Press the YES button MASTER SELECT 3 Press the NO button to read the master disc from the reader of master unit DVD MASTER 4 Press the NO button to read the data in the HD area 02 HD DV...

Page 54: ...an work with the master data just distributed as the standalone MODE or WRITE SPEED cannot be changed In the slave unit insert the blank disc s and press the YES button to start process NET SLAVE 0X NETWORK READY NET SLAVE 0X PRESS NET SLAVE 0X YES TO START Display of SLAVE BUSY for the master distribution The master distribution is available if all slave unit displays the screen as follows For th...

Page 55: ...the surface Check if the unit is moved from low temperature environment to high temperature environment in a short time The lens of the optical head may have caused condensing Leave the unit with the power turned on for a while then restart it DSR freezes with PLEASE WAIT screen Firmware of DSR may not boot up properly Try to reload a firmware CD Firmware CD can be made by downloading from the sit...

Page 56: ...r firmware CD SUM CHECK ERROR Sum in firmware does not match Load the firmware CD for DSR Check your firmware CD Read drive Message Checking Item ERROR MASTER Master read error Faulty in the master drive or bad master disc DISC TYPE Data format in your master disc is not supported MASTER ANALYZE Error during analyzing the master disc Faulty in the master drive or bad master disc Write drive Messag...

Page 57: ...nation of displaying error code as follows Example 1 Read error with the read drive ERROR MASTER CODE 11 05 11 ASC Additional Sense Code 05 ASCQ Additional Sense Code Qualifier Example 2 Buffer under run error with the write drive A during copying ERROR TARGET 01 CODE 0C 07 0C ASC Additional Sense Code 07 ASCQ Additional Sense Code Qualifier 57 ...

Page 58: ...R 15 01 MECHANICAL POSITIONING ERROR 15 02 POSITIONING ERROR DETECTED BY READ OF MEDIUM 17 00 RECOVERED DATA WITH NO EEOR CORRECTION APPLIED 17 01 RECOVERED DATA WITH RETRIES 17 02 RECOVERED DATA WITH POSITIVE HEAD OFFSET 17 03 RECOVERED DATA WITH NEGATIVE HEAD OFFSET 17 04 RECOVERED DATA WITH RETIES AND OR CIRC APPLIED 17 05 RECOVERED DATA USING PREVIOUS SECTOR ID 18 00 RECOVERED DATA WITH ERROR ...

Page 59: ...PHERAL DEVICES SELECTED 08 00 LOGICAL UNIT COMMUNICATION FAILURE 08 01 LOGICAL UNIT COMMUNICATION TIME OUT 08 02 LOGICAL UNIT COMMUNICATION PARITY ERROR 09 00 TRACK FOLLOWING ERROR 09 01 TRACKING SERVO FAILURE 09 02 FOCUS SERVO FAILURE 09 03 SPINDLE SERVO FAILURE 09 04 HEAD SELECT FAULT 0A 00 ERROR LOG OVERFLOW 0B 00 WARNING 0B 01 WARNING SPECIFIED TEMPERATURE EXCEEDED 0B 02 WARNING ENCLOSURE DEGR...

Page 60: ...HRESHOLD PARAMETERS NOT SUPPORTED 26 04 INVALID RELEASE OF ACTIVE PERSISTENT RESERVATION 27 00 WRITE PROTECTED 27 01 HARDWARE WRITE PROTECTED 27 02 LOGICAL UNIT SOFTWARE WRITE PROTECTED 27 03 ASSOCIATED WRITE PROTECT 27 04 PERSISTENT WRITE PROTECT 27 05 PERMANENT WRITE PROTECT 28 00 NOT READY TO READY CHANGE MEDIUM MAY HAVE CHANGED 28 01 IMPORT OR EXPORT ELEMENT ACCESSED 29 00 POWER ON RESET OR BU...

Page 61: ...0 INVALID BITS IN IDENTIFY MESSAGE 3E 00 LOGICAL UNIT HAS NOT SELF CONFIGURED YET 3E 01 LOGICAL UNIT FAILURE 3E 02 TIMEOUT ON LOGICAL UNIT 3F 00 TARGET OPERATING CONDITIONS HAVE CHANGED 3F 01 MICROCODE HAS BEEN CHANGED 3F 02 CHANGED OPERATING DEFINITION 3F 03 INQUIRY DATA HAS CHANGED 40 NN DIAGNOSTIC FAILURE ON COMPONENT NN 80H FFH 43 00 MESSAGE ERROR 44 00 INTERNAL TARGET FAILURE 45 00 SELECT OR ...

Page 62: ...0 END OF USER AREA ENCOUNTERED ON THIS TRACK 63 01 PACKET DOES NOT FIT IN AVAILABLE SPACE 64 00 ILLEGAL MODE FOR THIS TRACK 64 01 INVALID PACKET SIZE 65 00 VOLTAGE FAULT 72 00 SESSION FIXATION ERROR 72 01 SESSION FIXATION ERROR WRITING LEAD IN 72 02 SESSION FIXATION ERROR WRITING LEAD OUT 72 03 SESSION FIXATION ERROR INCOMPLETE TRACK IN SESSION 72 04 EMPTY OR PARTIALLY WRITTEN RESERVED TRACK 73 00...

Reviews:

Related manuals for DSR-4000dp