


HOBO MX pH and Temperature Logger (MX2501) Manual
3
Button Push” or with a delayed start. The blue LED blinks every
4 seconds when an alarm is tripped (unless the Show LED
option is disabled). The blue and red LEDs will blink once when
you press the magnetic switch to wake up the logger or will
blink four times when you press the switch to start or stop
logging. If you select Page Logger LED in the HOBOmobile app,
the red LED will be illuminated for 5 seconds.
Mounting Hole:
Use the hole on the mounting end of the
logger to attach it to a cable or cord for deployment (see
Deploying and Mounting the Logger
).
Switch:
This magnetic switch on the mounting end of the logger
works in conjunction with the reed switch. Press this switch for 3
seconds to start or stop the logger when it is configured to start
or stop “On Button Push” (see
Configuring the Logger
). Press this
switch for 1 second to wake up the logger (if configured with
Bluetooth Always Off as described in
Configuring the Logger
).
Installing the pH Electrode
The logger is shipped with the pH electrode uninstalled and the
glass pH sensor placed in a small bottle filled with storage
solution as shown below.
Important:
The pH sensor must be kept in storage solution
when not being calibrated or deployed in water
. The hydration
layer surrounding the sensor starts to break down after 10
minutes if the pH sensor is not submerged in storage solution,
calibration solution, or water. Once the layer breaks down or is
destroyed, the pH sensor will not provide accurate readings.
When the pH sensor is properly kept in storage solution or
deployed in water, the hydration layer can last for 6 months.
The hydration layer then naturally breaks down and will result
in unstable readings. Therefore, install a new pH electrode
every 6 months.
Important:
New pH electrodes are uncalibrated. Once a pH
electrode is installed in the logger for the first time, it must be
calibrated before configuring and deploying the logger (see
Configuring the Logger
).
To install the pH electrode in the logger:
1. Unscrew the closure cap over the sensor end cap of the
logger. Pull the sensor end cap straight out from the logger
without twisting it.
2. If this is the first time you’re installing a pH electrode, skip
to step 3. If a pH electrode is currently installed, gently
remove it from the sensor end cap. Use a foam swab
dipped in water to clean the internal O-rings. Use the foam
swab to spread a small dot of silicone-based grease along
both the O-rings inside the sensor end cap. Do not use a
cotton swab as the fibers on the swab can interfere with
the operation of the electrode.
3. Remove the pH electrode from the shipping bottle and wipe
the outer plastic body dry with a soft paper or cloth towel.
Never touch the glass bulb inside the clear plastic end of
the probe.
4. Remembering not to touch the glass bulb, gently push the
pH electrode into the sensor end cap. You will feel the pH
electrode pause as it passes through two internal O-rings
inside the sensor end cap (shown with step 2). Make sure
the internal O-rings are still in place as the probe is pushed
into the sensor end cap. Gently twist the electrode so that
the holes in the clear electrode body line up with the holes
in the end cap. Continue to gently push it into place until
the clear plastic is fully seated in the end cap as shown.
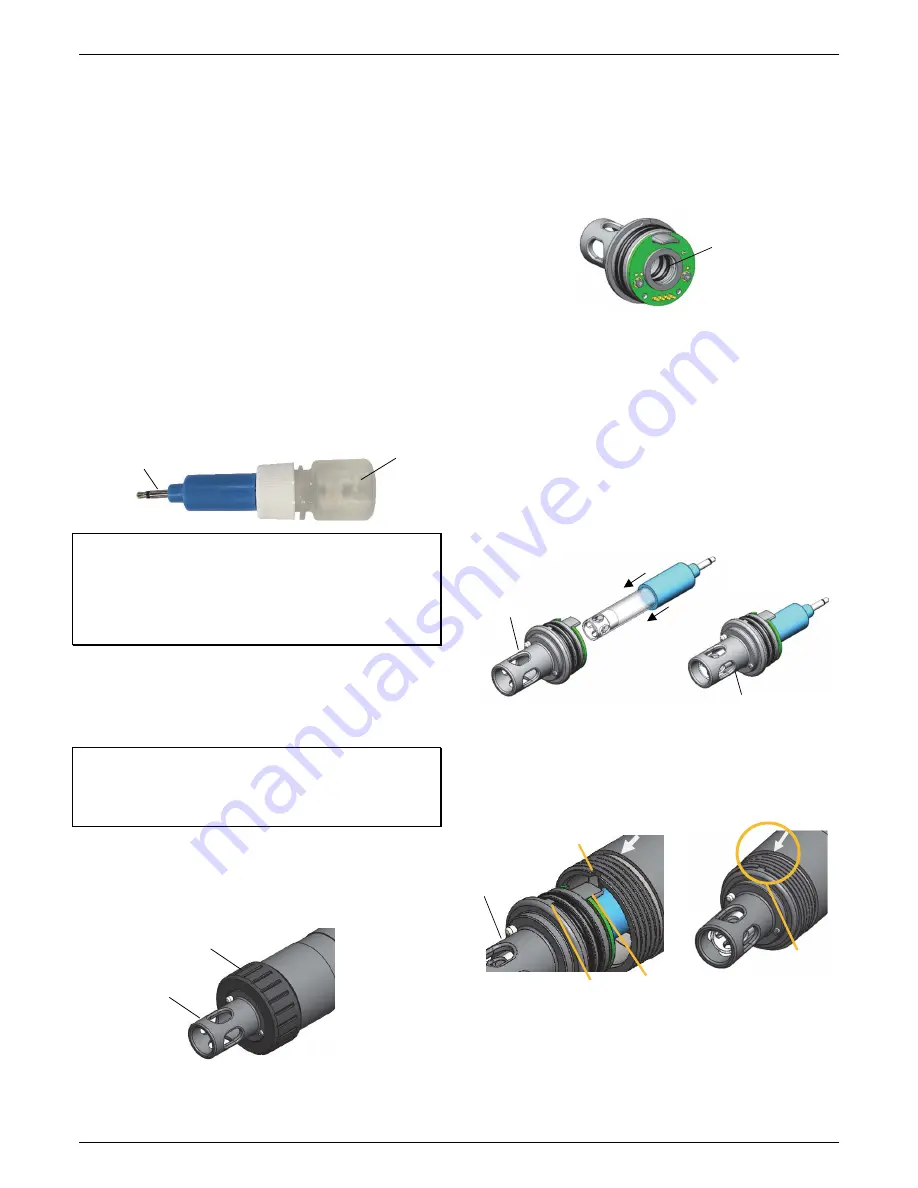
5. Push the sensor end cap back into the logger, making sure
the small tab in the end cap fits in the small groove in the
logger housing. Use the large tab on the end cap and the
arrow on the logger housing to help with proper alignment.
Do not twist or turn the end cap as you push it straight into
position.
6. Screw the closure cap back on the logger.
7. Place the electrode into the storage solution. Slide the
storage solution cap with the rubber grommet on the
sensor end of the logger. Remove the cap from the storage
solution bottle and insert the sensor into the bottle. Screw
pH electrode
pH sensor
in storage
solution
First, unscrew this closure cap
Then, pull this
sensor end cap
straight out
Gently push pH electrode
into end cap and twist the
electrode so the holes in
the electrode align with the
holes in the end cap
pH electrode installed
Use a foam swab dipped in
water to clean the internal
O-rings; use a foam swab
to spread a dot of silicone-
based grease on the
internal O-rings
Push the end cap
back into logger,
aligning tabs with
arrow
Sensor end cap
installed with
correct alignment
Large tab
Small tab
Small groove