BATFLY
250 FPV QUAD RACER USER'S GUIDE
18
USInG ThE FPV SYSTEm
moUnTInG ThE FPV RECEIVER monIToR (READY-To-FLY VERSIon)
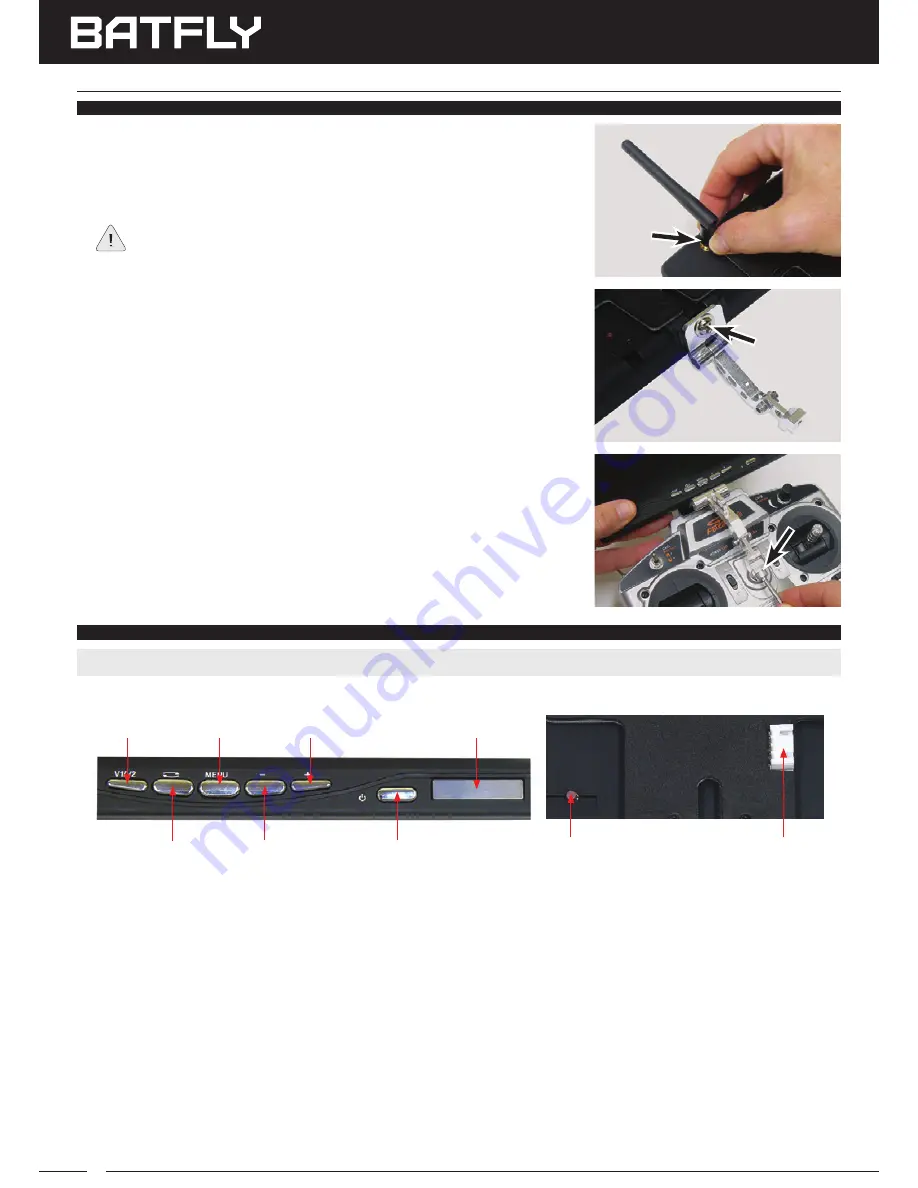
1) Carefully thread the 5.8GHz FPV Receiver Monitor Antenna onto the
antenna mount on the back of the FPV Receiver Monitor and tighten
it gently.
During use, the antenna should be pivoted into the vertical position.
2) Assemble the aluminum mounting arm using the illustration on the
separate sheet included with it as a guide.
3) Secure the aluminum mounting plate to the bottom of the FPV Receiver
Monitor, using the M5 x 8mm pan-head screw included.
The pivot joint
should be toward the front of the FPV Video Monitor.
4) Secure the aluminum mounting arm (with FPV Receiver Monitor attached)
to the transmitter neck strap mount, using the M3 x 10mm socket-cap
screw and aluminum bushing included.
5) Adjust the aluminum mounting arm to angle the FPV Receiver Monitor
viewing angle to suit, then firmly tighten the two adjustment screws to lock
the FPV Receiver Monitor securely in position.
USInG ThE FPV SYSTEm (READY-To-FLY VERSIon)
Prior to using the FPV system, familiarize yourself with the features of the FPV Receiver Monitor.
Channel Scan Button
- Press to manually select channels. Press and HOLD for 3 seconds to begin an automatic
scan of all available channels for the best, most reliable picture.
Decrease
- Press to decrease Menu values.
Increase
- Press to increase Menu values.
V1/V2 Key
- Press to swap video inputs. In most cases, this should be set to AV1.
Menu Key
- Press to change various options, such as Brightness, Contrast, Color, Zoom Mode, Screen Mode,
Language and Reset.
On/Off Key
- Press to power the FPV Receiver Monitor ON and OFF.
Power Input Port
- Used to plug the 3S LiPo battery’s XH balance connector into to power the FPV Receiver Monitor.
Power LED
- Indicates when the FPV Receiver Monitor is receiving power (LiPo battery plugged in). If the LiPo battery
is plugged in and the FPV Receiver Monitor is turned OFF, the Power LED will still illuminate Green. This is normal.
Swap Key
- Press to cycle through the four Screen Modes (how the picture is displayed on the FPV Receiver
Monitor), either UP or DOWN, or NORMAL or REVERSED.
Channel Scan
Increase
Decrease
Menu
Swap
V1/V2
ON/OFF
Power LED
Power Input Port
IMPORTANT:
Before using the FPV system, make sure to remove the lens cover from over the FPV camera!


