Hobbico starfire 40 User Manual Download Page 2

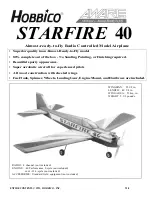
IMPORTANT: BEFORE YOU BEGIN.

Congratulations on your choice of an AWARF kit. BEFORE you begin assembly, carefully look through the box and

thoroughly read the instruction manual. Check the parts list against the items in the box to be sure you have everything that is
on the parts list. Although we have taken great pains to simplify the building process, there are no shortcuts to safety. These
instructions are your guide to safe and successful flying.

Only after you are thoroughly familiar with the construction process should you proceed with assembly. Remember! Under

no circumstances will a dealer accept a kit back for return if assembly has already begun.

If the Starfire is not quite what you expected, return it to your dealer in New and Unused condition. However, we think you

will agree with us that the Starfire kit is one of the finest models of its type and will offer you many hours of enjoyment.

BEFORE ASSEMBLY

CONSTRUCTION HINTS:

1. IMPORTANT! Trial fit each part before gluing.

Be certain that the parts fit properly.

2. Use PlastiZap or a thin type Cyanoacrylate glue for

installing the plastic parts. Do not use too much, as it
may run and spoil the appearance.

3. It is best to use 30 minute (or longer) epoxy for

assembly. This will allow time to position the parts
before the epoxy cures.

4. Before assembly, place your radio system on charge.

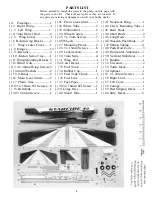
5. There is a metric ruler on page 3 to aid in finding the

correct screw or part sizes.

ADDITIONAL ITEMS

The following items are needed for completing the

Starfire kit:

Medium Fuel Tubing (12") .................................................1
.40 Sized 2-Cycle Engine....................................................1

OR

.61 - .70 Sized 4-Cycle Engine............................................1

4 - Channel Radio System.................................................1
Pacer PlastiZap CA Glue....................................................1

Goldberg #481 Foam Rubber .............................................1
Hobbico (HCAR3950) 30-Minute Epoxy............................1
Silicone Sealer.....................................................................1

Dubro 121 E-Z Connects (Optional)...................................2
Hobbico (HCAR3760)Threadlock...................................... 1
Dubro 340 in line Fuel Filter.............................................1
Propeller (Size depends on the engine) .............................1

Starter

12 V Battery

Glow Driver

Standard field equipment is required for  r u n n i n g the engine:
Starter, 12V Battery, Hot Shot Glow Plug Driver and compatible
glow engine fuel.

O.S. 70 Surpass

4-cycle

O.S. .40 SF

2-cycle

Glow Fuel

l See Engine s

Recommendations)

REQUIRED FOR  R U N N I N G THE ENGINE

TOOLS
You will need the following basic tools to assemble the kit. Hobby
knife. Phillips screwdriver (small and medium), needle nose pliers,
drill, drill bits, sanding block, ruler, and string.

A quality brand engine will be needed. We recommend the O.S.

.40 SF 2-Cycle engine or the O.S. 70 Surpass 4-cycle engine.

RADIO SYSTEM

A four-channel radio control system with 4 servos is required for

the Starfire 40.

2.

Summary of Contents for starfire 40

Page 1: ...batic aircraft for experienced pilots All wood construction with sheeted wings Fuel Tank Spinner Wheels Landing Gear Engine Mount and Hardware are included WINGSPAN 55 1 2 in LENGTH 49 3 4 in WING ARE...

Page 2: ...s best to use 30 minute or longer epoxy for assembly This will allow time to position the parts before the epoxy cures 4 Before assembly place your radio system on charge 5 There is a metric ruler on...

Page 3: ...crank 1 20 3 x 8mm Screw 1 21 Front Gear Strut 22 White Tube 2 23 450mm Rod 2 24 Wheel Collars 7 25 3 x 5mm Screws 7 26 Wheels 3 27 Mounting Plates 2 28 3 x 15mm Screws 8 29 Lockwashers 8 30 3mm Nuts...

Page 4: ...e a mark exactly 1 from the wing root on the leading edge 4 Next using a sanding block sand the wing roots of both wing halves to ensure that they are perfectly flat Be careful not to change the dihed...

Page 5: ...wo wing halves together using slow cure epoxy You can tape the wing halves together to hold them tight while the glue cures 9 Install the wing center cover using Plastizap CA Glue Wipe off any excess...

Page 6: ...ng up the holes The larger block should be at the bottom 13 Align the aileron servo tray on the wing and trace around it using a ball point pen Remove the covering material that was outlined underneat...

Page 7: ...s onto the screws 19 Place the wing onto the fuselage as shown Put the front in first by inserting the dowel rods in the holes It may be necessary to round the tips of the dowel rods and bevel the hol...

Page 8: ...ll the two main gear struts into the wing and attach using the plastic retaining straps and 3 x 10mm self tapping screws You may with to drill eight 1 16 holes to prevent the wood from splitting when...

Page 9: ...l collar on each side ofthe wheel Fasten the collars with 3 x 5mm screws 2 Set the engine on the mounting plates so that the center line of the engine is in line with the center ofthe engine mount Mak...

Page 10: ...tion 7 Install the throttle control rod on the throttle arm ofthe engine 5 Epoxy the white tube into the fuselage so that it sticks out I 8 Slide the throttle control rod into the white tube and attac...

Page 11: ...Slide the cap on until the lip on the fuel tank is in the groove of the cap Then tighten the screw Check to make sure the clunk is free to swing at the bottom of the tank 5 Glue the neoprene ring to t...

Page 12: ...two horns with the larger holes 3 Cut five 3 16 pieces of the clevis retaining tubing You will use two now and three later 1 Check the fit ofyour aileron servo in the aileron servo tray You may have...

Page 13: ...ust the clevises as needed 6 At each mark bend the pushrods at a right angle Next cut off the push rods 6mm from the bend 9 Install the three remaining servos into the tray using the grommets and scre...

Page 14: ...ully cut straight grooves from the holes to the ends Only cut a groove on one side of each end except for the end of the rod with two holes For this end make a groove on both sides 15 Trim out the thr...

Page 15: ...vo into the receiver and check for proper operation 2 Temporarily install the wing Next place the horizontal stabilizer in place Visually inspect the wing and stabilizer to see if they are parallel If...

Page 16: ...nter line Temporarily install the turtle deck as a guide for the fin Check the fin using a 90 angle to ensure that it is straight up and down Let cure 6 Using slow cure epoxy glue the stabilizer in pl...

Page 17: ...stiff continue to exercise until they loosen up 11 Trial fit the rudder onto the vertical fin Notice where the bottom hinge meets the fuselage and mark a spot in the fuselage where the rudder hinge sl...

Page 18: ...rods coming out of the fuselage Screw them on half way up the threads 20 Next make a 90 bend upwards at the mark and cut off the excess so that there is only 6mm of rod after the bend 18 Attach the r...

Page 19: ...wl edges This will allow the glue to adhere better to the plastic Next hold or tape the right side over the flange of the left side and glue together along the inside beam with Plastizap CA glue Let c...

Page 20: ...the plane at this point If not add weight to the nose or the tail until it balances perfectly See below The center of gravity is a very important aspect of setting up an airplane properly It will cont...

Page 21: ...heck the radio operation FLIGHT SAFETY This plane is designed for experienced fliers only NOTE If you are a beginner we suggest that you start off with a trainer aircraft like the Hobbico Flightstar 4...

Page 22: ...severe injury 7 Attach the glow plug clip at this time 8 With quick flipping movements flip the prop in the counter clockwise direction If the engine does not try to start in the first few tries doub...

Page 23: ...ver and result in a loss of range 2 Carefully wrap the receiver in foam and a plastic bag like the receiver battery 3 Make sure that all the servos are plugged tightly into the correct receiver termin...

Page 24: ...HCAA2600 ASAP Extra 300 HCAA2010 AWARF Avistar 40 HCAA2650 ASAP P 40E Warhawk HCAA2100 AWARF Hobbistar 60 HCAA2580 ASAP Telestar 40 HCAA2520 ASAP Telestar 25 HCAA2050 AWARF Flightstar 40 24 Entire con...

Reviews: