


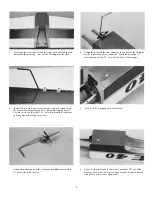


5. Attach the clevises to the aileron horns and slide on the retaining
tubes. After checking the neutral position of the aileron servo
and ailerons, put a mark on the push rods (scratching with a
hobby knife) where the servo arm holes line up. Be sure the
ailerons are in there neutral position.
8. Connect the aileron servo to the receiver and check the movement
of the ailerons. Make sure that both ailerons are neutral when
the servo is neutral. Adjust the clevises as needed.
6. At each mark, bend the pushrods at a right angle. Next, cut off
the push rods 6mm from the bend.
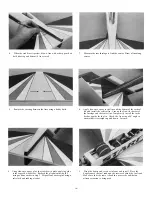
9. Install the three remaining servos into the tray using the
grommets and screws provided with the radio system. Be sure
that the servos are positioned as shown. You may have to trim
the tray slightly for a perfect fit.
7. Attach the rods to the servo arm using the rod clevis. Install the
clevis from the underside of the servo horn then snap onto the
rod.
10. Install the switch into the tray. You will have to drill the two
mounting holes depending on the switch. For a cleaner look,
install the Dubro #203 Kwik-Switch mount.
13.


