


Vertical Stabilizer (Fin):
Vertical tail wing that stabilizes
the model in the “right/left” direction by keeping the tail
behind the nose.
Rudder:
Movable surface connected to the fin. Controls
the turning direction of the model.
Horizontal Stabilizer (Stab):
Horizontal tail wing that
stabilizes the model in the “up/down” direction.
Elevator:
Movable surface connected to the stabilizer.
Controls the main wing angle to make the model climb
or descend.
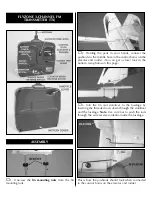
Transmitter (Tx):
Hand-held control box operated by
the pilot that sends signals to the receiver to control the
model for flying.
Receiver (Rx):
Electronic unit in the airplane that
receives signals from the transmitter and relays them to
the servos to operate the controls.
Servo:
An electronic unit inside the model with a small
motor, gears and an external arm that moves the
pushrod connected to the control surface (elevator and
rudder for the Mini Ventura).
Electronic Speed Control (ESC) with Auto Cut-off:
Electronic
unit in the airplane that controls the speed of the motor.
When the battery voltage drops to a certain point the
ESC will automatically cut off the motor, reserving
enough battery power to operate the radio while you
glide and land the airplane.
Trim Tabs:
The sliding tabs on the transmitter that allow
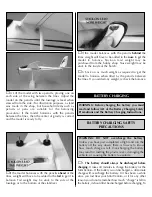
fine adjustments of the control surfaces.
Volt (V):
A Volt is a measure of a battery’s “muscle.” The
battery pack for the Mini Ventura is made up of five
individual 1.2V batteries. Connected together the total
Voltage is 6 Volts (1.2 x 5).
Ampere (A):
An Ampere, or “Amp,” is a measure of the
flow of electricity, or “current.” A milliamp (mA) is one
one-hundredth of an Amp.
Milliamp-Hours (mAh):
Indicates the “size,” or capacity
of a battery pack (and how much energy it can store).
The capacity of the Mini Ventura’s battery is a 600mAh
(.6Ah), so if the battery was connected to an electric
motor that required .6A to run, the battery could run the
motor for about one hour. However, at full power the
Mini Ventura’s motor uses about 7 Amps, so it will run
for about five minutes on the 600mAh battery (.6Ah
battery/7A = .086 hours (5.2 minutes).
Nickel-Metal Hydride (NiMH) Battery:
There are a few
different types of rechargeable batteries. The Mini
Ventura battery pack is a rechargeable NiMH battery.
NiMH batteries are lighter and smaller than most other
types of rechargeable batteries.
GLOSSARY
3


