Hobbico Mini Ventura Instruction Manual Download Page 12

closer in. Allow the MIni Ventura to glide by about ten feet
[3m] in front of you. When it gets too low or after it goes
by  add  power  and  do  it  again.  When  you  are  ready  to
actually  land  do  the  same  thing,  only  this  time  simply
don’t  add  power. As  the  Mini Ventura  gets  closer  to  the
ground apply more and more “up” elevator until it slows
to a stop–right on the ground. The propeller will fold back,
preventing damage. 

Retrieve the model and make a post-flight inspection by
looking at the propeller, wings and tail for any damage. 

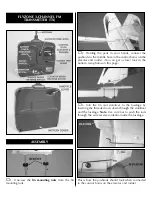
If  any  elevator  trim  was  required,  take  a  look  at  the
elevator  and  make  a  mental  note  of  its  position. With
the transmitter on and the battery plugged in, return the
elevator  trim  tab  to  center,  then  bend  the  pushrod  as
shown in step 7, on page 7, until the elevator will be in
the same position it was before you centered the trim. 

Do  the  same  with  the  rudder. The  idea  is  to  have  the
model fly straight-and-level with the trims centered.

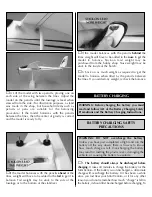
Unplug the battery, then turn the transmitter off. Remove
the battery and allow it to cool before recharging. Allow
the motor to cool before the next flight. 

Caution:

If the propeller is ever stuck and cannot rotate

when power is applied, the battery and speed controller
will overheat. Immediately cut the throttle lever to stop
the motor. If you fail to do this, the motor, speed control
and/or battery will be damaged.

In the hands of intermediate or advanced pilots the Mini
Ventura is capable of aerobatics. Among many thrilling
maneuvers, stall turns and loops are fairly easy and fun.

When  ready  to  attempt  aerobatics,  move  the  elevator
and rudder pushrods to the inner holes on the control
horns. This will require temporary removal of the fin and
stabilizer  so  the  bends  in  the  pushrods  can  be  guided
out of the holes. The closer in on the control horns that
the  clevises  are,  the  more  control  throw  the  control
surfaces  will  have  and  the  more  aerobatic  the  Mini
Ventura will be. 

Beginners should not attempt aerobatics until…they are
no longer beginners and are able to react quickly and
get the model out of adverse situations or avoid adverse
situations altogether!

Stall Turn:

First attempts at stall turns should be initiated

with  plenty  of  altitude  and  with  the  wind,  so  that  the
maneuver finishes into the wind. Stall turns are best done
off to the left or right of the pilot. Fly the model straight-
and-level under full power. Pull elevator until the model is
vertical.  Allow  the  model  to  climb  vertically  while
reducing  power  to  half-throttle.  Just  before  the  model
stops  its  vertical  ascent,  apply  full  left  rudder  until  the
model  pivots  around  the  wing  and  is  now  pointing
downward.  Continue  the  vertical  dive  until  the  Mini

AEROBATICS

AFTER FLIGHT

12

Summary of Contents for Mini Ventura

Page 1: ...bility shall be assumed nor accepted for any damage resulting from the use by the user of the final user assembled product By the act of using the user assembled product the user accepts all resulting...

Page 2: ...You should be especially aware of radio controlled model airplane club sites that may be near by Always look for other R C activity in the area If there is another R C model being operated kindly ask...

Page 3: ...oint the ESC will automatically cut off the motor reserving enough battery power to operate the radio while you glide and land the airplane Trim Tabs The sliding tabs on the transmitter that allow fin...

Page 4: ...starting assembly take an inventory of this kit to make sure it is complete and inspect the parts to make sure they are of acceptable quality If any parts are missing or are not of acceptable quality...

Page 5: ...look in the bottom two photos on this page 3 Join the fin and stabilizer to the fuselage by inserting the threaded rods down through the stabilizer and the fuselage Note Use care not to push the rods...

Page 6: ...evers Move the rudder servo reversing switch to the up position and the elevator servo reversing switch to the down position 4 Move the throttle lever on the transmitter all the way to the left when v...

Page 7: ...rudder and elevator must be done with the radio system on and the trims centered Use a fine point felt tip pen to write your name telephone number and address directly on the model or write it on a p...

Page 8: ...the inside of the hatch 5 Stick on as much weight as required to get the model to balance when lifted by the pencils between the lines If you added any weight recheck the balance 1 The battery should...

Page 9: ...ing the battery for the Mini Ventura 3 Connect the battery charger to a 12 volt accessory socket cigarette lighter in a vehicle The vehicle s engine must not be running Place the charger outside the v...

Page 10: ...vator control stick making sure the controls respond Have an assistant hold the airplane and press the motor start button to start the motor Perform the range test with the motor running The controls...

Page 11: ...vel flight With the Mini Ventura flying directly into the wind see what it does when you let go of the control stick It should fly straight and level If the Mini Ventura climbs it will need some down...

Page 12: ...he throttle lever to stop the motor If you fail to do this the motor speed control and or battery will be damaged In the hands of intermediate or advanced pilots the Mini Ventura is capable of aerobat...

Page 13: ...hub tighten the screws then replace the spinner Be certain the spinner and propeller hub can spin freely and are not contacting the fuselage Replacement parts for the Hobbico Mini Ventura are availab...

Page 14: ...yZone Ventura ARF The Ventura ARF has all of the popular FlyZone advantages rapid assembly easy operation low speed stability and affordability But with an almost 40 wingspan the Ventura is a little f...

Page 15: ...ommended range leaving the sport scale silhouette intact It s flight ready in a matter of hours with molded parts that eliminate shaping while adding authentic details HCAA2090 Hobbico Hobby Craft Kni...

Page 16: ..._____________________ Where Purchased ______________________ Date Assembly Started __________________ Date Assembly Finished ________________ Finished Weight ______________________ Date of First Fligh...

Reviews: