


If not flying at a model airplane flying site, find an area
clear of trees, power lines and other structures. Do not
fly within 6 miles of existing R/C flying fields or around
groups of people–especially children.
Review these flying procedures so you will have an idea
of what to expect when you meet your instructor.
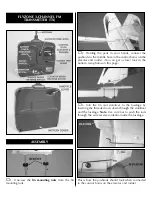
Place the wing on the fuselage. Center the wing from
side-to-side, aligning the arrows with the seam on the
top of the fuselage. First secure the wing with four
rubber bands–one on each side, then with two more
rubber bands in a crisscross fashion.
Tie the red ribbon to the tip of the transmitter antenna. This
will serve as a wind flag to indicate the wind direction.
Always take off and land into the wind.
Don’t forget to scan the area for other modelers who
may be operating R/C models that may be on the same
frequency as you.
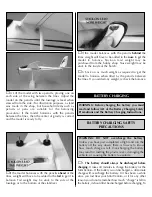
Fully extend the transmitter antenna. Make sure the
throttle lever is in the
off
position and then turn on the
transmitter. Install the battery; then plug it in. Be careful
not to inadvertently bump the motor start button.
Check the controls
before every flight
by moving the
control stick in all directions, observing how the
controls react, and making sure they respond in the
correct direction. Most malfunctions can be discovered
by performing this simple, last-second procedure,
saving your model from a crash.
Perform a range check before each flying session of the
day. Do not push the motor start button during the first
range check. With the antenna collapsed, walk 50 feet
[15m] from the airplane. Move the rudder and elevator
control stick, making sure the controls respond. Have an
assistant hold the airplane and press the motor start button
to start the motor. Perform the range test with the motor
running. The controls should respond as expected. If there
are any “glitches” or unexpected control movements, the
plane is not safe to fly. Make sure the transmitter batteries
are in good condition and make sure the motor battery in
the plane is adequately charged.
Extend the transmitter antenna. Do not press the motor
start button until you are actually ready to launch the
airplane. Scan the area one last time to make certain
there are no spectators, or that any spectators present
are standing
behind
you.
Hold the transmitter in your left hand and hold the
airplane in your right hand (or better, have your assistant
Caution:
It is likely that the Mini Ventura will not fly
straight ahead on the first launch. It may suddenly
dive or climb or turn to the right or the left. This is
impossible to predict because the model has not yet
been adjusted, or “trimmed” for straight-and-level
flight. Even though the controls were centered
visually at home, minor trim adjustments will
probably still be required to get the model to fly
straight. This means you will have to be ready on the
control stick to give corrections
immediately
after
launching. Instructions are provided for how to trim
the model after it has reached a comfortable altitude,
but until then continual control stick input may be
required. After the model has been trimmed it should
fly straight-and-level on its own–this will make the
next hand launch easier. Just remember to be ready to
give
immediate
control stick inputs after launching.
TAKE OFF
CHECK THE CONTROLS
OPTIONAL: INSTALL THE WIND FLAG
MOUNT THE WING
FLYING
10


