
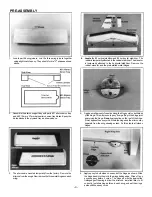


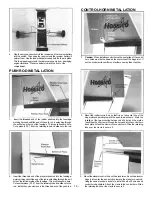


FUSELAGE PREPARATION
1. On the side at the rear of the fuselage use your finger to locate the
stabilizer cutouts. They will be soft spots under the covering on both
sides. Using a sharp knife remove the covering material from the soft
spots on both sides. During the process you will find a balsa tail post.
This must also be removed to allow the installation of the horizontal
stabilizer.
2. Again using your finger locate the vertical stabilizer slot on top of the
fuselage, and remove the covering from this area.
3. The factory has precut the rudder and elevator control rod exit holes.
These are approximately 1/8 inch by 1 inch long. The location
of the rudder exit hole is approximately 61/2 inches forward from the
tail post and on top of the fuselage and slightiy to the right when
viewing the plane from the tail. The area appears slightly darker.
Remove the covering from this area at this time. -8-
The elevator exit hole is located on the left side of the fuselage,
61/2" forward of the tail post and approximately 1 inch above the
bottom of the fuselage. You may be able to detect this as a soft spot
in the fuselage. Remove the covering from the elevator exit hole.
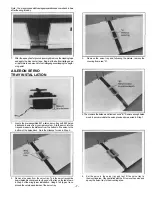
5. The wing dowel holes are also pre-drilled. They are located in the
area indicated in the photo. Using a sharp knife remove the covering
material at this time. There are four holes, two on each side of the
fuselage. Insert the dowels so that they protrude equal distance on
each side of the fuselage. Epoxy part of the dowel protruding from
the sides of the fuselage. This will keep fuel from ruining the dowels.
6. The main landing gear slot is located on the bottom of the fuselage,
approximately 171/2 inches back from the nose (or front) of the
plane. Using a sharp knife remove the covering from this area.


