


❏ ❏
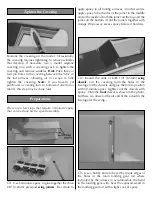
4. Tape a small piece of wax paper or a piece of
plastic from a sandwich bag to the wing under the
aileron torque rod. Coat the “arm” portion of the
torque rod and the hole and the slot in the aileron for
the torque rod with 30-minute epoxy. Immediately
proceed to the next step.
❏ ❏
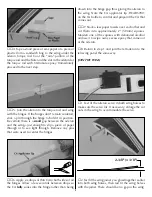
5. Join the aileron to the torque rod and wing
with the hinges. If the hinges don't remain centered,
stick a pin through the hinge to hold it in position.
Be certain there is a
small
gap between the aileron
and the wing—just enough to slip a piece of paper
through or to see light through. Remove any pins
that were used to center the hinges.
❏ ❏
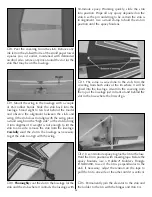
6. Apply six drops of thin CA to both sides of all
the hinges. Allow a few seconds between drops so
the CA
fully
soaks into the hinge rather than being
drawn into the hinge gap thus gluing the aileron to
the wing. Note the CA applicator tip (HCAR3780)
on the CA bottle to control and pinpoint the CA that
comes out.
❏ ❏
7. Stack a few paper towels over each other and
cut them into approximately 2" [50mm] squares.
Moisten one of the squares with denatured alcohol
and use it to wipe away excess epoxy that came out
of the aileron.
❏
8. Return to step 1 and join the left aileron to the
left wing panel the same way.
JOIN THE WING
❏
1. Test fit the aileron servo in both wing halves to
make sure the servo fits. If necessary, enlarge the cut
outs in the wing to accommodate the servo.
❏
2. Test fit the wing joiner you glued together earlier
into both wing halves, then test fit the wing halves
with the joiner. There should be no gap in the wing.
2-3/8" (± 3/8")
9
TH
IN
C
A


