


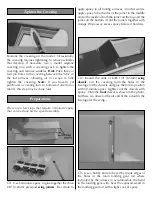


Refer to this photo while mounting the aileron servo.
❏
2. Use epoxy to glue the aileron servo tray to
the wing.
❏
3. Drill 1/16" holes through the servo tray for
mounting the servo. Run the servo screws in and out
of the holes a few times to make some threads in the
wood. Add a few drops of thin CA to the holes and
allow to fully harden. Mount the servo in the wing
using the screws that came with the servo.
❏
4. Make a two-arm servo arm from a four-arm
servo arm by cutting two of the arms off. Mount the
servo arm to the servo.
❏
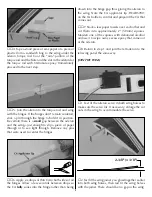
5. Screw a nylon clevis twenty-five full turns onto
a 2mm x 9-7/8" [250mm] pushrod. Make another
pushrod the same way. Screw the nylon
torque rod
horns
twelve full turns onto the aileron torque rods.
❏
6. Connect one of the clevises on the pushrod to
one of the torque rod horns. Make a 90-degree bend
in the pushrod so that when connected to the servo
arm, the aileron will be centered. Fit the pushrod in
the second from the outer hole in the servo arm,
then secure it with a nylon pushrod
keeper
. Cut the
pushrod 1/16" [2mm] from the keeper as shown in
the sketch.
Note:
It may be necessary to enlarge the
holes in the servo arm to fit the pushrod. If so, use a
hobby knife with a #11 blade to carefully enlarge
the holes from both sides of the arm.
❏
7. Connect the other pushrod to the servo arm and
the torque rod the same way.
❏
8. Center the servo arm. Adjust the length of the
pushrods by turning the clevises in or out until both
ailerons are centered.
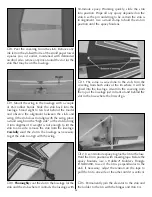
HOOK UP THE CONTROLS
Refer to this photo for the following three steps.
❏
1. Make two one-arm servo arms from the arms
that came with the servos. Also make one two-arm
servo arm.
❏
2. Install the arms on the servos, then test fit the
servos in the 1/8" [3.2mm] plywood
fuselage servo
tray
as shown. If necessary, enlarge the openings in
the tray to accommodate your servos.
❏
3. Drill 1/16" holes through the servo tray for
mounting the servos. Run the servo screws in and
out of the holes a few times to make some threads in
the wood. Add a few drops of thin CA to the holes
to harden the threads. After the CA has fully
hardened, mount the servos in the tray.
❏
4. Refer to the photo at step 6. Use epoxy to
securely glue the servo tray in the fuselage. Cut the
elevator
and
rudder pushrod tubes
so they “end”
approximately 1/8" [3mm] ahead of the former on
the aft end of the servo tray.
Keeper
Pushrod Wire
Servo
Arm
Keeper
16


