HKS DMR-150D Instruction Manual Download Page 11

39

40

 OPERATION & FUNCTIONS OF MULTI BUTTON

 HOW TO USE THE VIEWER MODE

1.Connecting the AV Cable

(1)

Connect the provided AV Cable to the AV OUT Port of the main unit.

(2)

Connect the AV Input Cable to the AV Input terminal of the external monitor and the AV Cable 

from the main unit.

(3)

When the AV Cable is being connected properly, the monitor shows the real-time image from 

the main camera.  To see the real-time image from the Second Camera, press 

Down

of the 

Multi Button to switch the image.

The AV input cable must be equipped with the external monitor.  If an AV input cable is not 

available, contact the distributor of the external monitor.

If the image was not appeared on the monitor, check "Real-time View Set" under the Viewer 

Mode is on.

Button Operation

Functions

Real-time Monitoring

Playing the recorded images Setting Change

Press more than 3 sec.

Starting-up the Viewer Mode

Press (less than 2 sec.)

Execute, Play, Stop

Execute

Move upward

Image from the main camera.

Move up

Move up

Move downward

Image from the second camera.

Move down

Move down

Connecting this product to an external monitor equipped with an AV input terminal can play the recorded 

images or images in real time on the monitor.  Also, setup using a monitor is possible.
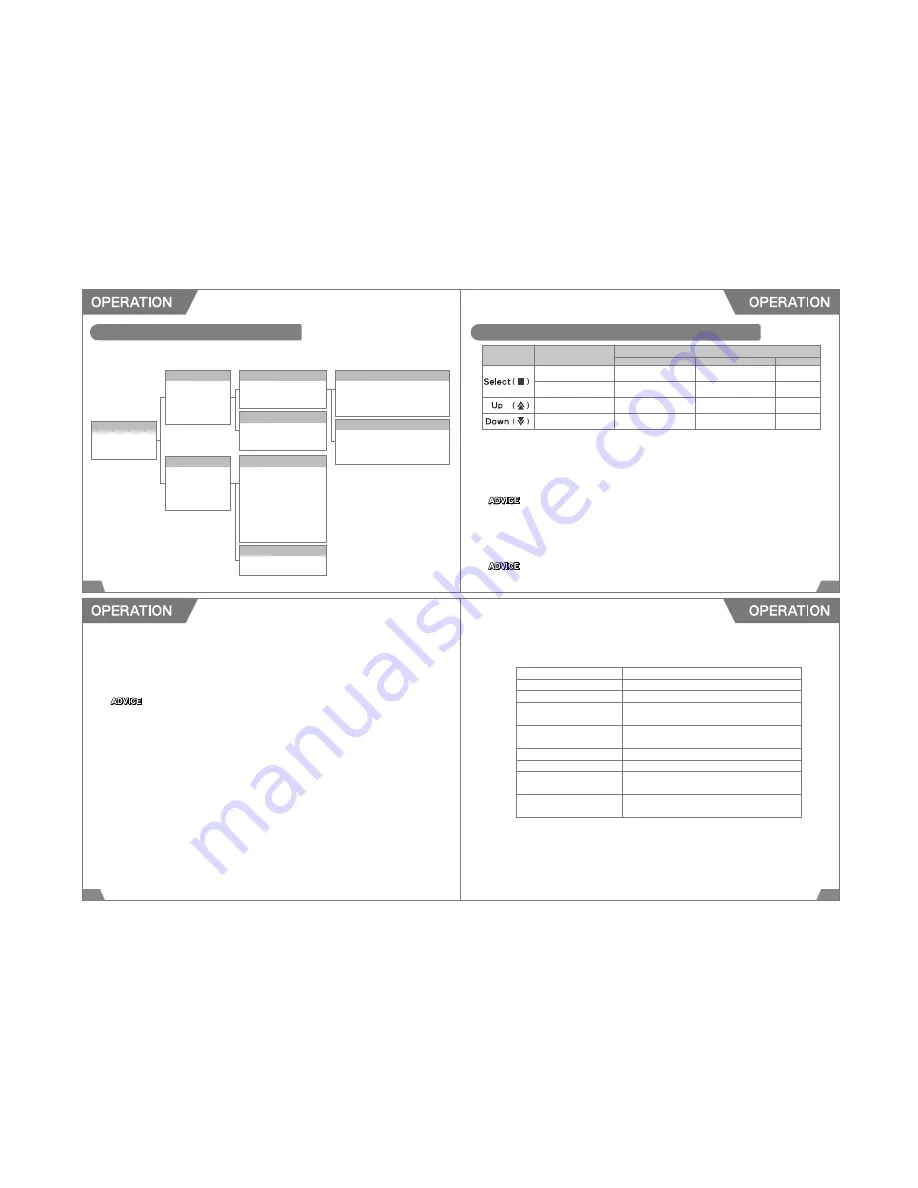
Main Menu

1 .Start Recording

2.Recording Files
3.Configuration

Front Recording Files

Always Recording Files

1 .Previous Menu

2.[CH1]20110407̲163156.mp4
3.[CH1]20110407̲163456.mp4
4.  ・・・

Event Recording Files

1 .Previous Menu

2.[EV1]20110417̲061158.mp4
3.[EV1]20110417̲061527.mp4
4.  ・・・

Rear Recording Files

1 .Previous Menu

2.Always Recording Files
3.Event Recording Files

Blackbox Configuration

1 .Previous Menu

2.Channel Set
3.GMT Set
4.Recording Set
5.G-sensor Set
6.Image Sensor Set
7.Image Brightness Set
8.Buzzer Set
9. Real-time View Set

Firmware Version Info

1 .Previous Menu

2.Firmware Version

Recording Files

1 .Previous Menu

2.Front Recrding

.

Files

3.Rear Recording

.

Files

Configuration

1 .Previous Menu

2.Blackbox

.

Configuration

3.Firmware Version

.

Info

1 .Previous Menu

2.Always Recording Files
3.Event Recording Files

41

42

5.Closing the Viewer Mode

(1)

Return to the menu screen, and select "1.Start Recording" or press the Emergency Recording 

Button once to close the Viewer Mode.

(2)

When completing the start-up, recording is resumed.

4.Changing DMR Main Unit Settings

(1)

Select "3. Configuration" from the main menu.

(2)

Select "2. Blackbox Configuration".

(3)

When completing each setting, close the Viewer Mode, and restart the DMR main unit.  

Without restarting the main unit, setting change(s) will not be executed.

1 .Previous Menu

To return to the previous screen.

2 .Channel Set

To select the recording channel.

3 .GMT Set

To set the GMT. (Set to +9:00 for use in Japan.)

4 .Recording Set

To select Constant Recording Mode or 

Shock Sensing Mode.

5 .G-sensor Set

To set the G-sensor sensitivity.

Smaller number is for higher sensitivity.

6 .Image Sensor Set

To select the main camera's resolution.

7 .Image Brightness Set

To adjust the image brightness.  (1-darkest, 10-brightest)

8 .Buzzer Set

To select to buzz when the main unit start-up is 

completed.

9 . Real-time View Set

To select to show the real-time images on the external

monitor.

2.Starting-up the Viewer Mode

Connect the AV Cable to the external monitor, and press the Multi Button of the main unit more than 

3 seconds.

The Viewer Mode starts up after 3 beeps (when beeping sound is set to on.)

Under the Viewer Mode, setting of the main unit and monitoring the recorded images are possible.

3.Playing the Recorded Images

(1)

Select "2. Recording Files" from the main screen.

(2)

Select "Front Recording Files (Main Camera)" or "Rear Recording Files (Second Camera)".

(3)

Select "Always Recording Files (Recorded under Constant Recording Mode)" or "Event 

Recording Files (Recorded under Shock Sensing Mode)".

(4)

Press the Multi Button to play the images.  Under the Viewer Mode, recent 30 files can be 

monitored.

(5)

Select "1. Previous Menu" to return the previous screen.

Recording of images will be paused under the Viewer Mode.  When the Viewer Mode is closed, 

Summary of Contents for DMR-150D

Page 1: ...installation and or use of this product HKS will not be responsible for any causalities and or property damage caused by an accident Also HKS will not be responsible for any damage or loss of data caused by incorrect use and or malfunction of this product HKS will not be responsible for the expense of the production installation and or removal and the loss caused by the period the vehicle cannot b...

Page 2: ...a this product is mounted If any other device is mounted reflection of said device on the windshield may be recorded 13 Do not subject the product to excessive heat to dry any wet portions Do not use a dryer microwave oven and or stove to dry wet portion to avoid explosion deformation and or damage to the product Contact your dealer for proper way of handling 2 Clean the windshield and lens of thi...

Page 3: ...and all LED gone out before removing the SD memory card 5 Do not leave near magnets or areas with strong magnetic field This can lead to damage or loss of data 7 Back up any data that must be kept for long periods of time When SD memory card capacity is full the oldest data will be overwritten Any data that needs to be saved should be backed up onto an alternative medium such as hard disc or CD R ...

Page 4: ...rk colored light shields may cause poor reception of the GPS Do not install the product around these shields 11 12 6 When a vehicle is moved to another position while the GPS wave cannot be received it will take longer to obtain the current position 7 Speed and distance are calculated by GPS signal The measured values may be different from the actual values due to the condition of the reception 8 ...

Page 5: ...dinary media player cannot play the data 5 Creating Event Report Create an event report displaying the picture G sensor figures and GPS location It s also possible to place a comment 6 Recreating the driving route Driving route can be traced using Google Earth 7 16 Frame Multi Capture The Viewers Multi frame capture feature display 16 frames to analyze events accurately 8 Recording while a vehicle...

Page 6: ...he second camera 9 Microphone LED Indicate the status of the microphone 10 Emergency Record Button Record during an emergency Switch the microphone on and off 11 Status LED Indicate the status of power and operation conditions 12 GPS LED Indicate the GPS connection status 13 Microphone Record sounds 14 SD Memory Cart Slot Insert the SD memory card to save data No Name Function DMR Main Unit AV Cab...

Page 7: ...cket to the wind shield using double side tape Install the unit to the position where is within 20 of the windshield s length from the top edge that is parallel and vertical to the vehicle s center line except on the weatherstrip moldings and masking area or behind the rearview mirror See the diagram below Make sure not to distract driving or the airbag operation Also make sure to install the area...

Page 8: ...cure cables using the provided clips not to distract driving to prevent possible accident 7 Connect the Second Camera to the DMR main unit using the provided Power AV Cable 8 Remove the protection cap from the Second Camera 6 Adjust the angle of the Second Camera Secure the camera using the provided small Screw 9 Plug in the Power Cable to the DMR main unit and the cigar lighter socket 10 Start th...

Page 9: ...a splice or electro tap splice 6 Connect to Power Supply Line Make sure to maintain adequate distance between the Constant Power Supply Unit and antenna and or antenna wires of other electrical devices to prevent poor reception Input Voltage Switch Power Switch Power Switch 34 OPERATION 33 1 Turn On the Power 2 Start Recording 1 Make sure the Power Cable is plugged in the DMR main unit properly an...

Page 10: ...eceived especially at beginning the file name may not reflect the correct recorded date DMR Main Unit Starting up After Starting up During reception of GPS Signal In Operation Detection of Shock Impact Optional Recording Microphone ON Connection Status Button Input LED Status Left Power Operating Condition Right GPS Side Microphone Beeping Sound 37 38 LED and Beeping Sound Setting Power is on Colo...

Page 11: ...ecording Files Configuration 1 Previous Menu 2 Blackbox Configuration 3 Firmware Version Info 1 Previous Menu 2 Always Recording Files 3 Event Recording Files 41 42 5 Closing the Viewer Mode 1 Return to the menu screen and select 1 Start Recording or press the Emergency Recording Button once to close the Viewer Mode 2 When completing the start up recording is resumed 4 Changing DMR Main Unit Setti...

Page 12: ...in unit and eject the SD memory card from the DMR main unit after all LED go out and insert the memory card to the USB card reader connected to the PC 2 Starting up the Installer Double click DMR_en msi file in the SD memory card 3 Executing the Installer Execute the installer and follow the installation guide A USB card reader is not included to this product it must be prepared separately 46 45 4...

Page 13: ...sistance is required please contact your dealer The unit does not power on If the LED Red Purple Blue do not come on after power is on make sure the Power Cable is con nected properly Contact your dealer if LED still do not come on even the Power Cable is properly connected the SD memory card may be damaged If the LED Red Purple Blue comes on dimly and the DMR does not work disconnect the power ca...

Page 14: ...f this manual consult a professional If the vehicle gets damaged have the repairs performed by a professional If you experience any abnormal noises scents or vibrations from the vehicle while driving reference the factory service manual Names of product company etc included in this manual are commonly used trademarks and or registered trademarks This manual does not show the symbols of Trademark T...

Reviews: