


11
10
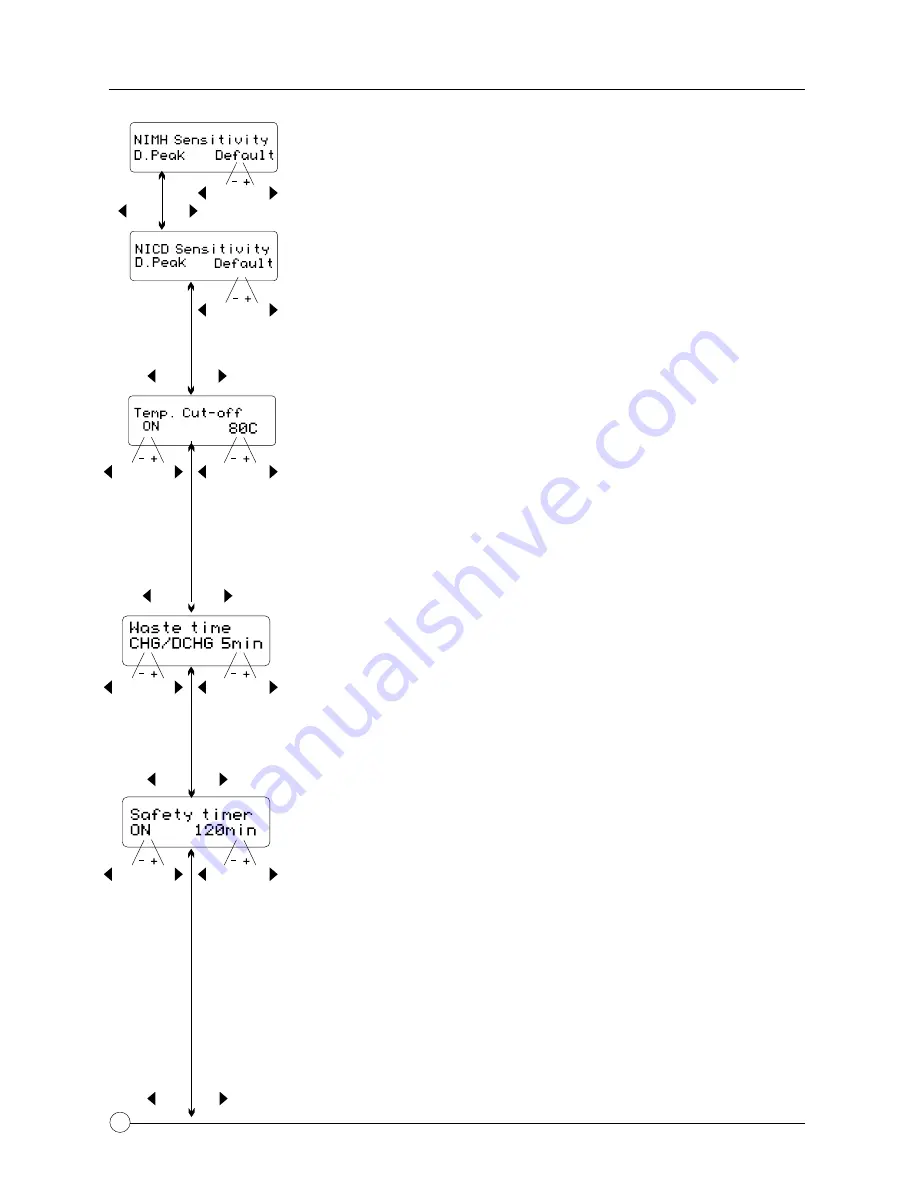
NiMh & NiCd Delta Peak Sensitivity Setting
This feature sets the cutoff voltage for the automatic charge
termination of a NiMH and NiCd battery pack. The setting can
range from 5 to 20mV per cell, the default is 12mV for NiCd
batteries and 7mV for NiMH, the parameters are set individually
for NiCd and NiMh batteries. If the cutoff voltage is too high,
there is a danger of overcharging the battery, if it is too low there
is a possibility of premature charge termination. Refer to the
battery manufacturer’s specifications to determine the proper
setting. Once you have established the desired settings press
Start/Enter
to confirm the setting then press
INC
to move on to
the next parameter.
Capacity Cutoff Setting
The charging software allows the user to create a maximum
charge capacity protection setting. If the delta-peak voltage is not
properly detected or the safety timer times out, the charge process
will stop automatically when the battery reaches the set maximum
charge capacity set by the user. Once you have established the
desired settings press
Start/Enter
to confirm the setting then press
INC
to move on to the next parameter.
Sound Settings (Key & Buzzer Mute)
A beep sounds to confirm the every time the user presses a button,
additionally a sound is emitted during the operation of the charger
to confirm a different mode change. These functions can be
switched on or off. Once you have established the desired settings
press
Start/Enter
to confirm the setting then press
INC
to move on
to the next parameter.
Low Input Voltage Setting
This function monitors the input voltage of the DC power source
used to power the charger. If the voltage is lower than the user
setting, the program will end forcibly to protect the input source.
Once you have established the desired settings press
Start/Enter
to confirm the setting. You have now set the initial user settings.
You can repeat this procedure for the other Channels.
Temperature Cutoff Setting
You can choose whether or not you want to use the automatic
temperature cut off when using the optional temperature
sensors. When turned on you can set the maximum temperature
at which the charger should allow the battery to reach during
charging. Once a battery reaches this temperature, the charge
or discharge process will be terminated to protect the battery.
Once you have established the desired settings press
Start/Enter
to confirm the setting then press
INC
to move on to
the next parameter.
Waste Time Setting
When charge/discharge cycling a battery the battery will become
warm. You can set a time delay ranging from 0 to 60 minutes
after each charge/discharge process to allow the battery to cool
down before starting the next charge/discharge cycle. Once you
have established the desired settings press
Start/Enter
to
confirm the setting then press
INC
to move on to the next
parameter.
Safety Timer Setting
When the charge process starts, the integrated safety timer runs
simultaneously. If an error occurs or the charge termination
circuit cannot detect if the battery is fully charged, this setting will
terminate the charge process to prevent overcharging. Use the
Safety Timer Calculation below to determine the proper setting.
Safety Timer Setting Calculation
To determine the correct safety time setting when charging NiCd
or NiMH batteries, divide the capacity by the current, and then
divide the result by 11.9. Set the results of this calculation as the
number of minutes for the safety timer setting. If the charger
stops at this time threshold, about 140% of the capacity will have
been fed into the battery.
Example:
2000mAh 2.0A
(2000/2.0=1000)/11.9=84 minutes.
CONNECTING THE BATTERY
WARNING
Before connecting a battery, it is absolutely essential to check that you have set the
parameters correctly. If the settings are incorrect, you can damage the battery and create
a dangerous situation that could result in serious damage or injury.
Connecting the Battery
To avoid creating a short circuit between the banana plugs always connect the charge
leads to the charger first, and then to the battery. Reverse the sequence when disconnect-
ing the pack.
Connecting the Balancer Socket
These pictures show the correct way
to connect your battery to the Hitec
X4 AC Plus for charging in the
balance mode. The balance socket
attached to the battery must be
connected to the charger with the
black wire aligned with the negative
marking. If your battery’s balancer
socket does not fit in the socket
make sure to use the proper adapter
board for you battery type.
1
2
3
4
5
6
+
S
2
+
S
1
+
S
3
DEC INC
DEC INC
DEC INC
DEC INC
DEC INC
DEC INC
DEC INC
DEC INC
DEC INC
DEC INC
DEC INC
DEC INC
DEC INC
DEFAULT USER PREFERENCES SETUP
DEFAULT USER PREFERENCES SETUP
DEC INC
DEC INC
DEC INC
DEC INC
DEC INC
Summary of Contents for multi cahrger X4 AC Plus
Page 1: ......
Page 14: ...12 PROGRAM FLOW CHART...
Page 27: ...25 USER NOTES...
Page 28: ...All specifications and figures are subject to change without notice...


