background image

36  

37  

Switch On Wi-Fi

1.  Press the Wi-Fi key as shown in the fi gure below.

If the Wi-Fi function is enabled, the Wi-Fi icon " 


" will appear 

on the top of the screen.

 Do not perform any key operations while waiting for the 

     Wi-Fi to connect or disconnect.

2.  Turn your camera on and wait until the blue Wi-Fi indicator 

flashes slowly. Search for a Wi-Fi hot spot on a mobile 
receiving device. Select the "AEE Magicam" network and 
connect (default password: AEE12345). The camera and 
the mobile device are now connected.

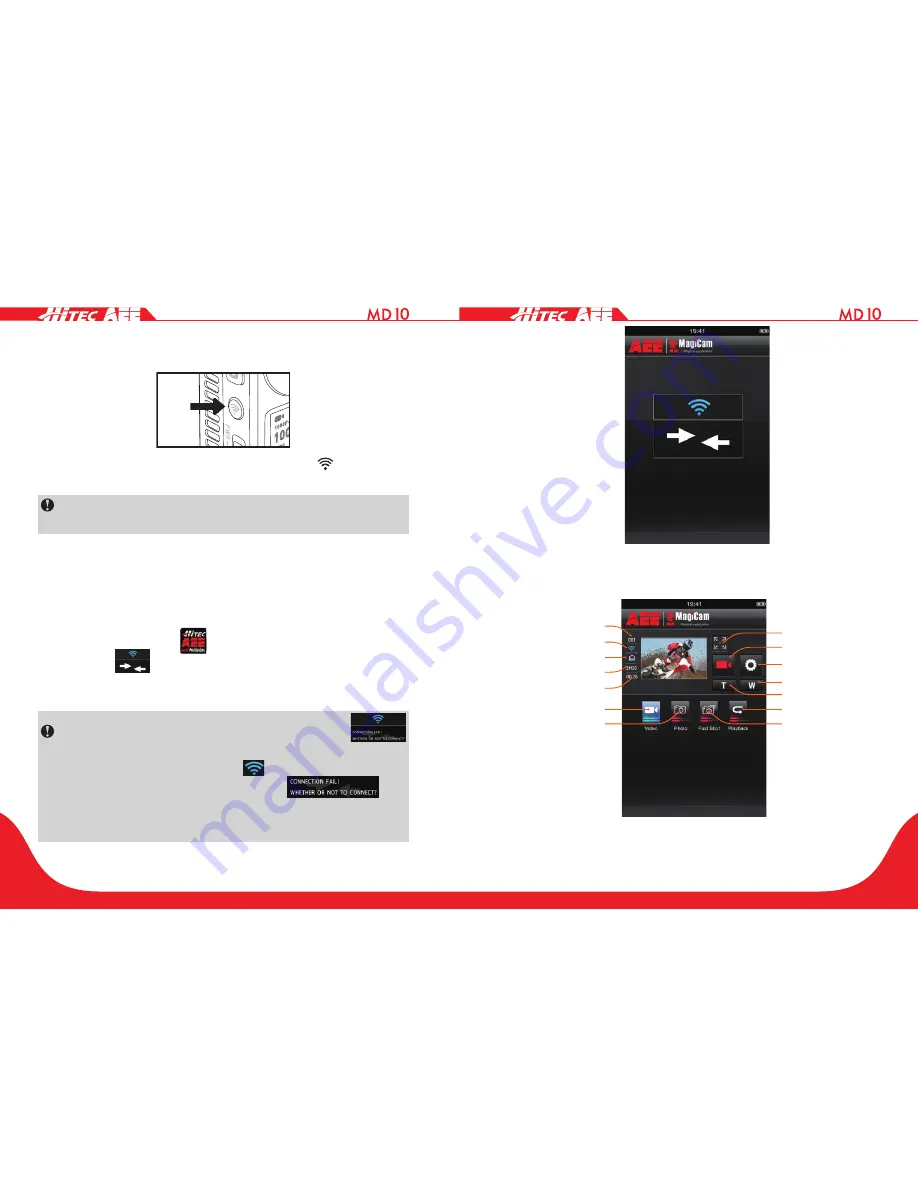
3.  Click the App icon " 

 " on the mobile device to display 

the icon " 

 " shown in Fig. 1. Enter the interface shown 

in Fig. 2 to remotely view your camera’s screen and set up 
its parameters.

 In the case of Wi-Fi connection failure, the icon " 


will appear. Select "Yes" to try to connect again. If you 
select "No," click the icon" 

 " to enter the WLAN 

settings interface or click the icon " 

 " to 

enter the main interface to view local fi les only (Available 
to Android users only).


Fig. 1 Wi-Fi Connection Interface

1
2
3
4
5
6

7

8

9

10

11

12

13

14

Fig. 2 Wi-Fi Control Interface

Summary of Contents for AEE MD 10

Page 1: ......

Page 2: ...4 LCD Segment Display 15 Preparations Before Use 16 Charging 16 Insert and Remove the Memory Card 16 Startup 17 Voice Activated Power On 18 Language 18 Date and Time 19 Video Mode Selection and Applic...

Page 3: ...33 TV Output Format 33 Format 33 Recover Factory Settings 33 Playback 34 Upload Audio Video Photo Files to PC 34 View Video Photo On HDTV 34 Wi Fi 35 Download Wi Fi App 35 Switch on Wi Fi 36 Wi Fi Co...

Page 4: ...f even the most discerning user Precautions When using the MD10 video camera adhere to the following precautions 1 Do not drop knock or shake the video camera 2 Do not place the video camera near an o...

Page 5: ...esolution Provides extended capacity voice recording Performs 4X digital zooming LCD Screen Wi Fi function and more app application Voice activated video recording function with long standby time A mu...

Page 6: ...h TF cards for storage up to 64 GB capacity Provides automatic standby for power saving and can be set to auto save audio and video data List of Accessories MD10 Camera Waterproof Housing Remote Contr...

Page 7: ...ay be slightly different from above The package is subject to change without further notice You can order the optional accessories marked with Component Guideline 1 2 3 4 5 6 7 8 9 10 11 12 13 1 Recor...

Page 8: ...d Voice recording Remain on Blink slowly Blink slowly in green Low power Blink quickly Blink quickly in red Being charged Blink slowly Blink slowly in red Charging finished Remain on Remain on in red...

Page 9: ...sert the memory card first ensure that the MD10 is switched off Next insert your SD card into the memory card slot in the direction of the arrow keeping the card flat and pushing it to the end A click...

Page 10: ...press the Record key 5 Press the Wi Fi key to select the required language and then press the Record key to confirm your selection 6 Press the Shoot key to exit Date and Time 1 Long press the Record k...

Page 11: ...ithin 3s the MD10 will auto enter the selected menu mode or you can enter such mode directly by pressing the Record key See the following explanations for menu icons Icon Functions Icon Functions Vide...

Page 12: ...ey to start video recording and enter the following interface 00 00 01 2H30 1080P 25 5sec 2 Press the Record key again to stop video recording Timed Recording Users can set a time interval for timed r...

Page 13: ...lowing interface 1888 5M 3 100 0081 Continuous Shooting In this mode you can shoot photos continuously under the pre set time interval until you press the Record key 1 Press the Shoot key to take phot...

Page 14: ...picture as a frame of the video every 1s 2sec Record a picture as a frame of the video every 2s 5sec Record a picture as a frame of the video every 5s 10sec Record a picture as a frame of the video ev...

Page 15: ...clearer image and larger file size Video Content Loop You can activate or deactivate the loop recording function If the function is ON the video file will be automatically stored in segments of 10 min...

Page 16: ...8 photos in one second Continuous 0 5sec Shutter a photo at 0 5s intervals after you press the Shutter key 1sec Shutter a photo at 1s intervals after you press the Shutter key 2sec Shutter a photo at...

Page 17: ...tus Indicator You can set the work indicator to On or Off On Screen Display This function allows you to show On or hide Off the recording icon and video photo details when you watch videos photos on a...

Page 18: ...erica video format otherwise the video and images on the MD10 cannot be properly displayed on screen Use an HDMI cable to connect the MD10 to the TV set This function is not available when opening Wi...

Page 19: ...ord AEE12345 The camera and the mobile device are now connected 3 Click the App icon on the mobile device to display the icon shown in Fig 1 Enter the interface shown in Fig 2 to remotely view your ca...

Page 20: ...to shooting mode The mobile device must be used within a maximum distance of 100 meters from the MD10 at a horizontal angle in an obstacle free zone The real time preview is unavailable for video reco...

Page 21: ...4 Single Mode You can set pixilation through the parameter setting interface 3 Fast Shot Click the Fast shot mode icon and notice that it turns to a blue The current state icon will display as Click i...

Page 22: ...lick the icon to enter the App settings interface Click the icon to return to the WiFi control interface Click the icon to enter File selecting C l i c k t h e i c o n t o download media files from th...

Page 23: ...In the thumbnail preview mode slide the icon to view local files Click the icon to access the interface shown in the figure below and then select the desired files to share them on social networking...

Page 24: ...e as the ending frame Change Wi Fi Connection Name and Password 1 To change the Wi Fi connection name Connect your camera with TF card installed to the computer and turn your camera on On the computer...

Page 25: ...ring the mode selection state press to select the option above Under the video recording mode press once to switch the current mode to the photography mode Under the photography mode press once to tak...

Page 26: ...control code pairing should be completed between it and the MD10 1 Turn on the MD10 and enable its Wi Fi function 2 Press and hold the stop key and then long press the power record key for 5s to turn...

Page 27: ...rtup please turn off the power to the remote control 6 The remote control is able to connect to one host only each time It cannot connect to multiple hosts simultaneously 7 If the remote control disco...

Page 28: ...and Wi Fi key simultaneously for 5s again to turn off the MD10 Follow these steps to install the MD10 into its water proof housing Follow these steps to assemble the waterproof housing rear case The p...

Page 29: ...waterproof housing adhere to the following precautions 1 Do not randomly remove or change the O ring key or lens cover Otherwise the waterproof performance deteriorates 2 Do not put the waterproof hou...

Page 30: ...time it is suggested that you charge it once every six months to maintain optimal battery performance 3 Use of the digital zooming function during shooting will slightly impact image quality 4 The vis...

Page 31: ...adio communications However there is no guarantee that interference will not occur in a particular installation If this equipment does cause Harmful interference to radio or television reception which...

Page 32: ......

Reviews: