background image


3

Making a Basic Recording

................................................................................................................ 30 

Using Instant Review

......................................................................................................................... 31 

Using Auto Focus

............................................................................................................................... 31 

Using Manual Focus

.......................................................................................................................... 33 

Using the Power Zoom

...................................................................................................................... 33 

Using the Digital Zoom

...................................................................................................................... 33 

Using the INST. ZOOM (Instant Zoom) Button

.............................................................................. 34 

Using Macro

........................................................................................................................................ 34 

Active Screen

...................................................................................................................................... 35 

Playback

............................................................................................................................................... 35 

Simple Playback (Using the Electronic Viewfinder or LCD monitor)

.......................................... 36 

Using Still

............................................................................................................................................. 36 

Using Forward and Reverse Search

............................................................................................... 36 

Playing Back Your Recording on Your TV

..................................................................................... 37 

Connecting to a Television with a VCR Attached

.......................................................................... 37 

Connecting to a Television with Audio In and Video In Jacks

..................................................... 38 

Connecting to a Television without Audio In and Video In Jacks

............................................... 39 

Advanced Techniques ............................................................................................................................... 40 

Changing the Angle of the LCD Monitor when Recording

........................................................... 40 

Recording an Image of Yourself while Monitoring the LCD Screen

........................................... 40 

Date Recording

................................................................................................................................... 41 

Digital Effects Recording

................................................................................................................... 43 

16x9 Mode Recording

........................................................................................................................ 44 

Negative/Positive Recording

............................................................................................................. 45 

X130 Digital Zoom Recording

........................................................................................................... 45 

Half-Mirror Recording

......................................................................................................................... 45 

Mosaic Recording

............................................................................................................................... 46 

Using Fade

.......................................................................................................................................... 46 

Fading In

.............................................................................................................................................. 47 

Fading Out

........................................................................................................................................... 47 

Using the Electronic Image Stabilizer (only for VM-E635LA)

...................................................... 47 

Using Quick Edit

................................................................................................................................. 48 

Using the Display Button

................................................................................................................... 48 

Date Search

......................................................................................................................................... 49 

Using Memory

..................................................................................................................................... 50 

Using the Wireless Remote Control

................................................................................................ 50 

Attaching the Optional Wide or Tele Converter Lens

................................................................... 51 

Creating and Recording A Title

........................................................................................................ 51 

Creating a Title

.................................................................................................................................... 52 

Correcting Errors

................................................................................................................................ 52 

Recording Title on a Tape in the Camcorder

................................................................................. 53 

Recording a Created Title while Transferring a Tape

................................................................... 53 

Dubbing from the Camcorder to a VCR

.......................................................................................... 53 

Simple Programmable Edit (Edit remote control is optional accessory)

.................................... 54 

Programming the Remote Control for the VCR

............................................................................. 54 

Operation

............................................................................................................................................. 56 

To End Programmable Simple Edit

................................................................................................. 58 

Using Audio/Video Dubbing

.............................................................................................................. 58 

General Maintenance................................................................................................................................. 60 

Cleaning the Camcorder Heads

....................................................................................................... 60 

Summary of Contents for VM-E535LA

Page 1: ...ad 3890 Steve Reynolds Blvd Norcross GA 30093 Missisauga Ontario L5N 2L8 Tel 770 279 5600 CANADA Tel 905 821 4545 HITACHI SALES CORPORATION OF HAWAII INC 3219 Koapaka Street Honolulu Hawaii 96819 Tel 808 836 3621 Thank you for buying a Hitachi product Please take time to become familiar with the manual and how it is set up Keep it handy for feature reference QR17263 Hitachi Ltd 1997 Printed in Jap...

Page 2: ...ck 20 Removing the Battery Pack 21 Checking the Battery s Charge 21 Using Alternative Power Sources 21 Using the AC Adapter Charger 21 Using a Car Battery 22 Inserting and Removing Cassettes 22 Inserting a Cassette 22 Removing a Cassette 23 Protecting Recorded Material 23 LCD Monitor 24 Opening the LCD Monitor 24 Adjusting the Brightness of the LCD Screen 24 Range in which the LCD Monitor can be m...

Page 3: ... 40 Date Recording 41 Digital Effects Recording 43 16x9 Mode Recording 44 Negative Positive Recording 45 X130 Digital Zoom Recording 45 Half Mirror Recording 45 Mosaic Recording 46 Using Fade 46 Fading In 47 Fading Out 47 Using the Electronic Image Stabilizer only for VM E635LA 47 Using Quick Edit 48 Using the Display Button 48 Date Search 49 Using Memory 50 Using the Wireless Remote Control 50 At...

Page 4: ... Periodic Maintenance 61 Troubleshooting 61 Specifications 64 General Specifications 64 Video Recorder Specifications 64 Camera Specifications 64 Available Accessories 65 To Order in the United States 65 By Phone 65 By Mail 65 FOR AUTHORIZED HITACHI SERVICE IN CANADA 65 ...

Page 5: ...mportant literature concerning the operation and maintenance of this unit has been included Therefore it should be read carefully to avoid any problems WARNING Many television programs and films are copyrighted In certain circumstances copyright law may apply to private in home videotaping of copyrighted materials This Class B digital apparatus meets all requirements of the Canadian Interference C...

Page 6: ...cted Consult the dealer or an experienced radio TV technician for help Caution to the user Changes or modifications not expressly approved by the manufacture could void the user s authority to operate the equipment Note to CATV system installer This reminder is provided to call the CATV system installer s attention to Article 820 40 of the NEC that provides guidelines for proper grounding and in p...

Page 7: ...t use this polarized plug with an extension cord receptacle or other outlet unless the blades can be fully inserted without blade exposure If you need an extension use a polarized cord 5 Power Sources This video product should be operated only from the type of power source indicated on the marking label If you are not sure of the type of power supply to your home consult your video dealer or local...

Page 8: ... an unstable card stand tripod bracket or table The video product may fall causing serious injury to a child or adult and serious damage to the appliance Use only with a cart stand tripod bracket or table recommended by the manufacturer or sold with the video product Any mounting of the product should follow the manufacturer s instructions and should use a mounting accessory recommended by the man...

Page 9: ...nel 18 Conditions Requiring Service Unplug this video product from the wall outlet and refer servicing to qualified service personnel under the following conditions a When the power supply cord or plug is damaged b If liquid has been spilled or objects have fallen into the video product c If the video product has been exposed to rain or water d If the video product does not operate normally by fol...

Page 10: ...ected to damage or stress 9 Do not operate charger with damaged cord or plug replace them immediately 10 An extension cord should not be used unless absolutely necessary Use of improper extension cord could result in a risk of fire and electric shock If extension cord must be used make sure A The pins on plug of extension cord are the same number size and shape as those of plug on charger B That e...

Page 11: ...oving on A Getting Started section to familiarize yourself with the controls and prepare you for recording A Basic Techniques section to allow you to use your video camcorder quickly and confidently before advancing to the more sophisticated features of the Hitachi VM E535LA VM E635LA Advanced Techniques to help you with some of the exciting sophisticated features of the Hitachi VM E535LA VM E635L...

Page 12: ...odels VM E535LA VM E635LA VM E535LA VM E635LA EIS function No Yes This instruction manual shows the illustrations for the VM E635LA With this camcorder you can view the picture being recorded or the playback picture whether on the LCD monitor or in the viewfinder Opening or closing the LCD monitor switches the picture to appear on the LCD monitor or in the viewfinder The following text describes t...

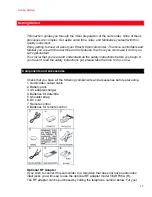
Page 13: ...all the safety instructions before you begin If you haven t read the safety instructions yet please take the time to do so now Components and Accessories Check that you have all the following components and accessories before preceding 1 Audio video output cable 2 Battery pack 3 AC adapter charger 4 Batteries for date title 5 Shoulder strap 6 DC cord 7 Remote control 8 Batteries for remote control...

Page 14: ...small button in the opener as you slide it to CLOSE However you need not hold it down to slide the opener to OPEN 4 Electronic Viewfinder 5 Diopter Control To use the electronic viewfinder turn this control for your optimum focus adjustment 6 Microphone Sensitive to sounds coming from the direction in which the camera is pointed 7 Record Indicator This indicator lights when the camcorder is record...

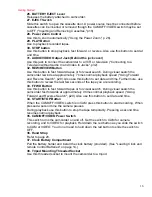
Page 15: ...to record Setting the Date and Time p22 and Date Recording p35 In the VIDEO mode the DATE DISP button is used as the DISPLAY button Using the Display Button p40 Note Be sure to insert the clock battery before setting the date and time or creating a title 21 FOCUS Control Buttons Press these buttons simultaneously to select manual or automatic focus For manual focusing Using Manual Focus p26 press ...

Page 16: ...t date and time Furthermore use this button to review the last few seconds of the tape you are recording 33 F FWD Button Use this button to fast forward tapes or for visual search During visual search the camcorder fast forwards at approximately 9 times normal playback speed Using Forward and Reverse Search p29 Also use this button to set date and time 34 START STOP Button When the CAM OFF VIDEO s...

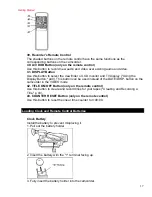
Page 17: ...utton p40 This button can be used instead of the DATE DISP button on the camcorder in the VIDEO mode 42 TITLE ON OFF Button only on the remote control Use this button to create and record titles for your tapes Creating and Recording a Title p 43 43 COUNTER RESET Button only on the remote control Use this button to reset the linear time counter to 0 00 00 Loading Clock and Remote Control Batteries ...

Page 18: ...the battery Note Do not hold the battery with the metallic tweezers Note Do not recharge the battery Note Keep the battery in a dark cool dry place Remote Control Batteries The remote control requires two AA batteries 1 Slide the cover in the direction of the arrow to remove it 2 Install batteries Be careful to install with correct polarity 3 Re attach the cover to the remote control Cautions on t...

Page 19: ...er the lamp goes out unplug the AC adapter charger from the AC outlet and remove the battery from the AC adapter charger Note You can use the battery before it is completely charged Note Remove the DC cord from the AC adapter charger before attempting to charge the battery Note If you re attach the fully charged battery to the AC adapter charger after the CHARGE lamp goes out the lamp will light T...

Page 20: ...ery is unable to take a charge and must be replaced Do not attach a hot battery to the AC adapter charger Allow it to cool Attaching a hot battery to the AC adapter charger causes the POWER lamp to flash THERE ARE NO USER SERVICEABLE PARTS INSIDE THE BATTERY OR AC ADAPTER CHARGER THROWING THE BATTERY INTO FIRE OR EXPOSING IT TO EXCESSIVE HEAT ABOVE 140 F 60 C MAY CAUSE INJURY SHORTING THE BATTERY ...

Page 21: ...of six symbols displays when the battery is used This flashing symbol indicates a battery nearly out of power Use an alternative power source or charger the battery before continuing to use the camcorder Note The battery charge indicator does not appear when the camcorder is powered by the AC adapter charger Using Alternative Power Sources Using the AC Adapter Charger Please ensure that the CAM OF...

Page 22: ...sing a Car Battery The camcorder can be powered with a car battery by using an optional car battery cord Hitachi VM CC80A to plug the camcorder into the car s cigarette lighter socket Please ensure that the CAM OFF VIDEO switch is in the OFF position whenever attaching or detaching any power supply ie battery AC adapter charger etc 1 Plug the car battery cord into the car s cigarette lighter socke...

Page 23: ...loses Caution Be sure that you push the cassette holder embossed PUSH LOCK to close the holder Otherwise the holder will not click into place and the tape may be slack which could lead to damage Note If TAPE flashes in the viewfinder or LCD monitor remove the cassette and check that the tape is not damaged is not slack or no dust adheres to it etc After making sure that there is no abnormality rei...

Page 24: ...onitor Adjusting the Brightness of the LCD Screen Note Even when the picture on the LCD monitor is adjusted the recorded video will not change 1 Load the battery Loading Batteries Camcorder Batteries p16 Press the red button on the CAM OFF VIDEO switch as you slide it to CAM or VIDEO 2 Use the BRIGHT control on the side of the LCD monitor to adjust the brightness of the LCD screen Range in which t...

Page 25: ...t could cause a malfunction The LCD monitor cannot be closed if it is tilted Close the LCD monitor after making sure it its parallel with the camcorder If you were to close the monitor while it faces the same direction as the lens or it is diagonal it could damage the LCD monitor Do not disassemble the LCD monitor as this might cause a malfunction When opening the LCD monitor be careful that no wa...

Page 26: ...l the way and turn the diopter control for your optimum focus adjustment Note Be sure to pull out the eye cup all the way so that you can see the subject in the viewfinder clearly Note Hold the knobs on both sides of the eye cup stem to pull out the eye cup Note The eye cup stem can be retracted when the camcorder is being carried Adjustment the Hand Strap Adjust the hand strap to best fit your ha...

Page 27: ...ulder strap through the slots at the back of the camcorder and thread through the shoulder straps buckles Note Make sure that the straps are securely fastened before using the shoulder strap to carry the camcorder Using the Linear Time Counter The linear time counter displays the tape run in hours minutes and seconds helping you to keep track of how long you ve been filming or time you have left t...

Page 28: ...o run Note When the remaining tape time becomes less than about three minutes TAPE END flashes in the viewfinder or LCD monitor Setting the Date and Time Take the time to set the date and time now The date and time can be recorded on your tapes to act as a handy reference when viewing them later Use the following procedure to set up the display for the current date and time Note Be sure to insert ...

Page 29: ...elect the proper day year hour minute and AM or PM 12 00 AM 11 5 1997 4 After setting the AM PM press the DATE DISP button The display changes and the internal clock starts 6 30 AM 11 5 1997 Note After the date and time are set AUTO appears and the camcorder enters the automatic date recording mode See Date Recording on page 35 Correcting the Date and Time 1 Press the DATE DISP button while pressi...

Page 30: ...tomatically in response to shutter speed 1 Connect the camcorder to a power source Loading Batteries Camcorder Batteries p 16 p17 2 Open the LCD monitor and insert a cassette Inserting and Removing Cassettes p18 If you want to view the picture being recorded on the LCD monitor leave the monitor open If you want to view the picture in the viewfinder close the LCD monitor Note Pull out the eye cup a...

Page 31: ...ashes in the viewfinder or LCD monitor when the tab on the side of the cassette is completely visible Note TAPE END flashes in the viewfinder or LCD monitor when about 3 minutes or less remain of the tape cassette Note If the camcorder is left in record pause mode for more than 5 minutes the camcorder turns off automatically To restart it press the Start Stop button and the camera returns to recor...

Page 32: ...ter of the viewfinder or LCD monitor Objects at different distances in the center of the viewfinder or LCD monitor Brightly lit objects such as a neon light objects lit by spotlight etc Objects behind water dappled or dusty glass Objects with little difference in light reflection such as a white wall Rapidly moving objects Dark objects Note With the T zoom control you can use the auto focus with s...

Page 33: ...ntrol to zoom back to the picture you desire Note To return to auto focus press the FOCUS control buttons and the FOCUS disappears from the viewfinder or LCD monitor Using the Power Zoom The power zoom W control widens the picture moving the subject farther away while the power zoom T control brings the subject closer narrowing the picture If ZOOM appears at the left of the viewfinder or LCD monit...

Page 34: ...utton The instant zoom feature activates the digital zoom to magnify the subject 1 5 times regardless of zooming engaged by the power zoom T and W controls Press the INST ZOOM button I ZOOM appears at the left of the viewfinder or LCD monitor and the picture is magnified 1 5 times Note To return to the original zoom position press the INST ZOOM button so that I ZOOM disappears from the viewfinder ...

Page 35: ...angle of the monitor Opening the LCD Monitor p19 2 Hold down the red button on the CAM OFF VIDEO switch while sliding the switch to VIDEO 3 Press the REW REVIEW button to the position where you want to start playback 4 Press the PLAY button and play back the tape To adjust the volume for the internal speaker adjust the Volume control at the bottom of the camcorder 5 Press the STOP button when you ...

Page 36: ... picture during playback press the Start Stop Press the Start Stop button again to resume playback If you leave the camcorder in play pause mode for more than 5 minutes the camcorder automatically stops the cassette to prevent damage to the tape You can view a still picture with less noise on the LCD monitor Note The still picture will have several noise bars in the viewfinder and on the TV but th...

Page 37: ... 4 times normal speed Press PLAY button to return to normal playback Note If you are using forward or reverse search with the LCD monitor closed then you will not ba able to view pictures with less noise when you open the monitor Note Several noise bars will appear on the TV screen during forward or reverse search Playing Back Your Recording on Your TV Depending on the setup of your video equipmen...

Page 38: ...tton to begin playback 7 Press the STOP button when finished Connecting to a Television with Audio In and Video In Jacks 1 Connect the provided audio video output cable to the AUDIO IN and VIDEO IN jacks of your television Note If your television has two stereo AUDIO IN jacks connect the audio plug to the left channel AUDIO IN jack 2 Connect the other ends of the cable to the AUDIO OUT and VIDEO O...

Page 39: ... 300 ohm to 75 ohm transformer Connect the antenna adapter to the VHF antenna lead and slide the adapter on to the ANT IN terminal 3 Connect the 75 ohm coaxial cable of the RF output adapter to the VHF antenna terminals on the back of the television If the television is set up to connect to a flat antenna lead you need to purchase antenna adapter 75 ohm to 300 ohm transformer Connect the adapter t...

Page 40: ...d from different positions See LCD Monitor p 19 for the range in which you can change the angle of the LCD monitor Note You need the remote control to operate the camcorder Recording an Image of Yourself while Monitoring the LCD Screen 1 Open the LCD monitor Opening the LCD Monitor p19 2 Turn the LCD monitor so the monitor screen faces the same direction as the lens Press the START STOP button on ...

Page 41: ...beginning of recording for 10 seconds AUTO 11 5 1998 Note The camcorder records the same date when the cassette is replaced you select AUTO and date display again the recording is less than 10 seconds long Note If the date changes while recording continues over 10 seconds the new date is recorded for about 10 seconds the next time you make a recording TITLE and Date Automatic Title and Date Record...

Page 42: ...te Recording The camcorder does not record the date Date and Time Date and Time Recording The camcorder records the date and time with the picture all the time 10 20 AM 11 5 1998 3 Press the start stop button Recording will start Note When AUTO and date display is selected the date disappears about 10 seconds after recording is started Note When TITLE and date display is selected the title and dat...

Page 43: ...gital zoom feature a symmetric image obtained by placing a mirror at the center of the screen half mirror recording and an image in mosaic mosaic recording Note The half mirror recording and mosaic recording functions cannot be used with digital zoom instant zoom image stabilizer or zoom fade function Each time the D EFFECT button is pressed the recording mode is switched 16x9 16X9 Mode NEGPOS Neg...

Page 44: ...hniques 44 X130 Digital Zoom Mode MIRROR Half Mirror Mode MOSAIC Mosaic Mode Normal Mode Returns to 16x9 Mode 16x9 Mode Recording The picture format can be switched from the 4 3 the picture format of an ordinary TV ...

Page 45: ...ording pause until normal mode is restored X130 Digital Zoom Recording 1 Place the camcorder in record pause 2 Repeatedly press the D EFFECT button until ZM 2 appears in the viewfinder or LCD monitor 3 Slide and hold the power zoom control to the T side until you reach your desired magnification 4 Press the start stop button to start recording To release the X130 digital zoom mode press the D EFFE...

Page 46: ...stant zoom image stabilizer or zoom fade function Using Fade Use the fade feature to add a professional touch to your recordings Use the FADE button to select one of the four fade options Note If you press the D EFFECT button after setting the fade function the fade function will be released After setting the digital effect mode reset the fade function White fade Fades in from a white screen or fa...

Page 47: ...ing fade begins automatically Fading Out 1 While recording with the camcorder use the FADE button to select a fade option 2 Press the Start Stop button to stop recording the fade begins automatically and REC flashes until the fade ends Note When fading out be sure to wait until the PAUSE indicator is visible in the viewfinder or LCD monitor before attempting to put the camcorder into the record mo...

Page 48: ... rough Note When the EIS function is engaged the angle of view at the wide angle end becomes narrower Note It is recommended that you do not use the EIS function when using a tripod The sensor would detect vibrations from the tripod in which case the picture would be blurred Using Quick Edit Use quick edit to search for the end of previously recorded material find a particular spot on your tape be...

Page 49: ...he camcorder Note Be sure that the date and time are set 1 Attach a power source and slide the CAM OFF VIDEO switch to VIDEO 2 Press the DATE DISP button the DISPLAY button on the remote control to display SEARCH in the viewfinder or LCD monitor 3 Press the REW REVIEW button to search for the start position from which you last made a recording or the F FWD button to recording end position SEARCH w...

Page 50: ...playback of a cassette Press the COUNTER RESET button on the remote control at the point to which you wish to return The linear time counter clears to 0 00 00 2 Press the STOP button to stop playback or press the start stop recording and set the CAM OFF VIDEO switch to VIDEO 3 Press the DISPLAY button on the remote control so the linear time counter with memory is displayed as shown in the figure ...

Page 51: ...ssembly Creating and Recording A Title Create titles easily and personalize your recordings while keeping a permanent visual record of what is contained on a tape The camcorder can store a title in its memory A title stored in memory can be displayed and recorded at any time A title contains two lines of up to 16 characters per line The camcorder contains 47 different characters for creating a tit...

Page 52: ...h to begin your title 5 Use the F FWD and REW buttons to select the first character of your title 6 Once you ve selected a character press the STOP button to set it 7 Complete the title by repeating steps 5 and 6 8 When you complete your title press the TITLE ON OFF button on the remote control to store the title in memory and remove the title graphics from the viewfinder or LCD monitor Note As lo...

Page 53: ...e and store your title before an event you plan to record Just press the TITLE ON OFF button on the remote control to superimpose the title over the scene as you record it This method avoids erasing previously recorded material which will happen when you record a title on a previously recorded tape Recording a Created Title while Transferring a Tape 1 Connect the camcorder to the VCR p30 2 Turn on...

Page 54: ...dubbed Note Reduce the volume of the camcorder as low as possible during dubbing Otherwise the played back pictures could be distorted Simple Programmable Edit Edit remote control is optional accessory Simple programmable edit allows you to program your camcorder to select the scenes you want to copy from a pre recorded tape Use the edit remote control optional to easily copy scenes from a recorde...

Page 55: ... of your VCR Refer to the VCR s instruction manual If the channel still does not change after you have changed the VCR s remote control code the edit remote control cannot operate your VCR VCR Brands Press VCR SET and This Button Hitachi REVERSE Sony PROGRAM Panasonic FORWARD Toshiba IN Mitsubishi COPY START Sanyo OUT Sharp NEC JVC Akai A V DUB Gold Star PHILIPS RCA DISPLAY Zenith COUNTER RESET Ma...

Page 56: ...s two stereo AUDIO IN jacks connect the audio plug to the left channel AUDIO IN jack 2 Insert a recorded tape into the camcorder 3 Set the CAM OFF VIDEO switch of the camcorder to VIDEO Turn the recording VCR on and select line input 4 Press the PROGRAM button of the remote control The program display appears in the viewfinder PROG 1 0 00 02 IN OUT Note If your VCR is connected to a TV the program...

Page 57: ...ART button to start simple programmable edit The camcorder automatically searches for the beginning of the first segment and starts playback The recording VCR automatically starts recording After recording the first segment the camcorder automatically searches for the beginning of the next segment and resumes playback The recording VCR is automatically released from the record pause mode and resum...

Page 58: ...ilt in microphone and camera onto a previously recorded tape in the camcorder 1 Connect your camcorder to the television following Connecting to a Television with Audio In and Video In Jacks on page 31 2 Turn on your television and place it in the camcorder input mode consult your television manual for details 3 Hold down the red button on the CAM OFF VIDEO switch while sliding the switch to VIDEO...

Page 59: ...stops automatically recording only the portion of the tape that you selected Note If the camcorder is in AV DUB pause or STILL mode for more than 5 minutes the camcorder stops automatically to protect the tape Note Automatic date recording is disabled during audio video dubbing Note When the audio video dubbed portion is played back noise may appear at the end of the dubbed portion ...

Page 60: ... consult your nearest dealer or VCR service center for professional head cleaning Cleaning the Lens and Picture Tube of the Electronic Viewfinder The lens of the electronic viewfinder can be user cleaned if dust dirt or other foreign matter adheres to it 1 Pull out the eye cup to the position where a mark can be seen up to a half where it can be pulled out all the way The side with the mark should...

Page 61: ...ity of the owner Consult your dealer or local VCR service center for recommendations regarding normal maintenance based on your use patterns location and the age of the camcorder Troubleshooting Quality is very important at Hitachi We inspect and check every camcorder carefully at the factory under the most rigid quality control and inspection systems If problems develop please check the following...

Page 62: ...move the clock battery after creating a title PLAYBACK OF PRE RECORDED CASSETTE Symptom Check Point Correction The PLAY button cannot be engaged Set the CAM OFF VIDEO switch to VIDEO No picture appears on television screen when the play button is pressed Set the television to the camcorder channel 3 or 47 depending upon the selected channel in the RF channel select switch of the RF output adapter ...

Page 63: ...in the viewfinder This does not indicate a fault it is because the power consumer by the LCD monitor and viewfinder is different NO OPERATION IS ACCEPTED Symptom Check Point Correction Power is turned on but no button operations are accepted Remove the power source and the date title battery After about one minute the display in the viewfinder or LCD moniter will be reset Then set the information ...

Page 64: ...es Required minimum illumination 0 8 lux 4 lux measured by EIA method Pickup device 1 4 C C D Lens diameter 46mm For U S A only HITACHI Service Hotline To locate an authorized HITACHI service facility in the continental U S A DIAL TOLL FREE 7 days a week 24 hours a day 800 HITACHI 1 800 448 2244 Hitachi Home Electronics America Inc Hitachi has made every effort to assure you hours of trouble free ...

Page 65: ...ce an order for any of these items call our toll free number or use the ordering form on page 59 1 800 995 4500 To Order in the United States By Phone To place an order by phone have your VISA MASTERCARD or DISCOVER card ready and call the toll free number 8 00AM 6 00PM East Coast Time workdays 1 800 995 4500 In Canada Please use Canadian order form in French version of this manual Page 59 By Mail...

Page 66: ...General Maintenance 66 Please consult the following telephone number Montreal 514 956 9882 Toronto 905 821 4545 Vancouver 604 214 0777 ...

Reviews: