-5-
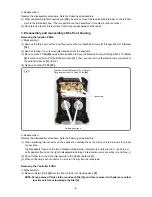
Fig. 2
•
Inside the back housing
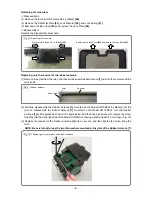
Fig. 3
•
Bottom of inside the back housing
Fig. 4
2. Disassembly and reassembly of the back housing
<<Disassembly>>
(1) Remove the five Machine Screws (W/Flange) M3 x 10 (Black)
[9]
. Then you can remove the Speaker
Back Cover
[23]
. (Fig. 2)
(2) Remove the Speaker Back Cover
[23]
. Then you can see Terminal Ass'y (E)
[34]
and AA Battery Box
[36]
. (Fig. 3)
(3) Remove the five Machine Screws (W/Flange) M3 x 10 (Black)
[9]
(indicated by arrows in Fig. 3) and the
three Machine Screws (W/Flange) M3 x 10 (Black)
[9]
from the
Jack Cover (L)
[27]
located externally on
the left side. You can now remove Terminal Ass'y (E)
[34]
.
(4) The Fuse (250 V-2 A)
[33]
is located to the right of the EB battery box in Terminal Ass'y (E)
[34]
, and can
be easily replaced.
Remove the five Machine Screws
(W/Flange) M3 x 10 (Black)
[9]
fixing the
Speaker Back Cover
[23]
.
Eight Machine Screws (W/Flange)
M3 x 10 (Black)
[9]
fixing the
Terminal Ass'y (E)
[34]
Three Machine Screws
(W/Flange) M3 x 10
(Black)
[9]
Fuse (250 V-2 A)
[33]
EB battery box

