background image

21 

EN

Closed Caption

WHAT IS CLOSED CAPTIONING?

This television has the capability to decode and display Closed 

Captioned television programs. Closed Captioning will display text 

on the screen for hearing impaired viewers.

Captions: 

This Closed Caption mode will display text on the 

screen in English or another language. Generally, Closed Captions 

in English are transmitted on CC1 and Closed Captions in other 

languages are transmitted on CC2.

Text: 

The Text Closed Caption mode will usually fill 1/2 of the 

screen with a programming schedule or other information.

1

Select “Setup” ⇒ “Closed Captions”, then press 

SELECT

.

2

Press


SELECT 

to set “Caption Display”, then pr

ess


▲ or ▼ to 

select


“CC On”, “CC on Mute”, or “CC Off”.

CC On:

 Captions will be displayed on the screen.

CC on Mute:

 Only when you press 

MUTE

, captions will be 

displayed.

CC Off:

 Captions will not be displayed on the screen.

3

Press


▲ or ▼ to select “Analog Closed Caption” or “Digital 

Closed Caption”.
When you select “Analog Closed Caption”, you can choose 

from CC1~4, Text1~4.
When you select “Digital Closed Caption”, you can choose 

from Service1~6 and Off. 

4

Press


▲ or ▼ to select the desired Closed Caption mode for 

both Digital and Analog Captions.

NOTE:

•  Depending on the broadcast signal, some Analog Captions 

will function with a Digital broadcast signal. This prevents 

two types of captions from overlapping.

•  If text is not available in your viewing area, a black rectangle 

may appear on-screen. If this happens, set the CC Setting 

to “CC Off”.

•  When selecting Closed Captions, the captioning will appear 

after approx. 10 seconds.

•  Misspellings or unusual characters may occasionally 

appear during Closed Captioning. 


This is normal with Closed Captioning, especially with live 

programs. This is because during live programs, captions 

are also entered live. These transmissions do not allow time 

for editing.

•  When Captions are being displayed, on-screen displays, 

such as volume may be seen but may interfere with Closed 

Captions.

•  Some cable systems and copy protection systems may 

interfere with the Closed Captioned signal.

•  If using an indoor antenna or if TV reception is very poor, 

the closed caption may not appear or may appear with 

strange characters or misspelled words. In this case, adjust 

the antenna for better reception or use an outdoor antenna.
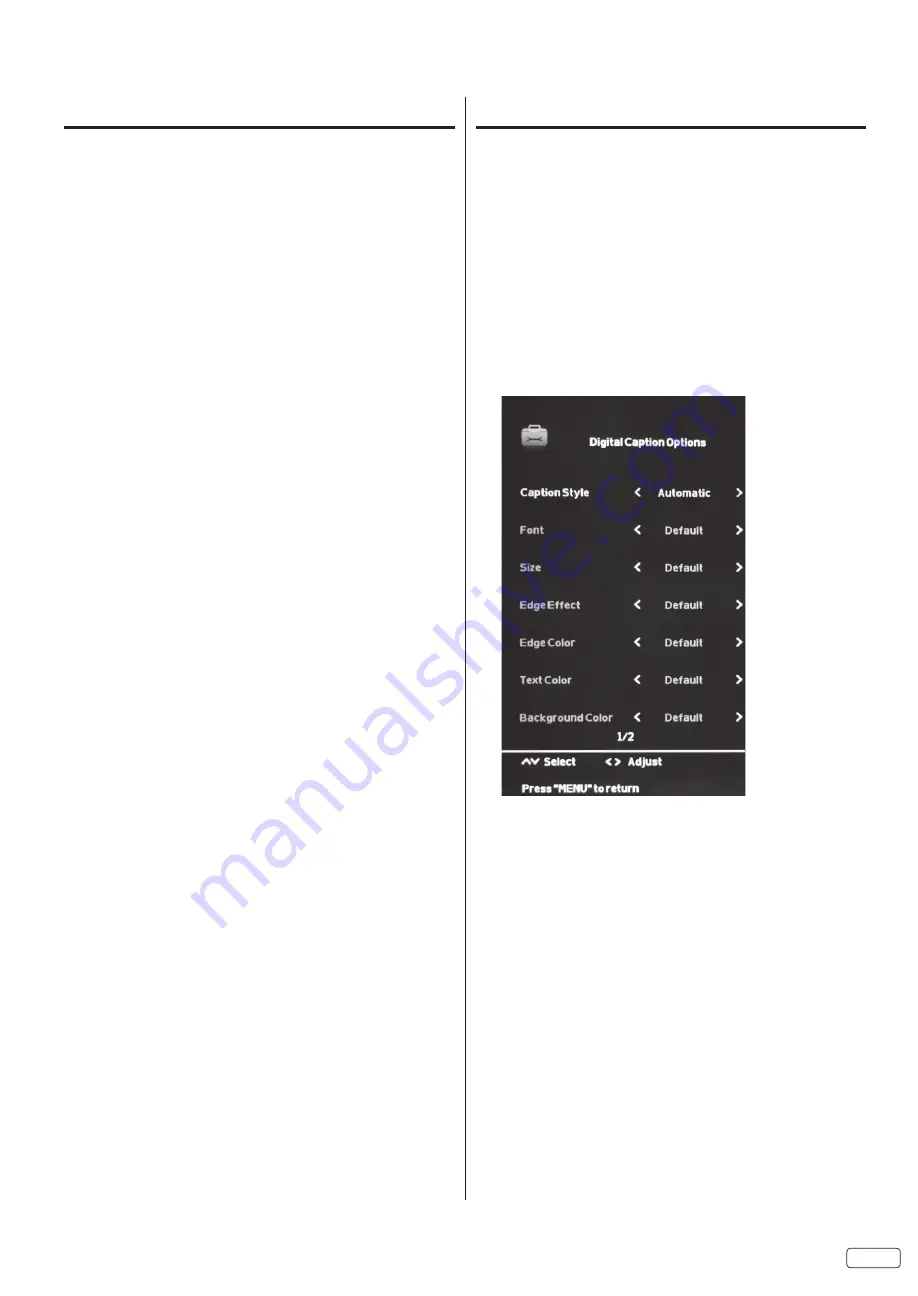
CC options

When you have selected “Custom” as the display 

method, 

you can adjust the various setting listed below.

This feature is designed to customize Digital Caption only.

1

Select “Setup” ⇒ “Closed Captions” ⇒ “Caption Display”, then 

press 

SELECT

.

2

Press


▲ or ▼ to set “Caption Display” to “CC Off”, “CC on 

Mute” or “CC On”.

3

Select “Digital Caption Options”, then press 

SELECT

.

4

Press ▲ or ▼ to select “Caption Style”, then press 

SELECT

.

5

Press ◀ or ▶ to set the “Caption Style” to “Custom”.

6

Press


▲ or ▼ to select the desired item, then press


◀ or ▶ to 

change the setting.

You can select from among the following items 

and parameters.

Font:

Select display font style.

Size:

Select display font size.

Edge Effect.

Select display font edge style.

Edge Color:

Select display font edge color.

Text Color:

Select foreground color.

Background Color:

Select background color.

Text Opacity:

Select foreground opacity level.

Background Opacity:

Select background opacity level.

NOTE:

•  You cannot set both “Text Color” and “Background Color” as the 

same color.

Summary of Contents for LE46H508

Page 1: ...uture reference Record the model name and serial number of your LCD Television for future reference This information is located on the back of the television TABLE OF CONTENTS 2 6 IMPORTANT SAFETY INSTRUCTIONS 7 HOWTOATTACH REMOVETHESTAND 8 12 FIRST TIME USE 13 22 TV OPERATION 23 26 CONNECTIONS TO OTHER EQUIPMENT 27 RECEPTION DISTURBANCES 28 TROUBLESHOOTING 29 SPECIFICATIONS 30 31 LIMITED WARRANTY...

Page 2: ...interference to radio communications However there is no guarantee that interference will not occur in a particular installation If this equipment does cause harmful interference to radio or television reception which can be determined by turning the equipment off and on the user is encouraged to try to correct the interference by one or more of the following measures Reorient or relocate the rece...

Page 3: ...ch power lines or circuits When installing an outside antenna system extreme care should be taken to keep from touching such power lines or circuits as contact with them might be fatal 17 Do not overload wall outlets and extension cords as this can result in a risk of fire or electric shock 18 Do not push objects through any openings in this unit as they may touch dangerous voltage points or short...

Page 4: ...surroundings into a warm room or if the temperature of the room rises suddenly When this happens unit s performance will be impaired To prevent this let the unit stand in its new surroundings for about an hour before switching it on or make sure that the room temperature rises gradually Condensation may also form during the summer if the unit is exposed to the breeze from an air conditioner In suc...

Page 5: ...5 EN Child Safety Notice ...

Page 6: ... be maintained If the insertion length is more than 31mm for LE42H508 and 25mm for LE46H508 a space is created between the Wall Mount Bracket and the Television Insertion Length Screw Length Washers Thickness Mounting Bracket Thickness Securing to a Wall 1Use metallic wire screw and clamp not provided on the rear of the TV as shown below 2 Keep the TV 4 inches away from the wall except when mounte...

Page 7: ...d any damage to the unit Do not touch or press the LCD screen the glass might break under pressure 1 Carefully place the TV screen face down on a clean cushioned surface 2 Insert and secure the stand with 4 screws supplied 4x16mm for LE42H508 and 3 screws supplied 4x20mm for LE46H508 as shown in Figure 1 Be sure to follow the above instructions Insufficient tightening or incorrect installation of ...

Page 8: ...ontrol 11 Antenna connections 12 Cable TV connections 12 TV operation Starting setup 13 TV operation 13 Quick guide for menu operation 14 Convenience functions 15 Channels setup 18 Setting the Parental Control 19 Closed Caption 21 CC options 21 Aspect Switching 22 JPEG Viewer 22 Additional information Connections to other equipment 23 Reception disturbances 27 Troubleshooting 28 Specifications 29 ...

Page 9: ...r will display television closed captioning or in accordance with FCC rules The terms HDMI and HDMI High Definition Multimedia Interface and the HDMI Logo are trademarks or registered trademarks of HDMI Licensing LLC in the United States and other countries Manufactured under license from Dolby Laboratories Dolby and the double D symbol are trademarks of Dolby Laboratories VGA and XGA are trademar...

Page 10: ...red setting during the menu screen operations Power Indicator Red Standby No Indication On POWER Button INPUT Button VOL VOLUME Buttons CH CHANNEL Buttons Rear AIR CABLE IN HDMI3 IN Left side PC DVI AuDIO in Control Key HDMI1 MHL IN HDMI2 ARC IN MENU Button Bottom side COMPONENT IN y Pb Pr AUDIO OUT AUDIO R L IN DIGITAL AUDIO OUT COAXIAL USB INPUT PC IN VIDEO IN ...

Page 11: ...tion to CC Off CC On Mute or CC On AUDIO Button Press to change the audio language USB Button Press to directly access the USB Input HDMI Button Press to directly access the HDMI Inputs COMP Button Press to directly access the Component Input AV Button Press to directly access the AV Input PC Button Press to directly access the PC Input Remote control 1 2 3 5 6 4 7 8 9 0 INPUT LAST CH MENU EXIT SE...

Page 12: ...e TV service with scrambled premium channels If you subscribe to a Cable TV service in which basic channels are unscrambled and premium channels require the use of a Converter Descrambler box you may wish to use a signal Splitter and an A B Switch box available from the Cable TV company or an electronics supply store Follow the connections shown below With the switch in the B position you can dire...

Page 13: ...ress POWER It may take approx 10 seconds for a picture to appear on screen 2 Adjust the volume level by pressing VOL VOLUME or The volume level will be indicated on the screen by a volume bar If the volume increases the number of bars also increases If the volume decreases the number of bars also decreases 3 Set the Source option to the appropriate selection see Air Cable selection on page 18 4 Pr...

Page 14: ...s MUTE to switch off the sound The TV s sound will be silenced and MUTE icon will appear on the screen The sound can be switched back on by pressing this button again or by pressing the VOL VOLUME button Quick guide for menu operation Example Select Menu Language 1 Press INPUT to select TV mode 2 Press MENU The TV menu screen will appear 3 Press or to select Setup then press SELECT 4 Press or to s...

Page 15: ...PC input mode Color Color Temperature Cool Bluish Standard Neutral Warm Reddish Custom Red Green Blue Aspect Ratio See page 22 Noise Reduction Set the level of decreasing noise included in the video signal Off Low Mid High DBC Use this feature to change the black level automatically according to the bright ness of an image The black level will become dark in a dark scene On Off Backlight Adjust th...

Page 16: ...resence and sound created offers a thoroughly enjoyable listening experience On Off Digital Output Select the format for your digital audio output If you have connected an amplifier receiver to the digital audio jack on your TV Raw PCM Lip Sync Synchronizes audio with video signal on digital and analog sources Speaker Delay Digital Out Delay Internal Speakers This function is useful when using ext...

Page 17: ...lay turn the TV on and the HDMI input that the device is connected to will become the active input device for the TV ARC To enable the audio through an AV receiver using HDMI ARC Device Lists Display devices that are connected to TV Connect To make a connection to a device shown on the device list Root Menu To access the device menu SW Version Time Clock Auto Clock The Auto Clock function will aut...

Page 18: ...ress EXIT while scanning the channel scan will stop NOTE If you are unsure of the digital channels available in your area you may visit www antennaweb org to receive a list based on your address or zip code If you require further assistance you may call our toll free customer service line at 800 HITACHI 800 448 2244 USA CANADA New channels may be added to your area periodically it is recommended t...

Page 19: ...hannel Selection Buttons 0 9 to enter your password To set the Parental Control 1 In the Lock menu press or to select Parental Control then press SELECT to set to On 2 Press or to select US then press SELECT 3 Press or to select TV Rating then press SELECT 4 Press to select which rating will be used then press SELECT Each rating below will appear TV You can set the rating using age level and genre...

Page 20: ... SELECT 2 Enter your old password using Direct Channel Selection Buttons 0 9 3 Enter your new password using Direct Channel Selection Buttons 0 9 4 Enter the new password again to confirm Your new password is now registered Downloading the additional Parental Control rating system Region 5 As a supplement to the standard Parental Control rating system your television is able to download an additio...

Page 21: ... after approx 10 seconds Misspellings or unusual characters may occasionally appear during Closed Captioning This is normal with Closed Captioning especially with live programs This is because during live programs captions are also entered live These transmissions do not allow time for editing When Captions are being displayed on screen displays such as volume may be seen but may interfere with Cl...

Page 22: ...hidden 4 3 16 9 PC Mode The entire picture is uniformly enlarged and displayed at 100 This aspect mode is only available in the HDMI inputs JPEG Viewer You can enjoy viewing pictures from your USB storage device 1 Connect the USB storage device into the USB Input terminal 2 Press INPUT and press or to select USB then press SELECT NOTE Do not disconnect a USB storage device while it is being access...

Page 23: ... Press INPUT on the remote control to select PC Input Switch on the computer The TV can operate as the computer monitor Note The on screen displays will have a different appearance in PC mode than in TV mode If there is no video signal from the PC when the unit is in PC mode Weak or No Signal will appear on the TV screen When the PC s resolution is set to 1920 x 1080 60 Hz FHD mode a signal that d...

Page 24: ... connect the other end of the cable to the HDMI1 MHL jack on the side of your TV 2 Press the INPUT button on the remote control and select HDMI1 input source 3 Your device s menu opens You can use CURSOR left right down or up buttons to navigate on your device and press the SELECT button on the remote control to access its menu NOTE Your device s menu varies with the device and the apps you have l...

Page 25: ... DVD player with Component Video Input You can enjoy a high quality picture by connecting the unit s COMPONENT VIDEO OUT jacks of your DVD player with the component video cables not supplied Note The Component Video input of this TV is compatible with 480i 1080i interlaced signals and 480p 720p progressive signals or GAME CONSOLE Bottom of the TV To Video Audio OUT Video Audio cable not supplied T...

Page 26: ...decoder etc as shown below To connect the TV to an audio system This connection allows you to use an audio amplifier and external speakers To Audio L R Inputs Audio cable not supplied Amplifier Bottom of the TV To AUDIO OUT Coaxial digital cable not supplied Center Speaker To DIGITAL AUDIO OUT COAXIAL To Coaxial Digital Audio Input Bottom of the TV Front Speaker Left Front Speaker Right Subwoofer ...

Page 27: ...ipples or diagonal streaks and in some cases causes loss of contrast in the picture PREVENTION OF AN OBSTACLE TO RADIO RECEIVERS This television has been designed pursuant to the FCC class B Rules This is to prevent a problem to Radio receivers If this television causes a problem to Radio receivers then take the following steps Keep the television away from Radio Adjust Radio antennas in order for...

Page 28: ...re properly made when using with other units SYMPTOMS POSSIBLE SOLUTIONS TV does not operate Make sure the power cord is plugged in Try another AC outlet Power is off check fuse or circuit breaker Unplug unit for an hour then plug it back in Poor sound or no sound Station or Cable TV experiencing problems tune to another station Check sound adjustments Volume or Mute Check for sources of possible ...

Page 29: ...Monitor Mini Dsub 15pin Antenna VHF UHF In 75 ohms coaxial Outputs Digital audio COAXIAL 0 5 V p p 75 ohms terminated Audio Out 3 5mm Stereo 470 mVrms 1k ohms Speakers Downfiring 157 5 mm 40 mm x 37 mm 8 ohms 2 Audio output power 8 0W 8 0W Power supply AC 120V 60Hz Power consumption Operation 85W Standby 1W Operation 120W Standby 1W Weight 9 2kg 20 3lbs 16 0kg 35 3lbs Dimensions Width 966 8mm 38 1...

Page 30: ...ase be prepared to submit proof of purchase and or delivery receipts to your 800 HITACHI Customer Service Representative Warranty coverage will be provided in accordance with the provisions of your Limited Warranty see the Limited Warranty page in this operating guide Pour de plus amples renseignements sur le service durant la periode couverte par la garantie sur le fonctionnement ou pour de l ass...

Page 31: ...esulting from improper or unauthorized service maintenance or repair D Damage resulting from abuse misuse mishandling neglect or damage caused by exposure to hostile operating environments such as areas containing dust and or smoke E Damage caused by power surges accidents natural disasters or any other events or circumstances outside Hitachi s control F Any Product used in any manner inconsistent...

Page 32: ...Memo ...

Page 33: ...Memo ...

Reviews: