'UDLQ3DQ/HYHO
.3,;(
0DNHVXUHWKDWWKHIRXQGDWLRQLVÀDWWDNLQJLQWRDFFRXQWWKH
PD[LPXPIRXQGDWLRQJUDGLHQW
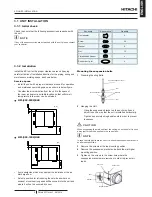
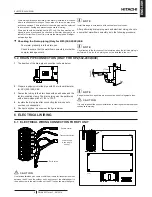
The unit should be installed so that one side of the unit is
VOLJKWO\DSSUR[LPDWHO\.3,;(ORZHUWKDQWKH
other side, in order to avoid the incorrect position of the drain
discharge.
Tighten the nuts of the suspension bolts with the suspension
brackets after adjustment is completed. Special plastic paint
must be applied to the bolts and nuts in order to prevent them
from loosening.
N O T E
.HHSWKHXQLWDVZHOODVUHOHYDQWHTXLSPHQWFRYHUHGZLWKWKHYLQ\OFRYHU
GXULQJLQVWDOODWLRQZRUN
3.1.3
&RQQHFWLQJ)LHOG6XSSO\'XFWDQG6XFWLRQ$LU)LOWHU6HUYLFLQJ
)LHOG6XSSO\'XFWLQVWDOODWLRQ
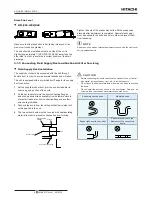
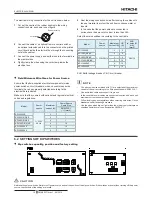
The supply duct should be connected with the unit through
ÀH[LEOHGXFWLQRUGHUWRDYRLGDEQRUPDOVRXQGVDQGYLEUDWLRQ
7KHXQLWLVHTXLSSHGZLWKDSUHGULOOHGGXFWÀDQJHIRUWKHVXSSO\
duct connection.
1
Set the supplied rubber duct joint to each duct adapter to
ensure a good junction of the ducts.
2
)LWWKHGXFWVVHFXUHO\LQWRWKHGXFWFRQQHFWLQJÀDQJHV
and wind aluminium tape available from hardware store to
SUHYHQWDLUOHDNVDOVRGXFWFRQQHFWLRQÀDQJHVKDYHWKHLU
own sealing installed.
3
Suspend the ducts from the ceiling so that their weight will
not be applied to the unit.
4
The two outdoor ducts must be covered with heatinsulating
material in order to prevent condensation from forming.
Flange
Heat-insulating
material
Outdoor duct
'XFWFRQQHFWLQJÀDQJH
Unit
C A U T I O N
•
%HIRUHFRQQHFWLQJWKHGXFWVFKHFNWKDWQRVDZGXVWRUDQ\RWKHUIRU
-
HLJQPDWWHUVFUDSVRISDSHUYLQ\OHWFLVLQVLGHWKHGXFWV
•
'RQRWWRXFKWKHGDPSHUSODWHLQVLGHWKHPDLQXQLWZKHQFRQQHFWLQJ
WKHGXFWV
•
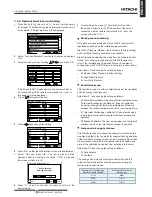
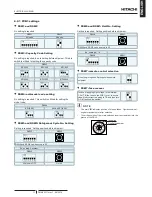
'RQRWLQVWDOOWKHGXFWVDVVKRZQLQWKHQH[W¿JXUHV'RLQJVRDLU
YROXPHZLOOEHUHGXFHGDQGDEQRUPDOVRXQGVPD\RFFXU
Extremely sharp bends
Multiple bends
Bends right next to the outlet
Extreme reduction in the
diameter of the connected
ducts
KPI UNITS INSTALLATION
PMML0371A rev.1 - 08/2016
6

