background image

17

English

TV and Optional Compo-

TV and Optional Compo-

TV and Optional Compo-

TV and Optional Compo-

TV and Optional Compo-

nent Hookups

nent Hookups

nent Hookups

nent Hookups

nent Hookups

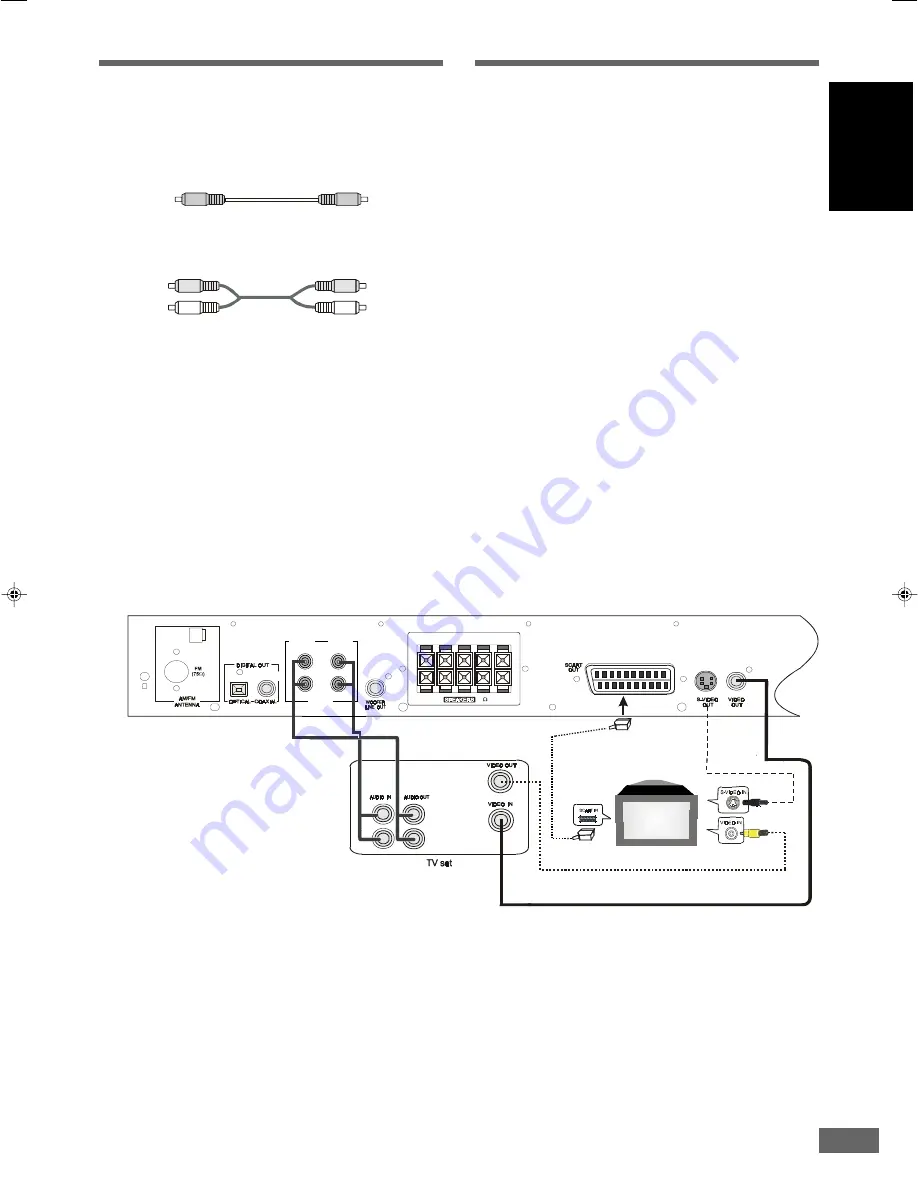
Required cords

 Video cord for connecting a TV set (supplied).

 Audio cords (supplied).

When connecting a cord, be sure to match the color-coded
pins to the appropriate jacks on the components.

Note


When using the S-VIDEO OUT jack instead of the VIDEO

OUT jack for better picture clarity.

Your TV monitor must also be connected via an S-VIDEO IN-
PUT jack. S-Video signals are on a separate bus from the video
signals and will not be output through the video jacks.


When using the SCART OUT connector instead of the

VIDEO OUT jack.

Your TV monitor must also be connected via an Scart socket.
The Scart terminal contains separate video signals and stereo
audio signals.


You can connect the OPTICAL or COAXIAL output to an-

other amplifier with DTS, Dolby Digital decoder.

Connecting the 

Connecting the 

Connecting the 

Connecting the 

Connecting the A

A

A

A

AC P

C P

C P

C P

C Po

oo

oow

w

w

w

wer

er

er

er

er

Cor

Cor

Cor

Cor

Cord

dd

dd

Note

  Power Requirements: 

AC 230 V, 50Hz

.

 The power that differs from above value will damage the sys-

tem or cause the system to work abnormally.

Before connecting the AC power cord (main lead) of this system
to a wall outlet, connect the speakers to the system.

Connect the AC power cord of the active subwoofer.

Connect the AC power cords (main leads) of your TV, optional
components to a wall outlet.

Yellow

Yellow

Red

White

White

Red

FL

C

FR

SL

SR

  
(8   )

AM

L

R

  AUDIO

         IN

  AUDIO

     OUT

   AUX IN

Summary of Contents for HTD-K160

Page 1: ...onamiento lea la totalidad de estas instrucciones Läs dessa anvisningar noga innan du börjar att använda apparaten Læs venligst instruktionerne igennem før De tager apparatet i brug DVD DIGITAL THEATER SYSTEM HTD K160 DVD VCD CD PLAYER WITH AV SURROUND RECEIVER Instruction manual Mode d emploi Bedienungsanleitung Istruzioni per l uso This product incorporates copyright protection technology that i...

Page 2: ...ly This DVD player can be used with a power mains voltage of 230V The OPERATE button is indicated this button allows you to select operate on or electrical power standby Notice The OPERATE button is secondarily connected and does not separate the apparatus from the mains supply in the switched off position Before Switching on make sure that the voltage of your elec tricity supply is the same as th...

Page 3: ...gs Overheating will cause damage and shorten the life of the equipment DON T use makeshift stands and NEVER fix legs with wood screws to ensure complete safety always fit the manufacturer s approved stand or legs with the fixings provided according to the instructions DON T allow electrical equipment to be exposed to rain or moisture ABOVEALL NEVER let anyone especially children push anything into...

Page 4: ...me cases fire or even an explosion ALWAYS Remove dead batteries from equipmentandallbatteriesfrom equipment you know you are not going to use for a long time Otherwise the batteries may leak and cause damage ALWAYS Never dispose of batteries in fire as this can cause them to explode Please put dead batteries in with the normalhouseholdwaste NEVER Supervise children if they are replacing batteries ...

Page 5: ...art Point Using the Time Code 24 Selecting a Track Using Number Buttons 24 Checking Information Using Display 25 Settings Adjustments Settings Adjustments Settings Adjustments Settings Adjustments Settings Adjustments 26 34 Using the SETUP Menu 26 27 SETUP Menu Item List 28 GENERAL SETUP TV Display Setting 29 TV Type Setting 29 Video Out Setting 29 Angle Mark Setting 30 OSD Language Setting 30 Scr...

Page 6: ... nearest service centre Copyright Audio visual material may consist of copyrighted works which must not be recorded without the authority of the owner of the copyright Please refer to relevant laws in your country Safeguards Electrical energy can perform many useful functions This unit has been engineered and manufactured to assure your personal safety Improper use can result in potential electric...

Page 7: ...ar disc vary depending on the features of that disc In some cases these functions and operations may differ from the descriptions given in this instruction Manual In this event follow the instructions given on the screen This instruction Manual only covers basic disc operations For some operations the icon may appear on the screen This indicates that the operation described in this instruction Man...

Page 8: ...se 1 English 2 Chinese 2 16 9 LB 2 1 2 3 4 5 6 Number of recorded audio tracks Number of subtitles recorded Screen aspect ratio recorded Disc with Multiple camera angles Region code indicator Note 4 DVD door can be opened in DVD function only Glossary of Disc Terms Title DVD The longest sections of a picture or a music piece on a DVD a movie etc for a picture piece on a video software or an album ...

Page 9: ...ntended for vinyl LPs Disc installing precautions Do not install more than 1 disc on disc tray Do not place the disc on the tray up side down Do not try to close the disc tray when the disc is not installed properly Do not store discs in high temperature high humidity locations The discs may develop warps and become unable to play Also discs with moisture on them may be unplayable Wipe any moistur...

Page 10: ...ottom of the screen Played in the NTSC system Specify the settings for the type of TV connected 4 3 16 9 Disc PAL NTSC TV Monitor When viewed on a 4 3 TV the images appear compressed horizon tally Can not be used Images play back in black and white Disc TV Monitor PAL NTSC Note If the type of disc does not match the type of connected TV you can also play the disc normally by setting the TV type in...

Page 11: ...page 18 Open or close the disc tray REMOTE SENSOR page 14 Accept the remote control signals Front Panel Display page 11 Indicate the playing time etc STOP Button page 19 Stop playing a disc SELECT Button page 32 Select the audio channel to view or adjust its level PLAY II PAUSE Button page 19 Play or pause a disc 1 2 3 4 5 6 7 8 9 F F F F Fr r r r ront P ont P ont P ont P ont Panel Displa anel Dis...

Page 12: ...ove the phase switch between the 0O and 180O position Leave the switch in the position that provides the strongest bass output Sub Sub Sub Sub Subw w w w woof oof oof oof oofer R er R er R er R er Rear P ear P ear P ear P ear Panel anel anel anel anel 1 AM FM ANTENNA Terminal page 16 Connect to the supplied AM FM loop antenna 2 OPTICAL Jack page 17 Connect to an optional receiver 3 COAXIAL Jack pa...

Page 13: ...e angles cyclicity 18 GO TO Button page 24 Select desired title chapter or timing to start playback 19 RETURN Button page 21 Back to the root menu when playing a DVD Back to the PBC menu when playing a CVD VCD or SVCD 20 LISTENING Button page 40 Select a listening mode you want 21 MUTE Button page 32 Shut off all of the sound 22 DISPLAY Button page 25 Switch the displayed item on the TV screen or ...

Page 14: ... battery leakage and corrosion The remote control may not be effective in the strong daylight During radio listening AM if you operate the remote con trol extremely close to the system some noise may be pro duced Installa Installa Installa Installa Installations tions tions tions tions This section describes how to hookup the system to the speakers a TV monitor with audio video input jacks and oth...

Page 15: ...ing of the speakers may damage the system To prevent this make sure to take the following precautions when connecting the speakers Make sure the stripped end of each speaker cord does not touch another speaker terminal or the stripped end of another speaker cord Examples of poor conditions of the speaker cord Stripped speaker cord is touching another speaker terminal Stripped cords are touching ea...

Page 16: ...g the FM pigtail antenna keep it as horizontal as possible Skill of connecting speaker wires Push and hold Speaker terminal tab down to insert wire Re lease tab to lock wire in terminal Make sure the insulation is completely removed from the ends of speaker wires at all connection points If you have poor FM reception Use a 75 ohm coaxial cable not supplied to connect the sys tem to an outdoor FM a...

Page 17: ...e VIDEO OUT jack Your TV monitor must also be connected via an Scart socket The Scart terminal contains separate video signals and stereo audio signals You can connect the OPTICAL or COAXIAL output to an other amplifier with DTS Dolby Digital decoder Connecting the Connecting the Connecting the Connecting the Connecting the A A A A AC P C P C P C P C Po o o o ow w w w wer er er er er Cor Cor Cor C...

Page 18: ...the main power of this system The front panel display lights up and the startup screen appears on TV screen 3 If the system is not in the DVD player mode press the DVD button on the remote control to enter DVD player mode directly or press the SOURCE button on the front panel to select it 4 Press the OPEN CLOSE button and place a disc on the disc tray Press again to close the tray The player begin...

Page 19: ...F1 SF2 SF3 normal play cyclicity Note SF Slow Forward SR Slow Reverse The larger the number is the lower the speed This function is not available for CD and MP3 On some discs the slow motion playback function is disabled Loca Loca Loca Loca Locate a P te a P te a P te a P te a Point Quic oint Quic oint Quic oint Quic oint Quickl kl kl kl kly y y y y Press the or remote control button while playing...

Page 20: ...ect the disc contents using the menu When you play these DVDs you can select the language for the subtitles the language for the sound etc using the DVD menu 1 Press the TITLE button while playing a DVD disc The DVD menu appears on the TV screen The contents of the menu vary from disc to disc 2 Use the buttons to select the item you want to change Depending on the disc you can use the number butto...

Page 21: ...ome discs you can only select the items using the num ber buttons 4 Press the ENTER button to execute your selection 5 Follow the instructions on the menu screen for interactive operations Refer to the instructions supplied with the disc as the operat ing procedure may differ according to the Video CD Note While playing a disc with PBC functions the number 0 9 10 buttons are useless Use MENU PBC t...

Page 22: ...Tracks Note You can not set repeat play during stop The repeat function for CVD SVCD and VCD2 0 are useless unless the PBC function set to OFF This button is useless in Tuner and AUX mode A B R A B R A B R A B R A B Re e e e epea pea pea pea peat Pla t Pla t Pla t Pla t Play y y y y You can play a specific portion in a chapter or track repeatedly This is useful when you want to memorize lyrics 1 W...

Page 23: ...y in track number again the FULL indica tor will appear on the TV screen and the front panel display 3 If you have completed the above program registration as you desire press the button to start the program play Note If you press the button or other foreign buttons in the program registration mode the system will interrupt and exit the pro gram setting 4 In program play mode press the button to s...

Page 24: ... not execute your selection and the selecting menu will exit The selecting menu will time out for a few seconds if you do not input valid number For some DVDs this function is ineffective If the playing disc is CVD SVCD or VCD 1 Press the GOTO button The time menu appears on the TV screen GOTO 2 Use the number buttons 0 9 10 to input the time code you want For example key in 0 1 2 3 GOTO 01 23 Whe...

Page 25: ...r CD 1 Press the DISPLAY button once to view the single elapsed time on the TV screen SINGLE ELAPSED 00 02 01 2 Press the DISPLAY button a second time to view the single remaining time on the TV screen SINGLE REMAIN 00 01 02 Chec Chec Chec Chec Checking Inf king Inf king Inf king Inf king Infor or or or orma ma ma ma mation Using Displa tion Using Displa tion Using Displa tion Using Displa tion Us...

Page 26: ...ntering the setup menu will reset the playback and all of audio output will be shut off After exiting the setup menu the system will go back to its previous status and resume playing according to the new setting As a shortcut pressing the SETUP again will complete and exit the setup expediently Or use screen cursor to quite menu to super menu Use to turn over the page FUNCTION DEFINITION 1 Press S...

Page 27: ...g item by using then press ENTER to confirm your selection 3 Use and ENTER to select and set other items 4 Use 0 9 buttons to key in numbers such as the password for parental control 5 Select Main Page and press ENTER to go back to the main page of setup menu 6 Press the icon as below to exit SETUP menu entirely SETUP MENU MAIN PAGE ...

Page 28: ...ERMAN SPANISH PARENTAL 1 G 3 PG 4 PG 13 6 PG R 7 NC 17 8 ADULT NO_PARENTAL PASSWORD CHANGE DEFAULTS RESET MAINPAGE The default settings are underlined SETUP MENU MAIN PAGE GENERAL SETUP SPEAKER SETUP AUDIO SETUP PREFERENCE SETUP EXIT SETUP GENERAL PAGE TVDISPLAY PAN SCAN LETTER BOX WIDE 16 9 TV TYPE AUTO NTSC PAL VIDEO OUT S VIDEO RGB ANGLEMARK ON OFF OSD LANGUAGE ENGLISH FRENCH ITALIAN GERMAN SPA...

Page 29: ...an mode playback are automatically played in Letterbox mode You must set the screen mode on your wide screen TV to FULL If WIDE is selected and a normal TV is connected 16 9 content will appear distorted during playback objects look thin TV TYPE Setting TV TYPE Setting TV TYPE Setting TV TYPE Setting TV TYPE Setting Path Main Page General Page TV TYPE Select the correct color TV system The default...

Page 30: ...EEN SAVER Turn the screen saver ON or OFF The default setting setting is OFF If you turn on the screen saver the screen saver image appears when you leave the system in pause or stop mode for 5 minutes The screen saver is useful to prevent your display from becoming damaged ON Turns on the screen saver OFF Turns off the screen saver OSD LANGU OSD LANGU OSD LANGU OSD LANGU OSD LANGUA A A A AGE Sett...

Page 31: ... as Best Position Setting TEST TEST TEST TEST TEST T T T T TONE Setting ONE Setting ONE Setting ONE Setting ONE Setting Path Main Page Speaker Page TEST TONE OFF ON Select ON or OFF to test the SPEAKER cyclicity Note If no disc the test tone function can also test the speaker cyclicity Best P Best P Best P Best P Best Position Setting osition Setting osition Setting osition Setting osition Setting...

Page 32: ...e VOLUME or buttons to adjust the level of each speaker Adjust the volume level so that the volume of the test tone from each speaker sounds the same The adjusted value will appear on the front panel display and TV screen If you do not operate the remote for a few seconds the value turns off and is stored in the system 3 Press OFF to turn off the test tone Note The playback will pause during test ...

Page 33: ...TUP DIGIT DIGIT DIGIT DIGIT DIGITAL OUT Setting AL OUT Setting AL OUT Setting AL OUT Setting AL OUT Setting Path Main Page Audio Setup Page DIGITAL OUT DIGITAL OUT Select the audio output format The default setting is underlined SPDIF RAW The COAXIAL or OPTICAL output accept Dolby Digital MPEG or DTS SPDIF signal SPDIF PCM The COAXIAL or OPTICAL output accept PCM signal OFF The COAXIAL or OPTICAL ...

Page 34: ...SC MENU Setting DISC MENU Setting DISC MENU Setting DISC MENU Setting DISC MENU Setting Path Main Page Preference Setup Page DISC MENU FRENCH ITALIAN GERMAN Select the preferred language for disc menu The default setting is ENGLISH Note When you select a preferred language that is not recorded on the DVD one of the recorded languages is automatically selected P P P P PARENT ARENT ARENT ARENT ARENT...

Page 35: ...fication level increases Two magnification levels are supported On each press of ZOOM the following message will appear on the TV screen ZOOM1 5 ZOOM2 ZOOM OFF ZOOM4 Note If you press the buttons the zoom point shifts allowing you to pan the zoomed picture Some discs may not respond to the zoom feature Zooming does not work on subtitles or menu screens included on DVDs The magnification level vari...

Page 36: ...hile playing a DVD disc press the LANGUAGE button repeat edly to select a desire language for audio and playback then continues in new language Note The first pressing shows the current selection Subsequent pressing toggles to the next audio setting Some DVDs allow you to change audio selections only via the disc menu Use and ENTER buttons The maximum number of audio languages stipulated by the ma...

Page 37: ...tl e A NGLE Return DISP LAY M UT E S ELE CT A DJ V OL S ET UP TITL E P LAY P AUS E OP E N CLOS E P ROG LIST E NING ENT POWER VOLUME PHONE 1 Plug your headphones to the HEADPHONE jack on the front panel of the unit Plug type 3 50 mm stereo If the listening mode is not set to Stereo the system will switch to stereo mode automatically when the headphones have been plugged 2 Adjust the volume level us...

Page 38: ...M or AM directly The last received station is tuned in 2 Press the PRESET or PRESET button repeatedly to se lect the preset station you want Each time you press the button the system tunes in one pre set station at a time In Tuner mode use the number buttons 0 9 10 to key in a preset number 1 40 you can select the preset station directly 3 Adjust the volume level by pressing the VOLUME or This sys...

Page 39: ... on the front panel 3 Press and hold the TUNING or button until the frequency indicator starts to change automatically then release the button Scanning stops when the system tunes in a station 4 Press MEMORY MEMO A preset number P00 and PROGRAM indicator appear on the front panel display 5 Press the PRESET or button on the remote control to select a preset number you want You can use the number bu...

Page 40: ... status Listening to an Exter Listening to an Exter Listening to an Exter Listening to an Exter Listening to an External nal nal nal nal Source Source Source Source Source If other audio component s are connected to this system see page 17 you can enjoy external source IR STANDB Y DV D TUNE R A UX 2 5 8 0 S LEE P RE PE AT A B N P M ENU PB C S LOW ME MO RY Zoo m E Q Langu age A UDIO Go To S ub Ti t...

Page 41: ...you press SLEEP the time changes as shown below 120 minutes 110 100 90 80 70 60 50 40 30 20 10 00 OFF 120 When you have specified the time the Sleep indicator lights on the front panel display 2 If no button has been pressed in 5 seconds the Sleep timer setting will be completed and the system start to time 3 You can check the time remaining before the system turns off Press SLEEP the remaining ti...

Page 42: ...e try connect ing your DVD system directly to your TV s S Video input if your TV is equipped with this input see page 17 The aspect ratio of the screen cannot be changed even though you set TV DISPLAY in the SETUP menu when you play a wide picture The aspect rate is fixed on your DVD disc If you connect the system with the S Video cable connect directly to the TV Otherwise you may not change the a...

Page 43: ... to 3 Stereo see page 40 Adjust the speaker volume see page 31 32 Subwoofer sound deficient or no sound Make sure connection setup is correct If it is still no good change the subwoofer phase angle 0o 180o or 180o 0o Radio stations cannot be tuned in Check that the antennas are connected correctly Adjust the antennas and connect an external antenna if necessary The signal strength of the stations ...

Page 44: ...ear speakers output ste reo sound with an expanded frequency range and a subwoofer channel for deep bass is independently provided This format is also called 5 1 because the subwoofer channel is counted as 0 1 channel since it functions only when a deep bass effect is needed All six channels in this format are recorded separately to realize superior channel separation Furtheremore since all the si...

Page 45: ...he limitation varies from disc to disc when it is activated playback is completely prohibited violent scenes are skipped or replaced with other scenes and so on Playback Control PBC Signals encoded on Video CDs Version 2 0 to control playback By using menu screens recorded on Video CDs with PBC func tions you can enjoy playing simple interactive programs pro grams with search functions and so on T...

Page 46: ... Vp p 75 ohms Optical Coaxial out 1 Vp p 75 ohms Audio line outputs Audio L R 1 Vrms 1k ohms Subwoofer 1 2Vrms maximum adjustable 1k ohms Audio power outputs Stereo mode 50 W 50 W 8 ohms at 1 kHz THD 10 Surround mode Front 50 W 50 W 8 ohms at 1 kHz THD 10 Center 50 W 8 ohms at 1 kHz THD 10 Rear 50 W 50 W 8 ohms at 1 kHz THD 10 Phones Headphones jack stereo 3 54mm General main unit Power requiremen...

Page 47: ...ustomerservice italy hitachi eu com HITACHIEUROPES A S Lyon Office B P 45 69671 Bron Cedex FRANCE Tel 04 72 14 29 70 Fax 04 72 14 29 99 Email france consommateur hitachi eu com HITACHIEUROPES A 364 Kifissias Ave 1 Delfon Str 152 33 Chalandri Athens GREECE Tel 1 6837200 Fax 1 6835694 Email service hellas hitachi eu com HITACHIEUROPES A Gran Via Carlos III 101 1 08028 Barcelona SPAIN Tel 93 409 2550...

Reviews: