background image

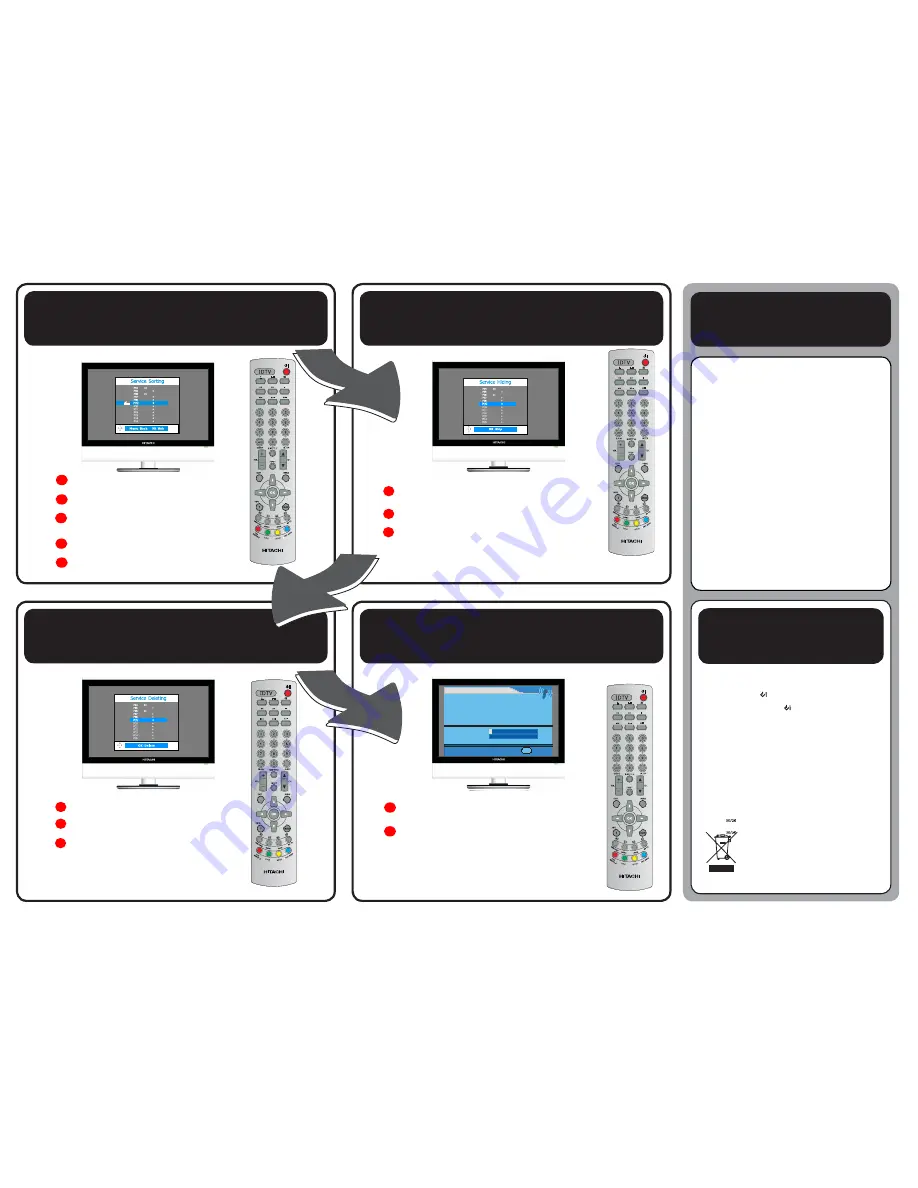
Sorting a channel

6

Skipping a channel

7

Checklist...

DTV Scan channel 

9

Deleting a channel

8

When the APS process has finished, The DTV scan channel menu will appear (as 
shown above).

The TV will automatically search and sort the channel.

Your TV is now fully tuned in, and ready to watch.

Note:

If you encounter problems receiving digital signals this may be due to having 

an inadequate aerial (you may have an old “Analogue” aerial). A replacement 
“Digital” aerial will be required, contact your local aerial installer for further 
information.

You should have...

z

Put the two AAA size batteries in your remote 
control.

z

Connected your TV to an aerial or VCR and/or 
VCR Satellite/Cable box.

z

Switched on your TV and any other connected 
equipment.  

z

Tuned in all available channels.

   Channel 1 .............. BBC1
   Channel 2 .............. BBC2
   Channel 3 .............. ITV
   Channel 4 .............. CH4
   Channel 5 .............. CH5
   Channel 6 .............. Satellite/Cable
   Channel 7 .............. VCR

Basic functions

1

After connecting the aerial to your LCD TV and connecting the mains cable to  

    the TV and mains socket, press 

AC SWITCH

 on the rear panel of the TV.

2

  A red LED indicator will show on the front panel of the TV.

3

Press the 

STANDBY

 button, and the red LED indicator will change to 

green.

4

To power off, press the 

STANDBY

 button again, and the green LED

    indicator will change to red.

In

the

interests

of

safety

and

to

avoid

unnecessary

energy

consumption, never leave your TV in standby while unattended for
long periods of time, eg. overnight, while on holiday or while out
of the house.

Changing channels

Press the 

NUMBER

 buttons to go directly to a channel e.g. press the number 

1

button to go to channel 1. For a channel number above 9, for instance, channel 12 
press the number 

1

 button quickly followed by the number 

2

 button.

To move up and down the channels in order press the

CH.

ɷ

or

CH.

ɹ

button.

Adjusting the volume

Press the

VOL.+

 button to increase the volume. Press the 

VOL.

 -

 button to decrease 

the volume.

Selecting Teletext

Press the 

 button to select Teletext. Press button again to select MIX. This will 

let you read the Teletext and still see the picture on your TV. The third time that you 
press the 

 button, text will clear from the screen.

C

A

B

A

B

This symbol on the product or in the instructions means that your 
electrical and electronic equipment should be disposed at the 
end of its life separately from your household waste. There are 
separate collection systems for recycling in the EU.
For more information, please contact the local authority or your 
retailer where you purchased the product.

Press the 

MENU

 button on the remote control to enter the menu option.

Press 

ɺɸ

 to select 

SETUP

.

Press

ɹɷ

to select 

CHANNEL SETUP

, press 

OK

 to enter 

CHANNEL

SETUP

.

Press 

ɹɷ

 to select 

SORT

, press 

OK

 to display the menu (as shown above).

Press 

ɹɷ

 to select the channel, press 

OK

 to sort the channel.

A

B

Press the

MENU

button on the remote control to return to the

CHANNEL

SETUP.

Press 

ɹɷ

 to select the 

SKIP

, press 

OK

 to enter menu option.

Press 

ɹɷ

 to select the channel, press 

OK

 to skip the selected channel.

C

A

B

Press the 

MENU

button on the remote control to return to the 

CHANNEL

SETUP.

Press 

ɹɷ

 to select the delete, press 

OK

 to enter menu option.

Press 

ɹɷ

 to select the channel, press 

OK

 to be deleted.

C

D

E

E X I T

Full sca n cha nne ls insta lla tio n

Cha nne ls fo und

0

Sca nning in pr o g r e ss

S ig n a l q u a lity

RCT-1522

RCT-1522

RCT-1522

RCT-1522

Summary of Contents for HIT15WDVB

Page 1: ...GB Instruction Manual HIT15WDVB HIT19WDVB 15 4 19 Widescreen LCD TV With Intergrated Digital Tuner ...

Page 2: ...or splashing or objects filled with liquids such as vases to be placed on the equipment DON T place hot objects or naked flame sources such as lighted candles or nightlights on or close to equipment High temperatures can melt plastic and lead to fires DON T use equipment such as personal stereos or radios so that you are distracted from the requirements of traffic safety DON T listen to headphones...

Page 3: ...ts and openings on the TV set are intended for ventilation and to ensure reliable operation To prevent overheating these openings must not be blocked or covered in anyway Heat and Flames The set should not be placed near to open flames and sources of intense heat such as an electric heater Ensure that no open flame sources such as lighted candles are placed on top of the TV Batteries should not be...

Page 4: ...hapter 2 Installing The LCD TV 10 Connecting a TV Cable or an Anterial 10 Connecting a DVD Player 14 Connecting a VCR Video Camera 15 Connecting a TV Cable Box or Satellite Receiver 16 Connecting an Audio Receiver 17 HDMI 18 Chapter 3 Using The Features 19 Basic Operation 19 OSD Menu Operation 20 The Video Settings 21 The Audio Settings 21 The Setup Settings 22 The Preferences Settings 23 The Scre...

Page 5: ...ng the TV SCART button on the remote control PC AUDIO IN AC IN 100 240V 50 60Hz AC POWER SWITCH VHF UHF IN Connect one end of the aerial lead to the aerial socket on the wall and the other end of the lead to the appropriate socket on the back of your TV Now go to stage 4 z If you just want to connect your TV to an aerial connect it as shown opposite z If you want to connect your TV to a VCR go to ...

Page 6: ...ot included How to install the TV Stand Ensure the TV stand is still attached with the bottom foam packaging material in the package Read all instructions before continuing with the stand installation a Open the box and make sure all necessary parts are in the box The package contains b Cover an even stable surface with a soft cloth Place the LCD TV unit face down on the cloth Fit the stand onto t...

Page 7: ... cover back into place 1 2 3 4 Effective range Your remote control can be activated from up to the LCD TV 5m away if points directly in front of the device 5M 30O 30O Handling the Remote Control ƒ It could cause corrosion or battery leak age and may result in physical injury and or property damage including fire ƒ Never mix used and new batteries in the device ƒ Replace all the batteries in a devic...

Page 8: ...on screen display press again to turn the OSD off VOL Adjust the volume up and down Select the main menu item and change values for items when in the OSD mode Turn the LCD TV on and into standby mode CH Ÿ ź Scan up and down through channels Select sub menu item when in the OSD mode INPUT Choose from different input signal sources Connect to the external earphone for private listening INPUT LED The...

Page 9: ...r video equipment 4 AV3 VIDEO AUDIO L R Connect to the composite A V output sockets on your video equipment 5 AV4 Y Pb Pr AUDIO L R Connect to the component Y Pb Pr video sockets and audio L R sockets of your DVD player HDTV or video equipment 6 AV5 VGA IN PC AUDIO IN Connect to a PC or other devices with a VGA interface 7 AV6 HDMI IN Connect to devices with a HDMI interface 8 DIGITAL OUT Connect ...

Page 10: ...re your LCD TV sound I II Cycle through the TV Sound options MONO DUAL STEREO This function is not available for this model 0 9 Select and switch to a channel by using 0 9 buttons GUIDE 10 In DTV mode press GUIDE button to display the Electronic Program Guide SLEEP Cycle through the LCD TV sleep timer OFF 15 30 or 60 minutes SUBTITLE Press the SUBTITLE button to display the subtitle which is broad...

Page 11: ... the current channel and the input source INFO Press once to display a variety of information such as the current channel and the input source Turn Teletext On Mix Off Display the main index in Teletext mode USB CARD This function is not available for this model Reveal hidden information such as the answer to a quiz in Teletext mode AUDIO This function is not available for this model Display the t...

Page 12: ...eception is more important than those for a black white TV reception For this reason a good quality outdoor antenna is strongly recommended The following is a brief explanation of the type of connection that is provided with the various antenna systems 75 ohm coaxial cable round IEC type connector 300 ohm twin lead cable flat Ŷ A 300 ohm system is a flat twin lead cable not included that can be atta...

Page 13: ...ohm cable into the ANT terminal Ŷ Some cable TV companies offer premium pay channels Since the signals of these premium pay channels are scrambled a cable TV converter descrambler is generally provided to the subscriber by the cable TV company This converter descrambler is necessary for normal viewing of scrambled channels Set your TV to channel 3 or 4 typically one of these channels is used If th...

Page 14: ...o on the remote control is only used for powering up and switching the TV to standby mode it does not disconnect the device from the mains supply To completely disconnect the main voltage please switch off the power switch on the rear of the TV or remove the power plug from the socket Unplug from a wall outlet Make sure the power switch is switched off STANDBY INPUT PC AUDIO IN AC IN 100 240V 50 6...

Page 15: ...anel of the TV b Press the STANDBY button the red light will change to green and the First Time Installation screen will show 1 Make sure an aerial is fitted then press OK button on the remote to start the Auto Programme Scan APS 2 In a short while you will see the TV programmes briefly as each channel is received and stored in the memory When APS is completed BBC1 will show press CH Ÿ ź buttons to ...

Page 16: ... equipments Press the STANDBY button to turn on your LCD TV To watch DVD press the INPUT button to select AV1 AV2 AV3 or AV4 Use an Audio cable to connect the DVD s audio output sockets to your LCD TV Use a S Video cable to connect your LCD TV and DVD player Use a SCART cable to connect the DVD s SCART socket to the LCD TV s SCART socket n METHOD C AV1 METHOD B AV2 METHOD A AV3 Use an A V cable to...

Page 17: ...R s SCART socket to the LCD TV s SCART socket Connect all power sources before turning on the power switch of the LCD TV or other connected equipments Press the STANDBY button to turn on your LCD TV n METHOD C AV1 METHOD B AV2 METHOD A AV3 To watch VCR press the INPUT button to select AV1 or AV3 To watch video camera press the INPUT button to select AV2 or AV3 Audio R Video Audio Cable ideo Audi L...

Page 18: ...onnect the TV Cable Box s RGB output sockets to your LCD TV Use a 3 5 mm socket to RCA adapter cable for connecting audio Method D AV1 Use a SCART cable to connect the TV Cable Box s SCART socket to the LCD TV s SCART socket Connect all power sources before turning on the power switch of the LCD TV or other connected equipments PC AUDIO IN AC IN 100 240V 50 60Hz AC POWER SWITCH VHF UHF IN Audio R ...

Page 19: ...tem Connecting an Audio Receiver Use an audio cable to connect the audio receiver s audio LINE IN sockets to LCD TV s DIGITAL OUT sockets Only for DVB T Input Source Press the STANDBY button to turn on your LCD TV Connect all power sources before turning on the power switch of the LCD TV or other connected equipments o p n Rear View of TV PC AUDIO IN AC IN 100 240V 50 60Hz VHF UHF IN Digital out C...

Page 20: ...imedia Interface HDMI This TV SET supports HDCP High Bandwidth Digital Content Protection Protocol for TV SET 480p 576p 720p 1080i modes When you connect to the output of an HD ready player DVD Player Set Top Box or PC switch to the AV6 HDMI function and the TV will automatically detect the resolution used by the HDMI source To get the best picture quality adjust the DVD Player or Set Top Box outp...

Page 21: ... button Change channels by pressing the CH Ÿ ź buttons To power off press the STANDBY button the green light will change to red Selecting a Source Press the INPUT button to display the function required TV AV Using the arrow buttons on the remote highlight the function required and press the OK button to select the function Select TV Channel Press the CH Ÿ ź buttons on the remote control and the C...

Page 22: ...l appear on the screen 3 Use Ż Ź buttons to highlight your main menu option then press OK button to enter your selected option Use Ÿ ź buttons to highlight an option of the sub menu Use Ż Ź buttons to change the value of the item Press the EXIT button to exit menu VIDEO OPTION DESCRIPTION Picture Mode Custom Select for user s settings The items of video can be adjusted when the picture mode is for...

Page 23: ...h by choosing YES or NO Choose YES to increase the blue colour intensity of the picture Choose NO to keep the default blue colour intensity Green Stretch Allow you to turn on or off the Green Stretch by choosing YES or NO Choose YES to increase the green colour intensity of the picture Choose NO to keep the default green colour intensity Colour Temp Allow you to adjust the Colour Temperature to be...

Page 24: ...tria Belgium Switzerland Czech Rep Germany Denmark Spain France Finland UK Greece Hungary Italy Norway Netherlands Portugal Poland Sweden Slovenia Slovakia Turkey and Others Manual Search Allow you to adjust the manual search by hand if signal is too weak or picture is blurry Channel Setup Press the Ź button to select Sort Delete Skip Finetune and Save Sort Allow you to manually sort the stored pr...

Page 25: ... you to change the 4 digit password Sleep Timer Allow you to select the sleep timer to be Off 15 min 30 min or 60 min OSD Timer Allow selection of the display time of the on screen menu 5s 10s 15s 20s and 25s OSD Reset Allow you to restore the factory settings OPTION DESCRIPTION Horizontal Size Allow you to adjust the Horizontal Size from 0 to 100 Horizontal Position Allow you to adjust the Horizo...

Page 26: ... Guide Allow to view the 7 day programs forecast and set the reminder for the favorite programs Press EDIT FAVOURITE LIST DTV SERVICES Highlight the Edit Favourite List option then press OK button to enter the menu then you can create modify and delete a favourite channel list There are three options in the menu Create a favourite list Modify a favourite list Delete a favourite list OK EXIT Edit f...

Page 27: ...favourite list MODIFY A FAVOURITE LIST You can modify the favourite list which you have created The list named TV RADIO is the default favourite channel list and it cannot be modified or deleted The rest are your created favourite list Select a favourite list then press OK button to modify the list TV RADIO FAV 1 FAV 2 OK EXIT Modify a favourite list Lock Skip Skip Add All Sort Move Exit Screen EXI...

Page 28: ...ist press O K to confirm EXIT OK Once the channel is locked you must enter the PIN Code that is previously set in the Parental Control menu in order to display the channel again Otherwise the menu will pop up and request to enter the PIN code again On the programe screen press the OK button to display the FAV menu For the four FAV menus the skipped channel name will not be shown unless you add it ...

Page 29: ... have moved to another location or want to rescan for new channels OK EXIT If you want the TV to do auto search for the channels use the Ÿ ź buttons to highlight the Channel Installation auto and press OK button to confirm You can choose the installation type by using the Ż Ź buttons Press the OK button to start the installation process If you choose Add the new channels will be added in the channe...

Page 30: ...choose the channel of which the signal quality bar is high then press the OK button to scan the channel If after the TV scanning the TV still found none the message Installation failed please wait will display on the screen Use the Ÿ ź buttons to hightlight New Detected Channels in the Channel Installation menu press OK button to confirm The TV will start searching the programes and the programe na...

Page 31: ... This function allows you to select the desired subtitle language whenever the subtitle information is available Use Ż Ź buttons to choose among the language options and press the OK button to confirm SYSTEM PARAMETERS Use the Ÿ ź buttons to highlight System Parameters in the Configuration menu then press the OK button to display the System Parameters menu Channel Inst allat ion U ser Sett ings Sy s...

Page 32: ...to confirm Sy st em U pgrade Syste m Param e te rs Sy st em Inform at ion Fact ory Reset OK EXIT DTV Warning all settings including previously stared TV channels will be erased Do you want to proceed Re installation confirmation Yes OK EXIT Configuration Syste m Inform a tion Hardware Version V2 1 ST5105 ST5105 Device iDTV5105 Plug in Software version Hardware Model Hardware Release OK UK_20070403 ...

Page 33: ...u then press OK button to enter the selected option The Parental Control menu will display as following PARENTAL CONTROL Channel Inst allat ion U ser Sett ings Sy st em Param et ers Configuration OK EXIT Signal Inform at ion Pa re nta l Control PIN code change OK EXIT Configuration Menu Parental Control Channel lock Receiver lock Maturity level Enabled Yes Yes Yes None SIGNAL INFORMATION Highlight...

Page 34: ...figuration Configuration Configuration Pa re nta l Control PIN code change OK EXIT Subtitle language Antenna Power Loacl Tim e offset Subtitle display Audio language Dolby Digital Opacity Level Configuration Menu Parental Control Channel lock Receiver lock Maturity level Enabled Yes Yes Yes None CONFIGURATION MENU Use the Ż Ź buttons to choose between YES and NO If you choose the YES option you wi...

Page 35: ...E TAILS Current program is displayed in the quarter screen image window Use the Ÿ ź buttons to change channels and view the programmes brief description There is a 7 day EPG you can see the channel lists by pressing the Ż Ź buttons The brief description of the highlighted channel is shown under the image window and you can see the extended description by pressing the INFO or OK button Press either...

Page 36: ...rol may be exhausted p Replace new and same brand batteries No picture no sound n Check the interface cable between TV and antenna cable TV o Press the STANDBY button on the remote p Press the INPUT button repeatedly on the remote to select the connected video sources Picture OK poor sound n Sound may be muted Press the button on the remote o Press the VOL button to increase the volume Poor pictur...

Page 37: ...nterface HDMI is a small user friendly interconnect that can carry up to 5 Gbps of combined video and audio in a single cable This system eliminates the cost complexity and confusion of multiple cables used to connect current A V systems HDTV Component Video Inputs ƒ Offers the best video quality for DVD 480p and 576p and digital set top box HD1080i 720p connections WSS Wide Screen Scale Function ...

Page 38: ... Wide 4 3 VGA Mode For 19 This unit may not support some VGA resolutions due to to the VGA source output signal In certain extreme cases the unit will only display a black or blue screen If this happens please change to another resolution or vertical frequency and try again For best performance the Vertical Line Frequency should be set to 60Hz Horizontal pixels x Vertical Scan Line Vertical Freque...

Page 39: ...tion 1280 pixels horizontal x 800 pixels vertical 1440 pixels horizontal x 900 pixels vertical Television System PAL I PAL I Brightness 250 cd m2 350 cd m2 Contrast Ratio 400 1 850 1 Inputs Output SCART 1 1 HDMI 1 1 VGA 1 1 PC Audio In 1 1 Video In 1 1 S video In 1 1 Earphone 1 1 Y Pb Pr 1 1 Digital Out 1 1 ANT In 1 1 Speaker Power 3 W 3 W 3 W 3 W Power Source MAX 100 240 V 50 60 Hz 50 W 100 240 V...

Page 40: ...end of the aerial lead to the aerial socket on the wall and the other end of the lead to the appropriate socket on the back of your TV Now go to stage 4 z If you just want to connect your TV to an aerial connect it as shown opposite z If you want to connect your TV to a VCR go to stage 3a z If you want to connect your TV to a VCR and a Satellite Cable box then go to stage 3b A Connect one end of a...

Page 41: ...er 1 button to go to channel 1 For a channel number above 9 for instance channel 12 press the number 1 button quickly followed by the number 2 button To move up and down the channels in order press the CH ɷ or CH ɹ button Adjusting the volume Press the VOL button to increase the volume Press the VOL button to decrease the volume Selecting Teletext Press the button to select Teletext Press button a...

Page 42: ...rged at National Rate For a replacement Remote Control for this product please quote part number 845 045 LM9XB THITH For a replacement Power cord for this product please quote part number 600 151 5000 LJH For a replacement SCART Adapter for this product please quote part number 412 SCA 0001H For a replacement Video cables for this product please quote part number 621 151 2000H For a replacement Au...

Reviews: