background image

EN

7.

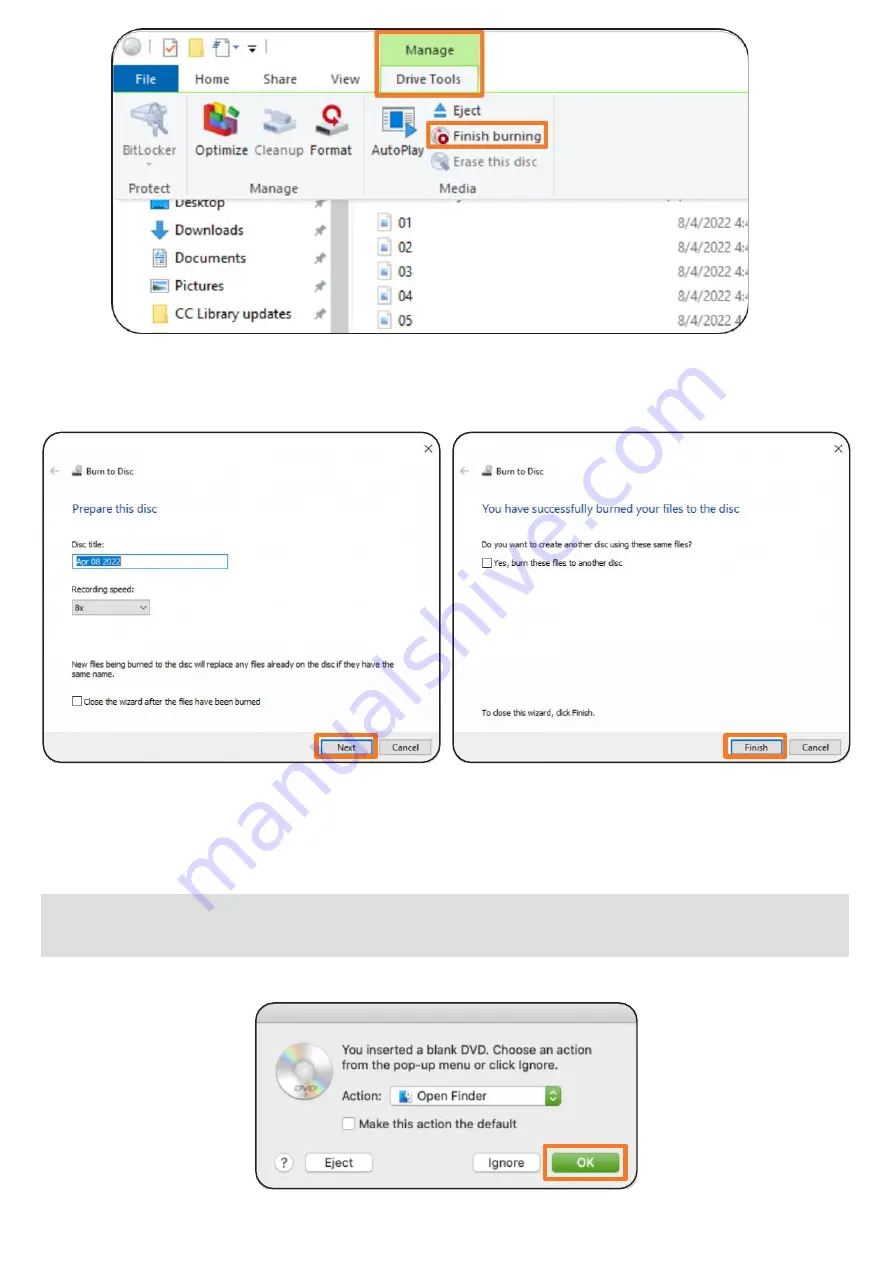
To burn the added files, click the “Manage” tab then “Drive Tools” on the tool bar ribbon of the 

File Explorer then click “Finish burning”.

8. Once a pop-

up window opens, set the disc title, recording speed then click “Next” to start the 

writing process. The writing process may take some time depending on the size of the files.

9.

After writing, click “Finish” to close the pop-up window.

4.8.2 Mac®

The screenshots in this chapter were taken on OS Catalina and might vary for 

different versions of the OS.

1. Place a blank compatible disc onto the disc compartment (F) and close it.

9

NOTICE

Summary of Contents for GPM1NB10

Page 1: ...Multi OS DVD Writer GPM1NB10 GPM1NW10 ...

Page 2: ...rce 4 3 Disconnecting from the power source 4 4 Inserting a disc 4 5 Ejecting a disc 4 6 Performing an emergency eject 4 7 Installing software Windows only 4 8 Burning a disc 4 8 1 Windows 4 8 2 Mac 4 9 Listening to music 4 9 1 Windows 4 9 2 Mac 4 10 Disc region code 5 1 Cleaning 5 2 Handling the disc compartment 5 3 Handling discs 5 4 Storage 8 1 Reading and writing speeds 02 03 04 05 06 07 08 4 ...

Page 3: ...A B E D C F G H A Micro USB port USB 2 0 B Main unit C Emergency eject hole D Open compartment button E Indicator F Disc compartment for 3 8 cm and 4 7 12 cm discs G Software disc user manual disc H USB A power data cable 3 ...

Page 4: ...cs This product can be also connected to a TV using ODD mode optical disc drive and can be used to view playback content directly on TV without using any additional software This product is intended for private use only This product is intended to be used in dry indoor areas only 4 Operation DISCLAIMER It is the sole responsibility of the user for direct or indirect damages including data loss cau...

Page 5: ...Device Connect the drive to the computer as shown in figure A Connect the USB cable micro plug to the drive B Connect the other end of the USB cable to your computer The drive may get its power from the PC USB power All systems may not meet USB power requirements and full performance may not be achieved In this case connect to the USB Y type cable not supplied A B 5 NOTICE ...

Page 6: ...source 1 Close the software being used 2 On the computer eject the product drive Windows Eject Path Press Windows E on the keyboard to open File Explorer Right click on the optical drive and select Eject from the pop up menu Mac Eject Path Method 1 Right click on the disc icon on the desktop and select Eject from the pop up menu Method 2 Press Command Shift C on the keyboard to open Computer folde...

Page 7: ...t will be used Emergency Eject Hole 7 CAUTION The disc rotates at high speed in the drive unit Use of worn damaged or non standard discs can adversely affect the drive and cause the disc to shatter or crush while in use Disc crush can only occur when damaged disk is used It is an extremely rare occurrence but there are steps which can be taken to prevent it Always check discs before placing them o...

Page 8: ...r insert the disc G then follow the on screen instructions to install the desired software The disc G also contains a copy of this user manual and a Quick Start Guide The screenshots in this chapter were taken on Windows 10 and might vary for different versions of the OS 1 Place a blank compatible disc onto the disc compartment F and close it 2 Click the notification that appears on the bottom rig...

Page 9: ...ecording speed then click Next to start the writing process The writing process may take some time depending on the size of the files 9 After writing click Finish to close the pop up window 4 8 2 Mac The screenshots in this chapter were taken on OS Catalina and might vary for different versions of the OS 1 Place a blank compatible disc onto the disc compartment F and close it 9 NOTICE ...

Page 10: ...cess The writing process may take some time depending on the size of the files 7 After writing the pop up window closes automatically 4 9 Listening to music 4 9 1 Windows 1 Place the desired disc onto the disc compartment F and close it 2 Open the disc drive using a File explorer 3 Double click the song that you want to play 4 The Windows Media Player app your default music player opens and plays ...

Page 11: ... with a soft slightly damp cloth Wipe the product dry after cleaning Never use corrosive detergents wire brushes abrasive scourers metal or sharp utensils to clean the product 5 2 Handling the disc compartment Do not insert foreign objects into the disc compartment as this could damage the mechanics The information from the compact disc is read by a laser from an optical lens If the product is bro...

Page 12: ...s can be easily affected by the slightest mechanical disturbance Never clean the product with a commercially available CD DVD cleaning set This can damage the product Recordable and rewritable discs are more sensitive than commercially available discs Use only a solvent free non abrasive marker when writing on a disc Do not stick labels on the discs Do not use worn damaged cracked warped or poor q...

Page 13: ...with a soft cloth or insert another disc 6 Frequently Asked Questions Problem Possible Cause Solution The product does not switch on The power data cable is not connected properly Check if the power data cable is properly connected to 2 USB A ports and the main unit No sound Volume is set too low Increase the volume level No video The USB A power data cable is not installed correctly Re install th...

Page 14: ...for Authoring CD ROM CD ROM XA CD I Video CD CD Extra CD Text Photo CD Single and Multi session standard CD DA M Disc DVD Reads and writes DVD R Ver 2 1 for General DVD R DL Dual Layer DVD RW DVD RAM Ver 2 2 DVD R DVD R DL Double Layer DVD RW CD R discs conforming to Orange Book Part 2 CD RW discs conforming to Orange Book Part 3 DVD R RW RAM with CPRM Supports CD layer of Super Audio CD Hybrid ty...

Reviews: