background image

4

Item

Description

SECURITY

This projector is equipped with security functions.

User registration is required before using the security functions.

Please contact your local dealer.

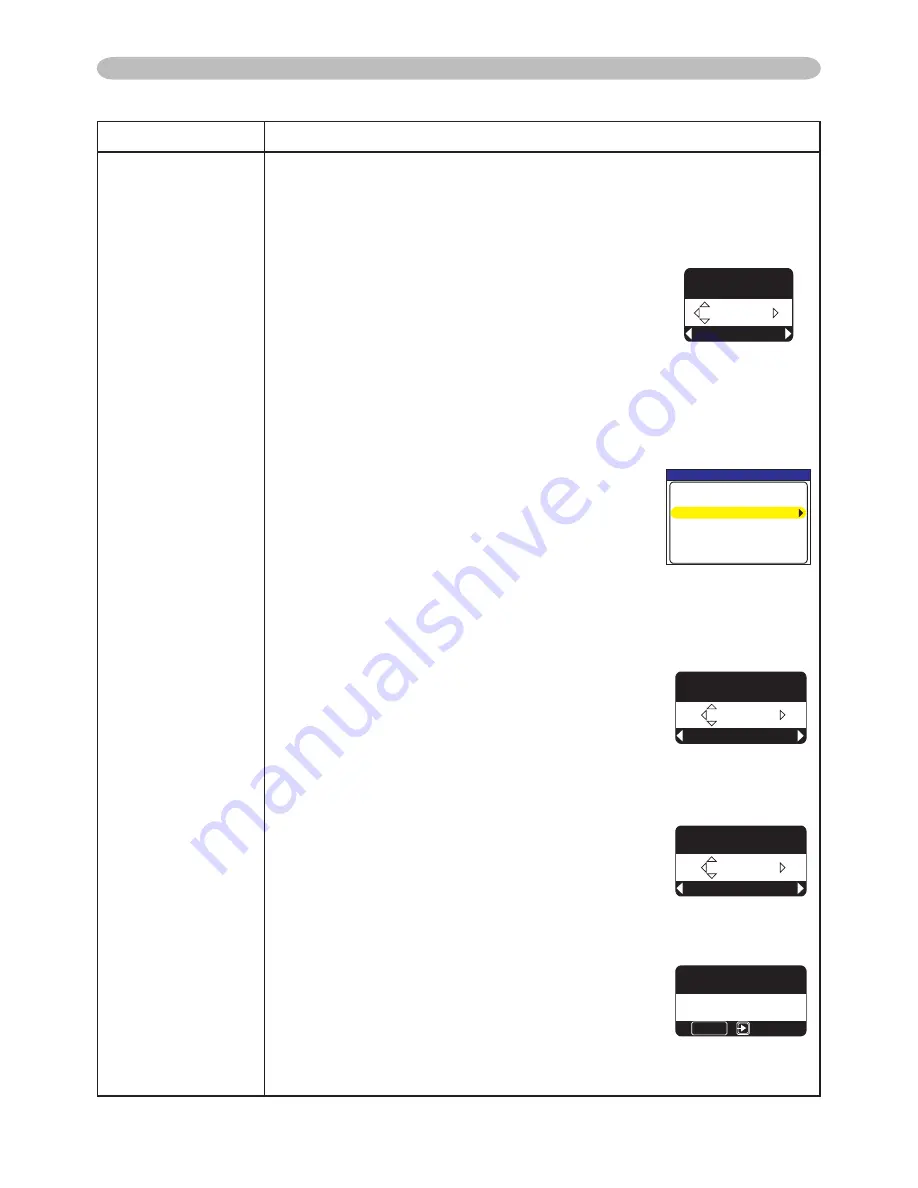
1. Using Security Features

1.1 Inputting the PASSWORD

1.1-1  Use the ▲/▼ buttons on the OPTION 

menu to select SECURITY and press the ► 

button. The ENTER PASSWORD box will be 

displayed.

The factory default PASSWORD is 

2805

. This 

PASSWORD can be changed (1.2 Changing the 

PASSWORD). 

• It is strongly recommended the factory default 

PASSWORD to be changed as soon as possible.
1.1-2  Use the ▲/▼/◄/► buttons to enter the 

registered PASSWORD. Move the cursor to 

the right side of the ENTER PASSWORD 

BOX and press the ► button to display the 

SECURITY menu. 


If an incorrect PASSWORD is input the 

ENTER PASSWORD BOX will be displayed 

again. If incorrect PASSWORD is input 3 

times the projector will turn off. Afterwards the 

projector will turn off every time an incorrect 

PASSWORD is input.

1.2 Changing the PASSWORD

1.2-1  Use the ▲/▼ buttons on the SECURITY menu 

to select SECURITY PASSWORD CHANGE 

and press the ► button to display the ENTER 

NEW PASSWORD BOX.

1.2-2  Use the ▲/▼/◄/► buttons to enter the new 

PASSWORD.

1.2-3  Move the cursor to the right side of the 

ENTER NEW PASSWORD BOX and press 

the ► button to display the NEW PASSWORD 

AGAIN BOX, enter the same PASSWORD 

again. 

1.2-4  Move the cursor to the right side of the NEW 

PASSWORD AGAIN BOX and press the ► 

button and the NOTE NEW PASSWORD BOX 

will be displayed for about 20 seconds, please 

make note of the PASSWORD during this 

time. 


Pressing the ENTER button will close the 

NOTE NEW PASSWORD BOX.

• Please do not forget your PASSWORD.

OPTION Menu (continued)

OPTION Menu

5'%74+6;

'06'42#55914&

0':6

37+6

5'%74+6;


5'%74+6;2#55914&%*#0)'
/[5ETGGP2#55914&67401((
2+0.1%-67401((
64#05+6+10&'6'%61467401((

5'%74+6;

'06'40'92#55914&

0':6

37+6

5'%74+6;

0'92#55914&#)#+0

1-

%#0%'.

5'%74+6;

016'0'92#55914&

':+6

'06'4

(continued on next page)

Summary of Contents for ED-X20 and

Page 1: ...ol indicates information that if ignored could possibly result in personal injury or physical damage due to incorrect handling Please refer to the pages written following this symbol NOTE The information in this manual is subject to change without notice The manufacturer assumes no responsibility for any errors that may appear in this manual The reproduction transfer or copy of all or any part of ...

Page 2: ... the magnify feature 18 Freezing the screen 19 Temporarily blanking the screen 19 Using the menu function 20 Content Content EASY MENU 21 Aspect Auto keystone execute Keystone Picture mode Brightness Contrast Color Tint Sharpness Whisper Mirror Reset Filter time Language Go to Advanced Menu PICTURE menu 23 Brightness Contrast Gamma Color temp Color Tint Sharpness My memory IMAGE menu 26 Aspect Ove...

Page 3: ... large projected image from even a short distance This projector has very compact and stylish design Also in such compact body high power optical engine is mounted which can make high bright image on screen Preparations Contents of package Please see the Contents of package in the User s Manual concise which is a book Your projector should come with the items shown there Contact immediately your d...

Page 4: ...ook into the lens or vents while the lamp is on since the strong light is not good for your eyes Do not handle the elevator knobs without holding the projector since the projector may drop down CAUTION Maintain normal ventilation to prevent the projector from heating up Do not cover block or plug up the vents Do not place anything that can stick or be sucked to the vents around the intake vents Cl...

Page 5: ... 12 14 16 FREEZE button 19 17 MY BUTTON 1 button 39 18 MY BUTTON 2 button 39 19 KEYSTONE button 18 20 POSITION button 17 21 MENU button 20 22 cursor buttons 12 20 23 ENTER button 12 20 24 ESC button 12 20 25 RESET button 12 20 26 Battery cover 11 HOME PAGE UP PAGE DOWN END VIDEO SEARCH FREEZE OFF ON MAGNIFY ASPECT AUTO BLANK MUTE VOLUME KEYSTONE MY BUTTON POSITION 1 2 ESC ENTER MENU RESET COMPUTER...

Page 6: ...Screen height b Projection distance c Screen height min max down up min max down up inch m m inch m inch cm inch cm inch m inch m inch cm inch cm inch 30 0 8 0 8 30 0 9 36 7 3 39 15 0 8 33 1 0 39 1 0 37 14 40 1 0 1 0 40 1 2 48 9 3 52 21 1 1 44 1 3 53 1 0 49 19 50 1 3 1 3 50 1 5 61 11 4 65 26 1 4 55 1 7 66 1 1 61 24 60 1 5 1 5 61 1 9 73 13 5 78 31 1 7 66 2 0 79 2 1 73 29 70 1 8 1 8 71 2 2 85 15 6 9...

Page 7: ...ojector on metallic thing or anything weak in heat Do not place the projector on carpet cushions or bedding Do not place the projector in direct sunlight or near hot objects such as heaters Do not anything near the projector lens or vents or on top of the projector Do not place anything that may be sucked into or stick to the vents on the bottom of the projector This projector has some intake vent...

Page 8: ...ll devices and unplug their power cords prior to connecting them to projector Connecting a live device to the projector may generate extremely loud noises or other abnormalities that may result in malfunction or damage to the device and the projector Use appropriate accessory or otherwise designed cables Ask your dealer about non accessory cables which may have to be of a specific length or equipp...

Page 9: ... manual of the corresponding laptop PC When the picture resolution is changed on a pc depending on an input automatic adjustment function may take some time and may not be completed In this case you may not be able to see a check box to select Yes No for the new resolution on Windows Then the resolution will go back to the original It might be recommended to use other CRT or LCD monitors to change...

Page 10: ...r dealer to newly get correct one Only plug the power cord into an outlet rated for use with the power cord s specified voltage range The power outlet should be close to the projector and easily accessible Remove the power cord for complete separation Never modify the power cord AC IN AC inlet to the outlet Connector of the power cord POWER indicator Using the security slot This product has the se...

Page 11: ...lder or disassemble a battery Do not allow a battery in a fire or water Keep batteries in a dark cool and dry place If you observe a leakage of a battery wipe out the flower and then replace a battery If the flower adheres your body or clothes rinse well with water immediately Obey the local laws on disposing the battery About the remote control signal The remote control works with the projector s...

Page 12: ...having a built in pointing device e g track ball like a notebook PC open BIOS setup menu then select the external mouse and disable the built in pointing device because the built in pointing device may have priority to this function Windows 95 OSR 2 1 or higher is required for this function And also this function may not work depending on the PC s configurations and mouse drivers You cannot do thi...

Page 13: ...r off the projector after all of connected devices are powered off This projector has the function that can make the projector automatically turn on off Please refer to the AUTO ON 37 and AUTO OFF 38 items of the OPTION menu Use the shutdown switch 54 only when the projector is not turned off by normal procedure Power on off STANDBY ON button POWER indicator Lens cover Turning off the power 1 Pres...

Page 14: ... When is selected for the AUDIO item of the SETUP menu 32 the volume adjustment is disable 1 Press the COMPUTER STORAGE button on the remote control Each time you press the button the projector switches its input port as below COMPUTER IN1 COMPUTER IN2 If the COMPUTER STORAGE button is pushed to switch from a signal from the VIDEO or S VIDEO port when TURN ON is selected for the AUTO SEARCH item i...

Page 15: ...ll check the VIDEO port Selecting an aspect ratio 1 Press the ASPECT button on the remote control Each time you press the button the projector switches the mode for aspect ratio in turn For a PC signal NORMAL 4 3 16 9 SMALL For a video signal s video signal or component video signal 4 3 16 9 14 9 SMALL For no signal 4 3 fixed The ASPECT button does not work when no proper signal is inputted The NO...

Page 16: ...ull the elevator knobs up to loose the elevator feet 2 Position the front side of the projector to the desired height 3 Release the elevator knobs in order to lock the elevator feet 4 After making sure that the elevator feet are locked put the projector gently 5 If necessary the elevator feet can be manually twisted to make more precise adjustments Hold the projector when twisting the feet CAUTION...

Page 17: ...ically adjusted And the aspect ratio will be automatically set to default Make sure that the application window is set to its maximum size prior to attempting to use this feature A dark picture may still be incorrectly adjusted Use a bright picture when adjusting For a video signal s video signal or component video signal The video format best suited for the respective input signal will be selecte...

Page 18: ...g 1 The AUTO executes automatic vertical keystone correction 2 The MANUAL displays a dialog for keystone correction Use the buttons for adjustment To close the dialog and complete this operation press the KEYSTONE button again Even if you do not do anything the dialog will automatically disappear after a few seconds The adjustable range of this correction will vary among inputs For some input this...

Page 19: ...h the indication will not appear when the TURN ON is selected to the MESSAGE item of the SCREEN menu 36 and the projector will go into the FREEZE mode To exit the FREEZE mode and restore the screen to normal press the FREEZE button again The projector automatically exits from the FREEZE mode when one of the projector s buttons or remote control buttons of STANDBY ON SEARCH COMPUTER STORAGE VIDEO B...

Page 20: ... will appear 4 Use the cursor buttons to operate the item Some functions cannot be performed when a certain input port is selected or when a certain input signal is displayed When you want to reset the operation press the RESET button on the remote control during the operation Note that some items ex LANGUAGE H PHASE VOLUME cannot be reset In the Advanced Menu when you want to return to the previo...

Page 21: ...LOR TEMP GAMMA NORMAL MID DEFAULT 1 DEFAULT CINEMA LOW DEFAULT 2 DEFAULT DYNAMIC HIGH DEFAULT 3 DEFAULT BOARD BLACK Hi BRIGHT 1 DEFAULT 4 DEFAULT BOARD GREEN Hi BRIGHT 2 DEFAULT 4 DEFAULT WHITEBOARD MID DEFAULT 5 DEFAULT When the combination of GAMMA and COLOR TEMP differs from pre assigned modes above the display on the menu for the PICTURE MODE is CUSTOM Please refer to the GAMMA 23 and COLOR TE...

Page 22: ... Using the buttons switches the mode for mirror status See the MIRROR item in SETUP menu 32 RESET Performing this item resets all of the EASY MENU items except the FILTER TIME and LANGUAGE A dialog is displayed for confirmation Selecting the RESET using the button performs resetting FILTER TIME Performing this item resets the filter time which counts usage time of the air filter A dialog is displa...

Page 23: ... time you press the ENTER button the pattern changes as below No pattern ð Gray scale of 9 steps Ramp Gray scale of 15 steps The eight equalizing bars correspond to eight tone levels of the test pattern except the darkest in the left end If you want to adjust the 2nd tone from left end on the test pattern Gray scale of 9 steps use the equalizing adjustment bar 1 The darkest tone at the left end of...

Page 24: ...low No pattern ð Gray scale of 9 steps Ramp Gray scale of 15 steps When this function is performed lines or other distortion may appear COLOR Using the buttons adjusts the strength of whole color Strong ó Weak This item can be selected only for a video signal s video or component video signal TINT Using the buttons adjusts the tint Greenish ó Reddish This item can be selected only for a video sign...

Page 25: ...ed memory has no data are skipped Remember that the current adjusted condition will be lost by loading data If you want to keep the current adjustment please save it before performing a LOAD function There may be some noise and the screen may flicker for a moment when loading data This is not malfunction The LOAD functions can be also performed by the MY MEMORY button which can be set by the MY BU...

Page 26: ...n when the V POSITION is selected will reset the V POSITION to the default setting When this function is performed on a video signal s video signal or component video signal the range of this adjustment depends on the OVER SCAN above setting It is not possible to adjust when the OVER SCAN is set to 10 H POSITION Using the buttons adjusts the horizontal position Left ó Right Over adjusting the hori...

Page 27: ...l be automatically adjusted And the aspect ratio will be automatically set to the default Make sure that the application window is set to its maximum size prior to attempting to use this feature A dark picture may still be incorrectly adjusted Use a bright picture when adjusting For a video signal s video signal or component video signal The video format best suited for the respective input signal...

Page 28: ...o s video or component video of 525i 480i or 625i 576i signal When this function is excessive it may cause a certain degradation of the picture COLOR SPACE Using the buttons switches the mode for color space AUTO ó RGB ó SMPTE240 ó REC709 ó REC601 This item can be selected only for a computer signal or component video signal The AUTO mode automatically selects the optimum mode The AUTO operation m...

Page 29: ...vertical frequency of 50 to 60 Hz When the TURN ON is selected a moving pictures are displayed more smoothly This function may cause a certain degradation of the picture In such a case please select the TURN OFF COMPUTER IN Set the computer input signal type for the ports of COMPUTER 1 Use the buttons to select a COMPUTER port to be set COMPUTER IN1 ó COMPUTER IN2 2 Use the buttons to select the c...

Page 30: ...x will be displayed Set the horizontal HORZ and vertical VERT resolutions using the buttons Although not all resolutions are guaranteed 5 To save the setting place the cursor on the right most digit and press the button The horizontal and vertical positions clock phase and horizontal size will be automatically adjusted and an aspect ratio will be automatically selected After the INFORMATION 41 dia...

Page 31: ... the zoom adjustment is set to the full WIDE wide angle focus whenever possible When the projector is placed on the level about 0 this function may not work When the projector is inclined to near 30 degree or over this function may not work well This function will be unavailable when the Transition Detector is on 46 KEYSTONE Using the buttons corrects the vertical keystone distortion Shrink the to...

Page 32: ...N and MIRROR status is changed Transition Detector Alarm 46 will be displayed when projector is restarted after the power switch is turned off VOLUME Using the buttons adjusts the volume High ó Low AUDIO Allocates the audio ports 1 Choose a picture input port using the buttons 2 Select the audio port to be interlocked with the input port using the buttons 1 ó 2 ó When is selected to an input port ...

Page 33: ... is displayed by pressing the BLANK button MyScreen ó ORIGINAL ó BLUE ó WHITE ó BLACK Feature MyScreen Screen can be registered by the MyScreen item 35 ORIGINAL Screen preset as the standard screen BLUE WHITE BLACK Plain screens in each color To avoid remaining as an afterimage the MyScreen or ORIGINAL screen will change to the plain black screen after several minutes From the SCREEN menu items sh...

Page 34: ...MyScreen item 35 ORIGINAL Screen preset as the standard screen TURN OFF Plain black screen To avoid remaining as an afterimage the MyScreen or ORIGINAL screen will change to the BLANK screen 33 after several minutes If also the BLANK screen is the MyScreen or ORIGINAL the plain black screen is instead used When the TURN ON is selected to the MyScreen PASSWORD of SECURITY item in OPTION menu 43 the...

Page 35: ...e previous dialog press the RESET or ESC button Registration takes several minutes When the registration is completed the registered screen and the following message is displayed for several seconds MyScreen registration is finished If the registration failed the following message is displayed A capturing error has occurred Please try again This function cannot be selected when the TURN ON is sele...

Page 36: ...f the menu is blank until a name is specified The SOURCE NAME dialog will be displayed 3 The current name will be displayed on the first line Use the buttons and the ENTER or INPUT button to select and enter characters The RESET button can be used to erase 1 character at a time The name can be a maximum of 16 characters 4 To change an already inserted character press the button while the cursor is...

Page 37: ...is function will be unavailable when the Transition Detector is on 46 AUTO ON Using the buttons turns on off the AUTO ON function TURN ON TURN OFF When set to the TURN ON the lamp in projector will be automatically turned on without the usual procedure 13 only when the projector is supplied with the power after the power was cut while the lamp was on This function does not work as long as the powe...

Page 38: ...lamp time is the time counted after the last resetting It is shown in the OPTION menu as the usage time of the lamp Pressing the RESET button or the button displays a dialog To reset the lamp time select the RESET using the button RESET ï CANCEL Please reset the lamp time only when you have replaced the lamp for a suitable indication about the lamp For the lamp replacement see the section Lamp 48 ...

Page 39: ...n will be lost by loading a data PICTURE MODE Changes the PICTURE MODE 21 FILTER RESET Displays the filter time reset confirmation dialogue 38 VOLUME Set the volume up VOLUME Set the volume down SERVICE Selecting this item displays the SERVICE menu Select an item using the buttons and press the button or the ENTER button to execute the item FAN SPEED AUTO ADJUST GHOST FILTER MESSAGE KEY LOCK FACTO...

Page 40: ...e buttons to disappear ghost FILTER MESSAGE Use the button to set the timer for the interval to show the message for cleaning up the air filter 50h ó 100h ó 200h ó 300h ó TURN OFF After selecting 50h 100h 200h or 300h the message REMINDER HRS PASSED AFTER THE LAST FILTER CHECK will appear after the timer reaches the interval time set by the menu 52 When the TURN OFF is chosen the air filter cleani...

Page 41: ...ther only 1 or only 2 12 Neither can be turned off at the same time INFORMATION Selecting this item displays a dialog titled INPUT INFORMATION It shows the information about the current input INPUT INFORMATION COMPUTER1 1024x768 60 FRAME LOCK ON INPUT INFORMATION S VIDEO PAL AUTO INPUT INFORMATION COMPUTER 576i 50 The FRAME LOCK message on the dialog means the frame lock function is working This i...

Page 42: ...tor will turn off Afterwards the projector will turn off every time an incorrect PASSWORD is input 1 2 Changing the PASSWORD 1 2 1 Use the buttons on the SECURITY menu to select SECURITY PASSWORD CHANGE and press the button to display the ENTER NEW PASSWORD BOX 1 2 2 Use the buttons to enter the new PASSWORD 1 2 3 Move the cursor to the right side of the ENTER NEW PASSWORD BOX and press the button...

Page 43: ... PASSWORD function can be used to prohibit access to the MyScreen function and prevent the currently registered MyScreen image from being overwritten 2 1 Turning on the MyScreen PASSWORD Function 2 1 1 Use the buttons on the SECURITY menu to select MyScreen PASSWORD and press the button to display the MyScreen PASSWORD on off menu 2 2 Setting the PASSWORD 2 2 1 Display the MyScreen on off menu usi...

Page 44: ...D BOX large Enter the registered PASSWORD and the screen will return to the MyScreen on off menu If an incorrect PASSWORD is input the menu will close If necessary repeat the process from 2 3 1 2 4 If you have forgotten your PASSWORD 2 4 1 Follow the procedure in 2 1 1 to display the MyScreen PASSWORD on off menu 2 4 2 Select TURN OFF to display the ENTER PASSWORD BOX large The 10 digit Inquiring ...

Page 45: ...lso turn off if there is no key input for about 5 minutes while the PIN BOX is displayed This function will activate only when the projector is started after the power switch was turned off Please do not forget your PIN Code 3 2 Turning Off the PIN LOCK Function 3 2 1 Follow the procedure in 3 1 1 to display the PIN LOCK on off menu Use the buttons to select TURN OFF and the PIN BOX will be displa...

Page 46: ...o display the input signal If the Transition Detector ALARM is displayed for about 5 minutes the lamp will turn off This function will activate only when the projector is started after the power switch was turned off 4 2 Setting the Transition Detector PASSWORD 4 2 1 Use the buttons on the SECURITY menu to select Transition Detector and press the or the ENTER button to display the Transition Detec...

Page 47: ...D is input the menu will close If necessary repeat the process from 4 3 1 4 4 If you have forgotten your PASSWORD 4 4 1 Follow the procedure in 4 1 1 to display the Transition Detector on off menu 4 4 2 Select TURN OFF to display the ENTER PASSWORD BOX large The 10 digit Inquiring Code will be displayed inside the BOX 4 4 3 Contact your dealer with the 10 digit Inquiring Code Your PASSWORD will be...

Page 48: ...e lamp by the handle It may make it easy to take the lamp out slightly toward the control panel of the projector 5 Insert the new lamp and retighten firmly the 2 screws of the lamp that are loosened in the previous process to lock it in place Tighten the screw first then screw 6 Slide the lamp cover back in place and firmly fasten the screw of the lamp cover 7 Turn the projector on and reset the l...

Page 49: ...e the room well and make sure not to breathe the gas that comes out of the projector vents or get it in your eyes or mouth Before replacing the lamp turn the projector off and unplug the power cord then wait at least 45 minutes for the lamp to cool sufficiently Handling the lamp while hot can cause burns as well as damaging the lamp Never unscrew except the appointed marked by an arrow screws Do n...

Page 50: ...n shape cut part to the swelled part of the filter cover 5 Put the filter unit back into the projector 6 Turn the projector on and reset the filter time using the FILTER TIME item in the EASY MENU 1 Press the MENU button to display a menu 2 Point at the FILTER TIME using the button then press the button A dialog will appear 3 Press the button to select RESET on the dialog It performs resetting the...

Page 51: ... wipe with gauze or a soft cloth If the projector is extremely dirty dip soft cloth in water or a neutral cleaner diluted in water and wipe lightly after wringing well Then wipe lightly with a soft dry cloth Other care WARNING Before caring make sure the power cable is not plugged in and then allow the projector to cool sufficiently The care in a high temperature state of the projector could cause...

Page 52: ...perature is rising Please turn the power off and allow the projector to cool down at least 20 minutes After having confirmed the following items please turn the power ON again Is there blockage of the air passage aperture Is the air filter dirty Does the peripheral temperature exceed 35 C If the same indication is displayed after the remedy please set FAN SPEED of the SERVICE item in the OPTION me...

Page 53: ...0 minutes After the projector has sufficiently cooled down please make confirmation of the following items and then turn the power on again Is there blockage of the air passage aperture Is the air filter dirty Does the peripheral temperature exceed 35 C If the same indication is displayed after the remedy please change the lamp referring to the section Lamp Blinking In Red or Lighting In Red Blink...

Page 54: ...ON Lighting In Green Alternative blinking in Red There is a possibility that the interior portion has become overcooled Please use the unit within the usage temperature parameters 5 C to 35 C After the treatment reset the power to ON NOTE When the interior portion has become overheated for safety purposes the projector is automatically shut down and the indicator lamps may also be turned off In su...

Page 55: ...se make confirmation of the attachment state of the lamp and lamp cover and then turn the power on again 48 Neither sounds nor pictures are outputted The signal cables are not correctly connected Correctly connect the connection cables 8 Signal source does not correctly work Correctly set up the signal source device by referring to the manual of the source device The input changeover settings are ...

Page 56: ...nging the COLOR TEMP COLOR TINT and or COLOR SPACE settings using the menu functions 21 24 28 COLOR SPACE setting is not suitable Change the COLOR SPACE setting to AUTO RGB SMPTE240 REC709 or REC601 28 Pictures appear dark The brightness and or contrast are adjusted to an extremely low level Adjust BRIGHTNESS and or CONTRAST settings to a higher level using the menu function 21 23 The WHISPER func...

Page 57: ... parts Please refer to the following figure Weight mass 1 8 kg Ports Computer input port COMPUTER IN1 D sub 15 pin mini x1 COMPUTER IN2 D sub 15 pin mini x1 Monitor output port MONITOR OUT D sub 15 pin mini x1 Video input port S VIDEO S video x1 VIDEO video x1 Audio input output port AUDIO IN1 Stereo mini x1 AUDIO IN2 Stereo mini x1 AUDIO OUT Stereo mini x1 Communication port CONTROL D sub 9pin x1...

Page 58: ... from the power outlet Thank you for purchasing this projector NOTE The information in this manual is subject to change without notice The manufacturer assumes no responsibility for any errors that may appear in this manual The reproduction transmission or use of this document or contents is not permitted without express written authority WARNING Before using read these user s manuals of this proj...

Page 59: ...place flower vases pots cups cosmetics liquids such as water etc on or around the projector Do not place metals combustibles etc on or around the projector To avoid penetration of foreign objects do not put the projector into a case or bag together with any thing except the accessories of the projector signal cables and connectors Never disassemble and modify The projector contains high voltage co...

Page 60: ...n in households where children are present Use only the correct power cord and the correct power outlet Incorrect power supply could result in fire or electrical shock Use only the correct power outlet depending on the indication on the projector and the safety standard The enclosed power cord must be used depending on the power outlet to be used Be cautious of the power cord connection Incorrect ...

Page 61: ...sconnecting the power cord or cables do it with your hand holding the plug or connector Do not place the cord near the heater Avoid bending the power cord sharply Do not attempt to work on the power cord Be careful in handling the battery of the remote control Incorrect handling of the battery could result in fire or personal injury The battery may explode if not handled properly Keep the battery ...

Page 62: ... periodically If the air filter becomes clogged by dust or the like internal temperature rises and could cause malfunction The projector may display the message such as CHECK THE AIR FLOW or turn off the projector to prevent the internal heat level rising When the indicators or a message prompts you to clean the air filter clean the air filter as soon as possible If the soiling will not come off t...

Page 63: ... detergent directly Do not use an aerosol sprays solvents volatile substances or abrasive cleaner Before using chemical wipes be sure to read and observe the instructions Do not allow long term close contact with rubber or vinyl About bright spots or dark spots Although bright spots or dark spots may appear on the screen this is a unique characteristic of liquid crystal displays and such do not co...

Page 64: ...emote control sensors could invalidate the remote control Avoid radio interference Any interfering radiation could cause disordered image or noises Avoid radio generator such as a mobile telephone transceiver etc around the projector About displaying characteristic The display condition of the projector such as color contrast etc depends on characteristic of the screen because the projector uses a...

Page 65: ...is product contains a mercury lamp do not put in trash Dispose of in accord with environmental laws For lamp recycling go to www lamprecycle org in USA For product disposal contact your local government agency or www eiae org in the US or www epsc ca in Canada For more information call your dealer Do not open the lamp cover while the projector is suspended from above This is dangerous since if the...

Page 66: ...o an outlet on a circuit different from that to which the receiver is connected Consult the dealer or an experienced radio TV technician for help INSTRUCTIONS TO USERS This equipment complies with the requirements of FCC Federal Communication Commission equipment provided that the following conditions are met Some cables have to be used with the core set Use the accessory cable or a designated typ...

Page 67: ...0 0 75 0 VESA SXGA 75Hz 1280 x 1024 91 1 85 0 VESA SXGA 85Hz 1600 x 1200 75 0 60 0 VESA UXGA 60Hz 1280 x 768 47 7 60 0 VESA W XGA 60Hz 1400 x 1050 65 2 60 0 VESA SXGA 60Hz NOTE Be sure to check jack type signal level timing and resolution before connecting this projector to a PC Some PCs may have multiple display screen modes Use of some of these modes will not be possible with this projector Depe...

Page 68: ...600 37 SVGA 75Hz 1 6 3 2 16 2 0 3 SVGA 75Hz 3 21 600 1 SVGA 85Hz 1 1 2 7 14 2 0 6 SVGA 85Hz 3 27 600 1 Mac 16 mode 1 1 3 9 14 5 0 6 Mac 16 mode 3 39 624 1 XGA 60Hz 2 1 2 5 15 8 0 4 XGA 60Hz 6 29 768 3 XGA 70Hz 1 8 1 9 13 7 0 3 XGA 70Hz 6 29 768 3 XGA 75Hz 1 2 2 2 13 0 0 2 XGA 75Hz 3 28 768 1 XGA 85Hz 1 0 2 2 10 8 0 5 XGA 85Hz 3 36 768 1 1152 x 864 75Hz 1 2 2 4 10 7 0 6 1152 x 864 75Hz 3 32 864 1 1...

Page 69: ... 15 A SCL DDC clock B No connection 8 Ground Blue 9 No connection K COMPUTER IN1 COMPUTER IN2 USB AUDIO IN1 AUDIO IN2 S VIDEO VIDEO MONITOR OUT CONTROL AUDIO OUT Connection to the ports 10 9 8 7 6 5 4 3 2 1 15 14 13 12 11 A B 2 for Component signal COMPUTER IN1 only Y Component video Y 1 0 0 1 Vp p 75 Ω terminator with composite CR PR Component video CR PR 0 7 0 1 Vp p 75 Ω terminator CB PB Compon...

Page 70: ...N NTSC4 43 1 0 0 1Vp p 75Ω terminator F AUDIO IN1 G AUDIO IN2 Ø3 5 stereo mini jack 200 mVrms 47kΩ terminator H AUDIO OUT Ø3 5 stereo mini jack 200 mVrms 1kΩ output impedance D S VIDEO Mini DIN 4pin jack Pin Signal 1 Color signal 0 286Vp p NTSC burst 75Ω terminator Color signal 0 300Vp p PAL SECAM burst 75Ω terminator 2 Brightness signal 1 0Vp p 75Ω terminator 3 Ground 4 Ground E D F H G ...

Page 71: ...S VIDEO VIDEO MONITOR OUT CONTROL AUDIO OUT I USB USB B type jack Pin Signal 1 5V 2 Data 3 Data 4 Ground 2 1 3 4 I J J CONTROL D sub 9pin plug Pin Signal Pin Signal Pin Signal 1 No connection 4 No connection 7 RTS 2 RD 5 Ground 8 CTS 3 TD 6 No connection 9 No connection 9 8 7 6 5 4 3 2 1 ...

Page 72: ... page 3 Turn the PC on and after the PC has started up turn the projector on Communications setting 19200bps 8N1 1 Protocol Consist of header 7 bytes command data 6 bytes 2 Header BE EF 03 06 00 CRC_low CRC_high CRC_low Lower byte of CRC flag for command data CRC_high Upper byte of CRC flag for command data 3 Command data Command data chart byte_0 byte_1 byte_2 byte_3 byte_4 byte_5 Action Type Set...

Page 73: ... setting value Decrement command 1 The PC sends the following decrement code to the projector Header Command data 05H 00H type 2 bytes 00H 00H 2 The projector decreases the setting value on the above setting code 3 The projector returns the response code 06H to the PC When the projector cannot understand the received command When the projector cannot understand the received command the error code ...

Page 74: ...EF 03 06 00 FD D3 02 00 04 20 00 00 Increment BE EF 03 06 00 9B D3 04 00 04 20 00 00 Decrement BE EF 03 06 00 4A D2 05 00 04 20 00 00 CONTRAST Reset Execute BE EF 03 06 00 A4 D2 06 00 01 70 00 00 PICTURE MODE Set NORMAL BE EF 03 06 00 23 F6 01 00 BA 30 00 00 CINEMA BE EF 03 06 00 B3 F7 01 00 BA 30 01 00 DYNAMIC BE EF 03 06 00 E3 F4 01 00 BA 30 04 00 BOARD BLACK BE EF 03 06 00 E3 EF 01 00 BA 30 20 ...

Page 75: ...a Point 6 Get BE EF 03 06 00 C4 FE 02 00 95 30 00 00 Increment BE EF 03 06 00 A2 FE 04 00 95 30 00 00 Decrement BE EF 03 06 00 73 FF 05 00 95 30 00 00 User Gamma Point 7 Get BE EF 03 06 00 80 FE 02 00 96 30 00 00 Increment BE EF 03 06 00 E6 FE 04 00 96 30 00 00 Decrement BE EF 03 06 00 37 FF 05 00 96 30 00 00 User Gamma Point 8 Get BE EF 03 06 00 7C FF 02 00 97 30 00 00 Increment BE EF 03 06 00 1A...

Page 76: ...03 22 00 00 Increment BE EF 03 06 00 2F 73 04 00 03 22 00 00 Decrement BE EF 03 06 00 FE 72 05 00 03 22 00 00 TINT Reset Execute BE EF 03 06 00 7C D1 06 00 0B 70 00 00 SHARPNESS Get BE EF 03 06 00 F1 72 02 00 01 22 00 00 Increment BE EF 03 06 00 97 72 04 00 01 22 00 00 Decrement BE EF 03 06 00 46 73 05 00 01 22 00 00 SHARPNESS Reset Execute BE EF 03 06 00 C4 D0 06 00 09 70 00 00 MY MEMORY Load Set...

Page 77: ...0 00 H SIZE Get BE EF 03 06 00 B5 82 02 00 02 21 00 00 Increment BE EF 03 06 00 D3 82 04 00 02 21 00 00 Decrement BE EF 03 06 00 02 83 05 00 02 21 00 00 H SIZE Reset Execute BE EF 03 06 00 68 D2 06 00 04 70 00 00 AUTO ADJUST Execute BE EF 03 06 00 91 D0 06 00 0A 20 00 00 COLOR SPACE Set AUTO BE EF 03 06 00 0E 72 01 00 04 22 00 00 RGB BE EF 03 06 00 9E 73 01 00 04 22 01 00 SMPTE240 BE EF 03 06 00 6...

Page 78: ... 33 00 00 NORMAL BE EF 03 06 00 AB 22 01 00 00 33 01 00 Get BE EF 03 06 00 08 23 02 00 00 33 00 00 MIRROR Set NORMAL BE EF 03 06 00 C7 D2 01 00 01 30 00 00 H INVERT BE EF 03 06 00 57 D3 01 00 01 30 01 00 V INVERT BE EF 03 06 00 A7 D3 01 00 01 30 02 00 H V INVERT BE EF 03 06 00 37 D2 01 00 01 30 03 00 Get BE EF 03 06 00 F4 D2 02 00 01 30 00 00 VOLUME COMPUTER1 Get BE EF 03 06 00 CD CC 02 00 60 20 0...

Page 79: ...3D 01 00 30 26 00 00 On BE EF 03 06 00 6F 3C 01 00 30 26 01 00 Get BE EF 03 06 00 CC 3D 02 00 30 26 00 00 IR REMOTE FREQ HIGH Set Off BE EF 03 06 00 03 3C 01 00 31 26 00 00 On BE EF 03 06 00 93 3D 01 00 31 26 01 00 Get BE EF 03 06 00 30 3C 02 00 31 26 00 00 LANGUAGE Set ENGLISH BE EF 03 06 00 F7 D3 01 00 05 30 00 00 FRANÇAIS BE EF 03 06 00 67 D2 01 00 05 30 01 00 DEUTSCH BE EF 03 06 00 97 D2 01 00...

Page 80: ...0 30 00 00 TURN ON BE EF 03 06 00 AB EE 01 00 C0 30 01 00 Get BE EF 03 06 00 08 EF 02 00 C0 30 00 00 RS 232C Communication continued MESSAGE Set TURN OFF BE EF 03 06 00 8F D6 01 00 17 30 00 00 TURN ON BE EF 03 06 00 1F D7 01 00 17 30 01 00 Get BE EF 03 06 00 BC D6 02 00 17 30 00 00 AUTO SEARCH Set TURN OFF BE EF 03 06 00 B6 D6 01 00 16 20 00 00 TURN ON BE EF 03 06 00 26 D7 01 00 16 20 01 00 Get BE...

Page 81: ...inued MY BUTTON 2 Set COMPUTER1 BE EF 03 06 00 C6 32 01 00 01 36 00 00 COMPUTER2 BE EF 03 06 00 06 30 01 00 01 36 04 00 S VIDEO BE EF 03 06 00 A6 33 01 00 01 36 02 00 VIDEO BE EF 03 06 00 56 33 01 00 01 36 01 00 MIU BE EF 03 06 00 66 31 01 00 01 36 06 00 INFORMATION BE EF 03 06 00 06 3F 01 00 01 36 10 00 AUTO KEYSTONE EXECUTE BE EF 03 06 00 96 3E 01 00 01 36 11 00 MY MEMORY BE EF 03 06 00 66 3E 01...

Page 82: ...14 29 70 Fax 04 72 14 29 99 Email france consommateur hitachi eu com HITACHI EUROPE S A 364 Kifissias Ave 1 Delfon Str 152 33 Chalandri Athens GREECE Tel 1 6837200 Fax 1 6835694 Email service hellas hitachi eu com HITACHI EUROPE S A Gran Via Carlos III Trade Torre Este 08028 Bar 86 Planta 5a Edificios celona SPAIN Tel 93 409 2550 Fax 93 491 3513 Email atencion cliente hitachi eu com HITACHI EUROPE...

Reviews: