Hitachi DV-PF5E Instruction Manual Download Page 20

– 20 –

EN

The PDC system looks for the start signal several hours
before published start time and for several hours afterwards.
This means that if the programme is broadcast anytime dur-
ing this period it will be recorded correctly. Please note that if
you have set an incorrect Timer setting, it will stay in the
memory until you cancel it (See above for details on how to
cancel a programme).

VCR

PDC (Programme Delivery Control)

When timer recording is finished, the DVD/VCR will automat-
ically rewind the tape to the beginning where it started
recording. If there are any remaining programmes including
Daily, Everyday, & Weekly, AUTO RETURN will not operate.

Press 

MENU

.

Press 

K

or 

L

repeatedly to point to “SET UP”, then press 

B

.

Press 

K

or 

L

to point to “AUTO RETURN”, then press 

B

.

• [ON] will appear next to “AUTO RETURN”.

Press 

MENU

to exit.

TO WATCH THE RECORDED TIMER PROGRAMME

Press 

TIMER

to cancel the Timer Stand-by. Then, select

VCR mode by pressing 

VCR

on your remote. Press 

B

.

4

3

2

1

VCR

Auto Return

RECORDING FUNCTION

For weekly recording:

To record a TV programme at the

same time on the same channel every week. While the
month digit is flashing, press 

K

or 

L

repeatedly to select “W-

MO” (Example: every monday).

For once-only recording only : Press 

K

or 

L

repeatedly

until your desired day appears.
Press 

K

or 

L

repeatedly until the relevant start hour

appears. Next, enter the minute digit.
Press 

K

or 

L

repeatedly until the relevant end hour

appears. Next, enter the minute digit.
Press 

K

or 

L

repeatedly until the relevant channel num-

ber appears.
Press 

K

or 

L

repeatedly until your the desired tape

speed appears.
Press 

K

or 

L

repeatedly to set PDC “ON” or “OFF”.

• The Programme Delivery Control (PDC) is a very conve-

nient system which assures that the TV programmes
you have programmed for timer recording will be record-
ed exactly from beginning to end (Refer to page 21).

Press 

B

. Programme 1 is now completed.

Press 

MENU

to exit.

To set another timer programme, repeat steps 

to 

.

Press 

TIMER

to activate the timer.

• TIMER light comes on.
• As REC light comes on the DVD/VCR becomes

STANDBY status, and switches to DVD mode automat-
ically.

• When all timer recordings are finished, REC light will

flash. To use the DVD/VCR again as usual, press
TIMER to disable the flashing REC light, then Press

DVD

or 

VCR

to choose DVD or VCR mode, then contin-

ue with the other features as described in this manual.

13

11

3

12

11

10

9

8

7

6

5

• If there is a power failure or the DVD/VCR is unplugged

for more than 30 seconds, the clock setting and all
timer settings will be lost.

• If a tape ends during TIMER RECORDING, the

DVD/VCR will stop, eject the tape, and switch to the DVD
mode automatically as the REC light blinks. (If the DVD
power is off, the VCR will become STANDBY status).

• If a tape is not in the DVD/VCR or does not have a

safety tab, the REC light flashes and timer recording
will not operate. Please insert a recordable tape.

• When all timer recordings are finished, the REC light

will flash. To use the DVD/VCR again as usual, press
TIMER to disable the flashing REC light, then press
VCR to select the VCR mode. Select either VCR or
DVD mode, then continue with the other features as
described in this manual.

• When timer recordings are set, the REC light will come

on. To use the DVD/VCR as usual until the time for the
recording, press 

TIMER

so that REC light disappears.

Press 

VCR

to choose the VCR mode. Select either

VCR or DVD mode, then continue with the other fea-
tures as described in this manual.

• In timer standby mode, VCR feature does not function.
• To exit timer standby mode, press 

TIMER

. The REC

light disappears and you can operate the VCR.

If you want to use the DVD/VCR during a VCR timer
recording or while the TIMER light is on or flashes.

• You can use the DVD/VCR while the REC light is on or

flashes, or during a timer recording. Press 

y

y

/I

to turn

on the DVD/VCR. ;Press 

DVD

on the remote control to

choose DVD mode, then continue with the other DVD
features as described in this manual. You don’t have to
set the TIMER off to use the DVD only.

TO STOP AN AUTOMATIC TIMER PROGRAMME
ALREADY STARTED

Press 

C

/

A

on the DVD/VCR.

VCR

Hints for Timer Recording

TO CHECK, CORRECT, OR CANCEL AN AUTOMATIC
TIMER PROGRAMME

Press 

TIMER

.

• If the VCR’s power is off, press 

y

y

/I

instead of TIMER,

then go on to the next step.

• If the DVD output mode is selected, you have to switch

it to the VCR mode by pressing the 

VCR

on the remote

control or the OUTPUT on the DVD/VCR.

Repeat steps 1 to 3 in the “Timer recording” section.
Select the programme number you want to check by
pressing 

K

or 

L

.

• The details of the selected programme appears on the

TV screen.

• Go to the digit you want to change by pressing 

s

or 

B

.

Then, enter correct numbers by pressing Arrow 

K

or 

L

.

• You may cancel the entire programme by pressing 

s

while the programme number flashes.

Press 

MENU

to exit.

Press 

TIMER

to return to timer stand-by mode.

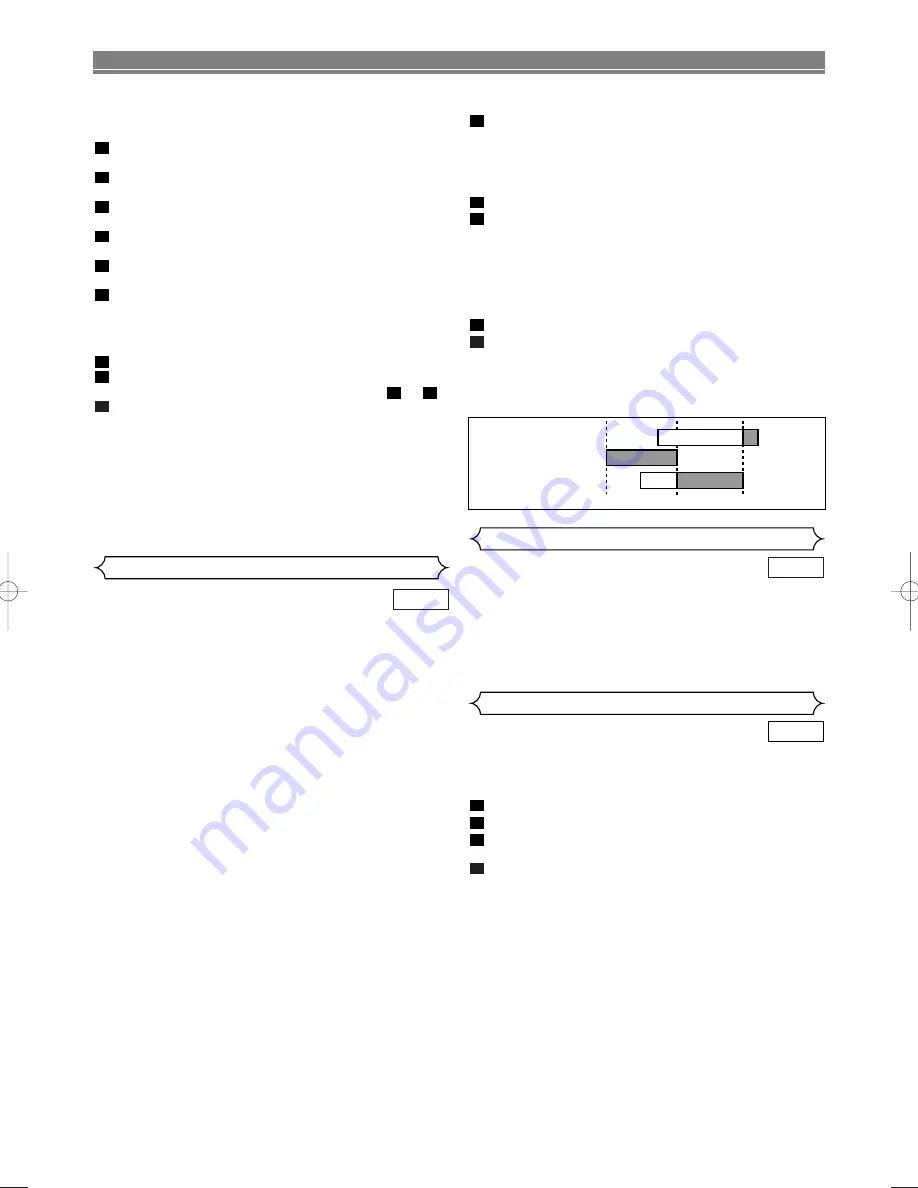
TO AVOID OVERLAP OF TIMER PROGRAMMES

A timer programme will not work whilst another programme
is under execution.

5

4

3

2

1

9:00

10:00

11:00

Programme 1

Programme 2

Programme 3

H97H1BD(EN).qx4  04.10.27  5:11 PM  Page 20

Summary of Contents for DV-PF5E

Page 1: ...with VIDEO CASSETTE RECORDER INSTRUCTION MANUAL Instruction manual To obtain the best performance and ensure years of trouble free use please read this instruction manual completely MODEL DV PF5E UK DVD VCR Combo DV PF5E UK PAL ...

Page 2: ... unit Warning TO AVOID THE HAZARDS OF ELECTRICAL SHOCK AND FIRE 1 Do not handle the power cord with wet hands 2 Do not pull on the power cord when disconnecting it from AC wall outlet Grasp it by the plug 3 If by accident water is spilled on your DVD VCR unplug the power cord immediately and take the unit to our Authorized Service centre for servicing 4 Do not put your fingers or objects into the ...

Page 3: ...er vital information here and retain this book as a permanent record of your purchase to aid identification in case of theft Serial numbers are not kept on file Before Switching on make sure that the voltage of your electricity supply is the same as that indicated on the rating plate Mains Cord This appliance may be fitted with a non rewireable plug If it is neces sary to change the fuse in a non ...

Page 4: ...19 Normal Recording 19 OTR One Touch Recording 19 Timer Recording 19 Hints for Timer Recording 20 PDC Programme Delivery Control 20 Auto Return 20 Copying a video tape 21 A Status Display 21 TV Colour System 21 Auto Rewind 21 Real Time Tape Counter 21 PLAYING A DISC 22 Basic Playback 22 General Features 22 Disc Navigation 22 Pause 22 Disc Menus 22 Title Menu 22 CALLING UP A MENU SCREEN DURING PLAY...

Page 5: ...ms to the PAL colour system Also you can play discs recorded with the NTSC colour systems via a PAL sys tem TV set 2 Certain DVD Video discs do not operate as described in this manual due to the intentions of the disc s producers 3 Only the discs which have been recorded in the video format and finalized can be played back Discs unfinalized or recorded in the video recording format cannot be playe...

Page 6: ...l Search Chapter search Title search Track search Time search Repeat Chapter Title Track All A B Zoom Marker Electronic references point designated by user can be called back Disc Navigation Displays the first scenes of each chapter in a title Resume Play Virtual Surround EURO A V SCART You can set SCART OUTPUT to RGB or S VIDEO for video output MPEG sound This DVD VCR can handle a disc that suppo...

Page 7: ...tapes when the green VCR OUTPUT light is on To make the green VCR OUTPUT light come on VCR on the remote control or OUTPUT on the front panel 14 OUTPUT Press to select DVD mode or VCR mode You can switch the output mode either by pressing OUTPUT on the front panel or by pressing DVD or VCR on the remote control However if you press OUTPUT on the front panel first you need to re select the correspo...

Page 8: ... your TV Caution Do not touch the inner pins of the jacks on the rear panel Electrostatic discharge may cause perma nent damage to the DVD VCR COAXIAL DIGITAL AUDIO OUT S VIDEO OUT DVD DVD VCR AV1 TV AV2 DECODER VCR ANALOG AUDIO OUT L R AERIAL RF OUT 5 1 2 3 4 6 7 8 REAR PANEL Display FUNCTIONAL OVERVIEW Lights up when the inserted disc is being played back Displays a type of the disc which is ins...

Page 9: ...ction following the and marks in the remote control unit s battery compartment To prevent damage or battery fluid leakage Do not use a new battery with an old one Do not use two different types of batteries such as alkaline and manganese Do not short circuit disassemble heat or dispose of batteries in flames Remove the batteries when not planning to use the remote control unit for a long period of...

Page 10: ...er recording SURROUND SPEED Number Buttons To select chapter or title directly DVD To select track directly CD To select channel DISC NAVIGATION Button The first scenes of each chapter of the title being played will be displayed DVD DISCNAVIGATION SEARCH Buttons Allows you to search forward backward through a disc To begin slow forward backward through a disc DVD Press to call up the index or time...

Page 11: ...tape in slow motion SLOW Button SLOW SKIP PROG SKIP PROG OPEN CLOSE EJECT Displays the current time tape counter channel Press to eject the video cassette from the VCR To select STEREO L CH R CH or normal Press to control the TV programmes To adjust the tracking manually during playback Begin tape playback To select the DVD output mode To use the remote control in DVD mode Accesses various audio f...

Page 12: ... picture quality NICAM stereo sound is only achieved when using a SCART cable Euro A V scart cables are obtainable at your dealer AV1 TV CONNECTION TO TV If your TV has Scart sockets you may connect your DVD VCR s AV1 TV scart socket to the Scart socket on the back of your TV Please see the instruction manual for your TV AV2 DECODER CONNECTION FOR OTHER EXTERNAL DEVICES The second Scart socket AV2...

Page 13: ...onnected to a Dolby Digital decoder or an MPEG decoder set DOLBY DIGITAL and MPEG to PCM for audio output in the setup mode Playing a DVD using incorrect settings may generate noise distortion and may also damage the speakers See page 26 The audio source on a disc in a Dolby Digital 5 1 channel surround format cannot be recorded as digital sound by an MD or DAT deck COAXIAL COAXIAL DIGITAL AUDIO O...

Page 14: ... we recommend connecting it to the this product s S Video output con nector using a commercially available S Video connection cord If you use the Euro A V SCART jack it is not necessary to connect the analog audio cable Connect the DVD VCR directly to a TV If the A V cables are connected to a VCR pictures may be distorted due to the copy protection system When your TV conforms to RGB input signal ...

Page 15: ... a pre recorded tape into the DVD VCR The DVD VCR will turn on and start playback automati cally If playback does not start press B B PLAY Select and adjust your TV to channel 35 If the playback picture appears on the TV screen con tinue with step If channel 35 is employed for broadcasting or interfer ence lines appear on the picture the RF converter must be set to a different channel between CH22...

Page 16: ... by pressing B B Although seconds are not displayed they begin count ing from 00 when you exit by pressing MENU Use this feature to synchronise the clock with the correct time When unplugging the power cord or if there is a power failure for more than thirty seconds you may have to reset the clock Auto Clock Setting Follow the steps through 1 to 3 in Manual clock setting Press K or L to select AUT...

Page 17: ... then press B Press K or L to select MANUAL then press B Press K or L to select POSITION then press B B When a weak signal is received in Manual Tuning mode you can change the background to solid blue or the static screen by pressing CLEAR C RESET Press the number buttons or K or L to select relevant position number then press B Press K or L to select SKIP then press B to select ON To memorise the...

Page 18: ...he menu Once you select the Picture Select mode it stays in effect even after you turn off the DVD VCR 4 3 18 EN PLAYBACK FUNCTION Normal Playback Insert a prerecorded tape The DVD VCR will turn on If the safety tab has been removed the VCR will start playback automatically If a cassette is in DVD VCR STOP symbol appears in TV screen when turning on the DVD VCR VCR mode Turn on the TV and select t...

Page 19: ...er the DVD VCR has been in Pause mode for 5 min utes it will stop automatically to protect the tape and the video head from damage Press C when recording is completed NOTE When you wish to watch another programme while recording select desired channel on your TV 5 4 3 2 1 VCR Normal Recording You may programme the DVD VCR to start and end a record ing while you are away You can set eight programme...

Page 20: ...ailure or the DVD VCR is unplugged for more than 30 seconds the clock setting and all timer settings will be lost If a tape ends during TIMER RECORDING the DVD VCR will stop eject the tape and switch to the DVD mode automatically as the REC light blinks If the DVD power is off the VCR will become STANDBY status If a tape is not in the DVD VCR or does not have a safety tab the REC light flashes and...

Page 21: ...pe TO MONITOR THE RECORDING Turn on the TV and select the video channel on the TV SP 0 12 34 SP 17 40 P02 CLOCK and CHANNEL NUMBER mode COUNTER mode Press once Press once Press once OFF mode Press DISPLAY to check the Counter or Clock Channel number Each time you press the DISPLAY TV screen will change as illustrated When you select the channel using the remote control number buttons select the de...

Page 22: ...le or it may skip these titles During the playback of two layered disc pictures may stop for a moment This happens when the 1st layer switches to the 2nd layer This is not a malfunction 5 4 3 2 1 CD DVD Press MENU The DVD main menu will appear If the feature is not available symbol may appear on the TV screen If disc menu is available on the disc audio language subtitle options chapters for the ti...

Page 23: ...rack 3 press 3 To play track 26 press 10 2 6 on the number but tons Using the SEARCH MODE Press SEARCH MODE The Track search display appears Within 30 seconds select a desired track number using the number buttons For single digits press 0 first if the total track of the disc is more than 10 tracks Playback will start at the selected track Using the SKIP H H G G During playback press SKIP G G to m...

Page 24: ...k CD DA TOTAL 0 08 00 ENTER ALL CLEAR 8 3 30 8 3 30 9 2 30 10 1 30 2 2 This shuffles the order of tracks instead of playback of in the original sequence In STOP mode press MODE twice RANDOM screen appears Press B PLAY to start ran dom playback NOTE To repeat the current track in the random selection press REPEAT repeatedly until TRACK appears during playback To repeat the entire random selection p...

Page 25: ...screen Ensure that appears in the display and press s or B to select the number of the marker 1 10 When you reach the desired point press ENTER The Title or Track and elapsed playing time will appear on the TV screen To return to a Marker later press SEARCH MODE repeatedly until the Marker Setup Screen appears during playback and s or B to choose the desired marker then press ENTER NOTES Opening t...

Page 26: ...TOM menu will appear Press s or B to select AUDIO then ENTER to confirm Press K or L to select an item then press ENTER DRC Dynamic Range Control To compress the range of sound volume DRC function is available only on the discs that are recorded in the Dolby Digital format The default setting is ON DOWN SAMPLING Set to ON when outputting in 48kHz Set to OFF when outputting the original sound When ...

Page 27: ...ibetan 4861 Tigrinya 6655 Tonga 6661 Tsonga 6665 Turkish TUR 6664 Turkmen 6657 Twi 6669 U Z Ukrainian 6757 Urdu 6764 Uzbek 6772 Vietnamese 6855 Volapuk 6861 Welsh 4971 Wolof 6961 Xhosa 7054 Yiddish 5655 Yoruba 7161 Zulu 7267 Language Code Language Code Language Code Language Code If you choose a Language that has a 3 letter language code the code will be displayed every time you change the Audio o...

Page 28: ...l output Check the digital connections Check if the audio format of the selected audio language matches your receiver capabilities No sound and picture Check that the VIDEO AUDIO cable is connected to the correct device See Connecting to a TV Picture freezes momentarily Check the disc for fingerprints scratches and during playback clean with a soft cloth wiping from centre to edge Clean the disc D...

Page 29: ... operated while referring to the relevant sections and to TROUBLESHOOTING GUIDE in this Instruction Manual the laser optical pickup unit may be dirty Consult your dealer or an Authorized Service centre for inspection and cleaning of the laser optical pickup unit Disc Handling Handle the discs so that fingerprints and dust do not adhere to the surfaces of the discs Always store the disc in its prot...

Page 30: ...may cause a short circuit resulting in leakage or in extreme cases fire or even an explosion Remove dead batteries from equipment and all batteries from equipment you know you are not going to use for a long time Otherwise the batteries may leak and cause damage Never dispose of batteries in fire as this can cause them to explode Please put dead batteries in with the normal household waste NEVER A...

Page 31: ...leave equipment switched on when it is unattended unless it is specifically stated that it is designed for unattended operation or has a standby mode Switch off using the switch on the equipment and make sure that your family know how to do this Special arrangements may need to be made for infirm or handicapped people DON T use equipment such as personal stereos or radios so that you are distracte...

Page 32: ...other than our authorised Engineer 3 The product serial number is not removed or altered This guarantee does not apply to products acquired secondhand or for commercial or communal use This guarantee does not extend to user control adjust ments battery replacement and aerial adjustment Any parts replaced under guarantee shall become the property of Hitachi Europe Ltd Please note that evidence of t...

Page 33: ...47 Milano Italia ITALY Tel 39 02 487861 Tel 39 02 38073415 Servizio Clienti Fax 39 02 48786381 2 Email customerservice italy hitachi eu com HITACHI Europe AB Box 77 S 164 94 Kista SWEDEN Tel 46 0 8 562 711 00 Fax 46 0 8 562 711 13 Email csgswe hitachi eu com HITACHI EUROPE S A S Lyon Office B P 45 69671 BRON CEDEX FRANCE Tel 33 04 72 14 29 70 Fax 33 04 72 14 29 99 Email france consommateur hitachi...

Reviews: