


49
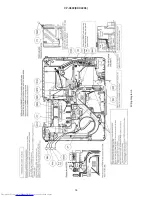
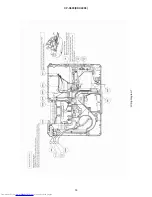
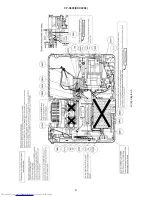
CP-X600(EDX40K3)
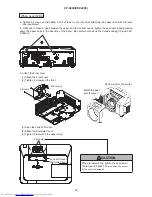
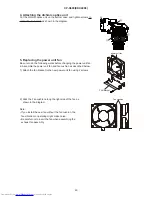
4. Attaching the dichroic optics unit
Put the dichroic optics unit on the bottom case, and tighten screws in
order of 1, 2, 3 and 4 as shown in the diagram.
5. Replacing the power unit fan
Be sure to do the following works before changing the power unit fan.
a. Assemble the power unit fan and fan cushion as described below.
1) Attach the fan bracket to the new power unit fan using 2 screws.
2) Stick the Fan cushion along the right side of the fan as
shown in the diagram.
Note:
• If you install the new fan without the fan cushion, the
fan vibration in operating might make noise.
• Be careful not to invert the fan when assembling the
exhaust fan assembly.
①
④
②
③
power unit fan
FAN bracket
Fan cushion
Summary of Contents for CP-X600 series
Page 33: ...33 CP X600 EDX40K3 7 Wiring diagram Wiring diagram 1 ...
Page 34: ...34 CP X600 EDX40K3 Wiring diagram 2 ...
Page 35: ...35 CP X600 EDX40K3 Wiring diagram 3 ...
Page 36: ...36 CP X600 EDX40K3 Wiring diagram 4 ...
Page 37: ...37 CP X600 EDX40K3 Wiring diagram 5 ...
Page 38: ...38 CP X600 EDX40K3 Wiring diagram 6 ...
Page 39: ...39 CP X600 EDX40K3 Wiring diagram 7 ...
Page 40: ...40 CP X600 EDX40K3 Wiring diagram 8 ...
Page 41: ...41 CP X600 EDX40K3 Wiring diagram 9 ...
Page 42: ...42 CP X600 EDX40K3 8 Disassembly diagram ...
Page 43: ...43 CP X600 EDX40K3 ...
Page 67: ...CP X600 EDX40K3 1 2 3 4 5 6 6 1 2 3 4 5 D G F E C B A POWER UNIT BALLAST 1 CONFIDENTIAL ...
Page 68: ...CP X600 EDX40K3 1 2 3 4 5 6 6 1 2 3 4 5 D G F E C B A POWER UNIT BALLAST 2 CONFIDENTIAL ...
Page 88: ...CP X600 EDX40K3 MEMO ...
Page 90: ...QR72691 Printed in Japan JE CP X600 YK No 0586E ...


