


46
CP-X600(EDX40K3)
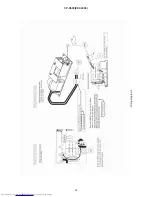
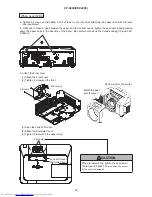
a. Tighten 9 screws on the bottom and 2 screws on the rear after attaching the upper case with the lamp
door separated.
In order not to make a gap between the upper and the bottom cases, tighten these screws while pressing
down the upper case in the direction of the arrow. Be careful not to bend the outside casing.(Torque:0.39-
0.59N•m)
When assembling
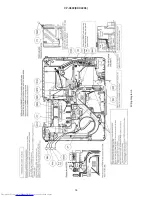
b. Attach the Front cover.
(1) Attach the Front cover.
(2) Tighten 2 screws on the front.
(3) Open the Lens shift cover.
(4) Attach the Dial Hole Cover.
(5) Tighten 2 screws on the upper case.
CAUTION
When re-assembling, tighten these screw at
the torque of 0.49±0.1 N•
m so that the screw
holes are not damaged.
2 screws
Lens shift cover
2 screws
front cover
Dial Hole Cover
Set the lever to the center
Match the dent
with the lever.
Summary of Contents for CP-X600 series
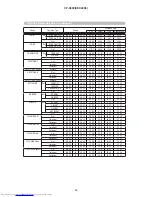
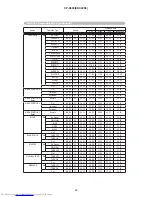
Page 33: ...33 CP X600 EDX40K3 7 Wiring diagram Wiring diagram 1 ...
Page 34: ...34 CP X600 EDX40K3 Wiring diagram 2 ...
Page 35: ...35 CP X600 EDX40K3 Wiring diagram 3 ...
Page 36: ...36 CP X600 EDX40K3 Wiring diagram 4 ...
Page 37: ...37 CP X600 EDX40K3 Wiring diagram 5 ...
Page 38: ...38 CP X600 EDX40K3 Wiring diagram 6 ...
Page 39: ...39 CP X600 EDX40K3 Wiring diagram 7 ...
Page 40: ...40 CP X600 EDX40K3 Wiring diagram 8 ...
Page 41: ...41 CP X600 EDX40K3 Wiring diagram 9 ...
Page 42: ...42 CP X600 EDX40K3 8 Disassembly diagram ...
Page 43: ...43 CP X600 EDX40K3 ...
Page 67: ...CP X600 EDX40K3 1 2 3 4 5 6 6 1 2 3 4 5 D G F E C B A POWER UNIT BALLAST 1 CONFIDENTIAL ...
Page 68: ...CP X600 EDX40K3 1 2 3 4 5 6 6 1 2 3 4 5 D G F E C B A POWER UNIT BALLAST 2 CONFIDENTIAL ...
Page 88: ...CP X600 EDX40K3 MEMO ...
Page 90: ...QR72691 Printed in Japan JE CP X600 YK No 0586E ...


