


32
CP-X600(EDX40K3)
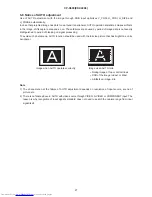
By the control panel
By the remote control transmitter
1. Display the Advanced menu by
the “MENU” button.(If EASY
MENU appears, choose “Go to
Advanced menu” to display
ADVANCED MENU.)
2. Select the “OPTION” on the
menu.
3. Continue press the button [ ]
fi
rst, then press the button [ ]
together with “INPUT”, and hold
for 3 seconds.
1. Display the menu by the
“MENU” button. (If EASY
MENU appears, choose “Go to
Advanced menu” to display
ADVANCED MENU.)
2. Select the “OPTION” on the menu.
3. Press the “MAGNIFY OFF”
button.
Next hold the “MAGNIFY OFF”
button for 3 seconds.
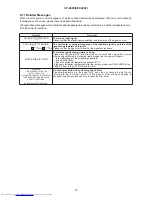
To display the OSD for “HIDDEN SERVICE MENU” set up.
HIDDEN SERVICE
AIR-SENSOR
LAMP ALARM
1
SOFT RESET
STARTUP TYPE
EXECUTE
NONE
6-13 HIDDEN SERVICE MENU
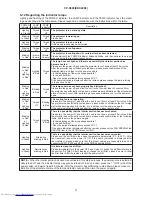
6-15 RUN TIME window
SOFT RESET
If this is executed, all of the user data is initialized.Never use it when not required.
Set operating time display method (accumulated lamp time display method)
1. Select “OPTION” from the Advanced menu, then place the cursor on the “LAMP TIME”.
2. Press the [ ], [ENTER] or [RESET] button.
3. Press the [Reset] button once, then press [KEYSTONE] button of the remote control for 3 seconds or
more to display the screen shown below. (The menu will close after 10 seconds if there are no further
operations.)
4. Use [ ] or [ ] to select the usage status number. (The usage status is as shown below.)
Usage status number
0 ..... Total usage status
1 ..... Current usage status
2 ..... Usage status before first reset
3 ..... Usage status before second reset
||
9 ..... Usage status before eighth reset
RUN TIME
LAMP
Lamp time
1234 h
h
h
h
NORMAL
Lamp time(Normal)
1000
WHISPER
Lamp time(Whisper)
234
AC
2000
AC energizing time
On
Number of times on
1
Off
Number of times off
No.0
Usage status number(See below)
0
Summary of Contents for CP-X600 series
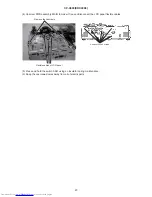
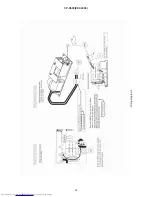
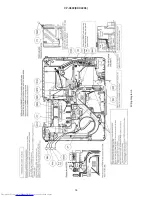
Page 33: ...33 CP X600 EDX40K3 7 Wiring diagram Wiring diagram 1 ...
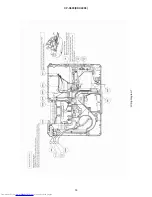
Page 34: ...34 CP X600 EDX40K3 Wiring diagram 2 ...
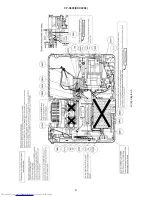
Page 35: ...35 CP X600 EDX40K3 Wiring diagram 3 ...
Page 36: ...36 CP X600 EDX40K3 Wiring diagram 4 ...
Page 37: ...37 CP X600 EDX40K3 Wiring diagram 5 ...
Page 38: ...38 CP X600 EDX40K3 Wiring diagram 6 ...
Page 39: ...39 CP X600 EDX40K3 Wiring diagram 7 ...
Page 40: ...40 CP X600 EDX40K3 Wiring diagram 8 ...
Page 41: ...41 CP X600 EDX40K3 Wiring diagram 9 ...
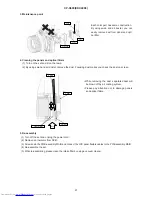
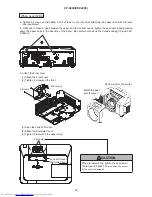
Page 42: ...42 CP X600 EDX40K3 8 Disassembly diagram ...
Page 43: ...43 CP X600 EDX40K3 ...
Page 67: ...CP X600 EDX40K3 1 2 3 4 5 6 6 1 2 3 4 5 D G F E C B A POWER UNIT BALLAST 1 CONFIDENTIAL ...
Page 68: ...CP X600 EDX40K3 1 2 3 4 5 6 6 1 2 3 4 5 D G F E C B A POWER UNIT BALLAST 2 CONFIDENTIAL ...
Page 88: ...CP X600 EDX40K3 MEMO ...
Page 90: ...QR72691 Printed in Japan JE CP X600 YK No 0586E ...


