33
SERVICE ADJUSTMENTS
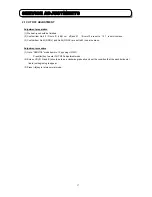
2.6 SIDE PIN DISTORTION ADJUSTMENT
Adjustment Preparation
(1) PICTURE control should be set Factory Preset condition.
(2) DCU ROM CHECK should be finished.
(3) Place the set facing east.
Adjustment Procedure
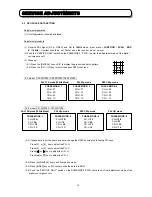
PAL 100i MODE
I
2
C No.15
(1) Input any PAL signal.
(2) Press [MENU] key.
(3) Choose [FUNCTION] and [Scan Mode], set to [100Hz] mode.
(4) Press [MENU] key to exit from [FUNCTION].
(5) Press and hold the SERVICE ONLY SW. on DEF/CONVER P.W.B. and
[MUTE] key of Handset.
DCU cross-hatch is appeared with Conv. Data cleared.
(6) Press the [TV/VIDEO] key on the front control panel, then SERVICE MENU appears.
(7) Choose SIDE PIN (EW parabola) item by using Handset up/down cursor key.
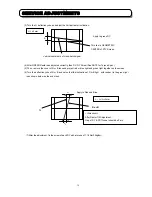
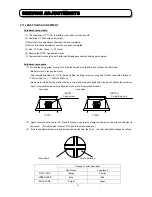
(8) Adjust SIDE PIN as following by using Handset left/right cursor key.
(9) Press [ENTER] key of handset to write the adjusted data.
(10) After adjustment, press SERVICE ONLY SW. to exit from SERVICE mode.
PAL 50p MODE
I
2
C No.19
(1) Input any PAL signal.
(2) Press [MENU] key.
(3) Choose [FUNCTION] and [Scan Mode], set to [Virtual HD] or [Progressive] mode (50P mode).
(4) Press [MENU] key to exit from [FUNCTION].
(5) Adjust the same items as (5)-(10) of setting PAL 100i MODE.
NTSC 60p MODE
I
2
C No.23
(1) Input any NTSC signal
(2) Adjust the same items as (5)-(10) of setting PAL 100i MODE.
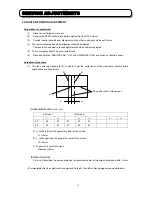
PAL HD MODE(16:9 Model only)
I
2
C No.27
(1) Input any PAL HD signal (1080i/50).
(2) Press [MENU] key.
(3) Choose [FUNCTION] and [Scan Mode], set to HD mode.
(4) Press [MENU] key to exit from [FUNCTION].
(5) Set PAL HD mode referring to P29(*) setting procedure of PAL HD mode.
(6) Adjust the same items as (5)-(10) of setting PAL 100i MODE.
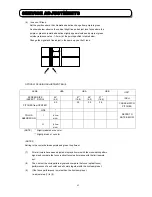
Edge of vertical DCU cross-hatch line should
be straight condition.
Note: If it’s impossible to adjust the straight line, set
a little pin condition.
Summary of Contents for C43-FD7000
Page 72: ...72 SERVICE ADJUSTMENTS SIGNAL SUB P W B IG02 IG03 IG04 IQ01 IQ02 IR01 Rear view IG01 I R 0 2 ...
Page 78: ...78 EXPLODED VIEW ...
Page 79: ...79 EXPLODED VIEW ...
Page 143: ......
Page 144: ......
Page 145: ......
Page 146: ......
Page 147: ......
Page 150: ......
Page 151: ......
Page 152: ......
Page 153: ......
Page 154: ......
Page 155: ......
Page 156: ......
Page 157: ......
Page 158: ......
Page 159: ......
Page 160: ......
Page 161: ......
Page 162: ......
Page 163: ......
Page 164: ......
Page 165: ......
Page 166: ......
Page 167: ......
Page 168: ......
Page 169: ......
Page 170: ...SIGNAL SIDE A P W B ...
Page 171: ...SIGNAL SIDE B P W B ...
Page 172: ...SIGNAL SUB SIDE A P W B ...
Page 173: ...SIGNAL SUB SIDE B P W B ...
Page 174: ...TUNER SIDE A P W B ...
Page 175: ...TUNER SIDE B P W B ...
Page 176: ...AUTO POWER AV INPUT CONVER SENSOR SW P W B ...
Page 177: ...CPT CONTROL AV NET LED P W B ...
Page 178: ...POWDEF P W B ...
Page 179: ......


