background image

Maintenances

Troubleshooting

Error Codes

NOTE


24

The start of the appliance does not work or it stops during operation.

First try to find a solution to the problem, if not, contact the service centre.

Description

Reason

Solution

Restart after the door is closed

Check if the clothes is stuck 

Door is not closed properly

Door can’t be 

opened

Washer's safety protection 

design is working 

Disconnect the power, restart 

the product

Water leakage

The connection between inlet

 pipe or outlet hose is not tight

Check and fasten water pipes

Clean up outlet hose
Clean and wipe the detergent 

box 

Abnormal noise 

Check if the fixing (bolts) have 

been removed

and level floor

Check


it’s installed on a solid 


Indicator or display 

does not light

Disconnect the power


PC board or harness has 

connection problem

Check if the power is shut 

down and the power plug is 

connected correctly

Washing machine 

cannot start up

Detergent residues 

in the box

Detergent is dampened 

or agglomerated

Description

Reason

Solution

Check if the water pressure is 

too low

Straighten the water pipe

Check if the inlet valve filter is blocked

Check if the drain hose is blocked


Water injecting 

problem while 

washing 

Overtime water draining

Please try again first, call up 

service line if there are still 

troubles

Others

Water overflow

This is caused by a faulty device sensor.

Restart the washer

Restart after the door is closed

Check if the clothes is stuck 

Door is not closed properly

After the check activate the appliance If the problem occurs or the display


.   


shows other alarm codes again, contact the service centre.

Summary of Contents for BD-70CVE

Page 1: ...structions Safety Instructions 2 Product Description 7 Installation Installation 8 Quick Start 12 Operation 13 Model BD 70CVE BD 80CVE Before Each Washing 14 Detergent Dispenser 15 Control Panel Option 16 Other Function 17 Programs 18 Washing Program Table 19 Cleaning And Care 21 Maintenances 24 Troubleshooting 25 Technical Specifications 26 Specification Please keep this Instruction Manual for fu...

Page 2: ...h may result in death or serious injuries unless it s avoided This combination of symbol and signal word indicates a potentially dangerous situation which may result in slight or minor injuries or damage to property and the environment This combination of symbol and signal word indicates a potentially dangerous situation which may result in slight or minor injuries NOTE WARNING The electric shock ...

Page 3: ... the machine when it is running This could cause an electric shock To ensure your safety power plug must be inserted into an earthed three pole socket Check carefully and make sure that your socket is properly and reliably earthed Make sure that the water and electrical devices must be connected by a qualified technician in accordance with the manufacturer s instructions and local safety regulatio...

Page 4: ... for indoor use only It isn t intended to be built in using The openings must not be obstructed by a carpet Washing machine shall not be installed in bath room or very wet rooms as well as in the rooms with explosive or caustic gases The washing machine with single inlet valve only can be connected to the cold water supply The product with double inlet valves should be correctly connected to the h...

Page 5: ...3 Handle the machine carefully Never hold each protruded part on the machine while lifting Machine door can not be used as the handle during the conveyance 4 This appliance is heavy Transport with care Please do not close the door with excessive forces If it is found difficult to close the door please check if the clothes are put in or distributed well It is forbidden to wash carpets Before washin...

Page 6: ...To prevent possible harm to the environment or human health from uncontrolled waste disposal recycle it responsibly to promote the sustainable reuse of material resources To return your used device please use the collection systems or contact the retailer where the product was purchased They return and can take this product for environmental safe recycling Do not wash waterproof items such as rain...

Page 7: ...ilter Door Water Supply Hose Top Cover Drain Hose Installation NOTE 7 Product Description The product line chart is for reference only please refer to real product as standard Accessories Transport Bolts Supply Hose Drain Hose Support Optional Instruction Manual 4pcs ...

Page 8: ...on Keep all packaging well away from children 1 Remove the cardboard box and styrofoam packing 2 Lift the washing machine and remove the base packing foam is removed with the bottom one together If not lay the unit down with side surface then remove the small foam from the unit bottom manually Make sure the small triangle 3 Remove the tape securing the power supply cord and drain hose 4 Remove the...

Page 9: ...ow the instructions in this chapter Do not kink crush modify or sever water inlet hose For the model equips hot valve connect it to hot water tap with hot water supply hose Energy consumption will decrease automatically for some program Connect the inlet pipe as indicated There are two ways to connect the inlet pipe Connection between ordinary tap and inlet hose clamp nut Loosen clamp nut and four...

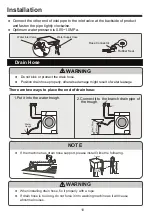
Page 10: ...t to the branch drain pipe of the trough NOTE If the machine has drain hose support please install it like the following Trough Hose Retainer Bind Max 100cm Min 60cm Min 60cm Max 100cm When installing drain hose fix it properly with a rope If drain hose is too long do not force it into washing machine as it will cause abnormal noises Hose Connector Rubber Seal Connect the other end of inlet pipe t...

Page 11: ...off 6 Press the Power button again to switch power on 7 Select the Spin program and press the Start Pause button 8 Check if there is no abnormal vibration or sound and that water is drained out properly If any of the following conditions or other abnormalities occur immediately pull out the power plug to prevent an accident and contact your local service center The washing machine does not operate...

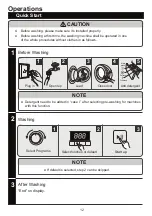
Page 12: ...out clothes in as follows 1 2 Before Washing 1 2 3 4 5 Plug in Open tap Load Close door Main wash Prewash Softener Add detergent Detergent need to be added in case I after selecting pre washing for machines NOTE with this function Washing 1 2 3 Select Programs Select function or default Start up If default is selected step 2 can be skipped 3 After Washing End on display CAUTION NOTE ...

Page 13: ...on Put small clothes into the pillow slip Turn easy pilling and long pile fabric inside out Separate clothes with different textures WARNING When washing a single clothes it may easily cause great eccentricity and give alarm due to great unbalance Therefore it is suggested to add one or two more clothes to be washed together so that spinning can be done smoothly Don t washing the clothes touching ...

Page 14: ...or dilution to prevent the inlet of detergent box from being blocked and overflowing while filling water Please choose suitable type of detergent for the various washing temperature to get the best washing performance with less water and energy consumption Rapid 15 Daily 45 Daily 60 Tub Clean Outdoor Baby Care CAUTION Use the amount of detergent recommended on the detergent package The type and am...

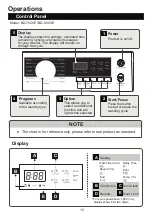
Page 15: ... an additional function and will light when selected Display The display shows the settings estimated time remaining options and status messages for your washer The display will remain on through the cycle NOTE The chart is for reference only please refer to real product as standard Child Lock Reload Display End Temp C Door Clean Door Lock Wash Time h min Delay Time Speed r m For spin speed above ...

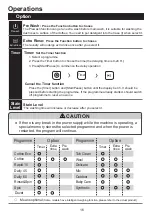
Page 16: ...nction Press the Timer button and Start Pause button until the display be 0h It should be pressed before starting the programme If the programme already started should switch off programme to reset a new one Stain Level Stain Level The washing time will increase or decrease after you select it If there is any break in the power supply while the machine is operating a special memory stores the sele...

Page 17: ... speed above 1 000 r m display shows first two digits To avoid misoperation by children Press the two button 3 sec also to be released the function The Child Lock will lock all buttons except Power button Cut off the power supply the kid s protection is to be released The child lock will remain effective when the power is resumed for some models Temp Choose Press the Temp button for 3sec the buzze...

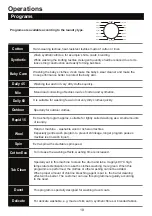
Page 18: ...e of cotton and synthetics It is suitable for washing few and not very dirty clothes quickly Specially for outdoor clothes Extra short program approx suitable for lightly soiled washing as a small amounts Hand or machine washable wool or rich wool textiles Especially gentle wash program to prevent shrinkage longer program pauses textiles rest in wash liquor Extra spin with selectable spin speed To...

Page 19: ...Eco 60 40 C Speed the highest speed Other as the default Half load for 6 0 7 0 8 0Kg machine 3 0 3 5 4 0Kg Cotton Eco 60 40 C is the standard washing programs to which the information in the label and the fiche relates and they are suitable to clean normally soiled cotton laundry and that they are the most efficient programmes in terms of combined energy and water consumptions for washing that typ...

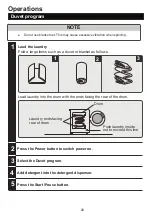
Page 20: ... large items such as a duvet or blanket as follows Load laundry into the drum with the ends facing the rear of the drum Drum Laundry ends facing rear of drum Push laundry inside not to exceed this line Press the Power button to switch power on 4 5 Select the Duvet program Add detergent into the detergent dispenser Press the Start Pause button ...

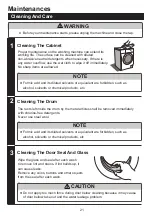
Page 21: ... as alcohol solvents or chemical products etc Cleaning The Drum The rusts left inside the drum by the metal articles shall be removed immediately with chlorine free detergents Never use steel wool Formic acid and its diluted solvents or equivalent are forbidden such as alcohol solvents or chemical products etc Cleaning The Door Seal And Glass Wipe the glass and seal after each wash to remove lint ...

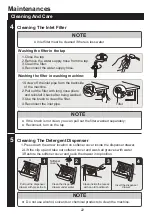
Page 22: ...tall it back after being washed 3 Use the brush to clean the filter 4 Reconnect the inlet pipe If the brush is not clean you can pull out the filter washed separately Reconnect turn on the tap 1 Press down the arrow location on softener cover inside the dispenser drawer 2 Lift the clip up and take out softener cover and wash all grooves with water 3 Restore the softener cover and push the drawer i...

Page 23: ...hole plates otherwise water may leak Some machines don t have emergency drain hose so step 2 and step 3 can be skipped Rotate lower cover cap directly to make water run into basin When the appliance is in use and depending on the programme selected there can be hot water in the pump Never remove the pump cover during a wash cycle always wait until the appliance has finished the cycle and is empty ...

Page 24: ...id Indicator or display does not light Disconnect the power PC board or harness has connection problem Check if the power is shut down and the power plug is connected correctly Washing machine cannot start up Detergent residues in the box Detergent is dampened or agglomerated Description Reason Solution Check if the water pressure is too low Straighten the water pipe Check if the inlet valve filte...

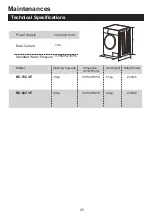
Page 25: ...ications MAX Current Standard Water Pressure 10A 0 05MPa 1MPa Power Supply 220 240V 50Hz Dimension W D Hmm Rated Power Net Weight Washing Capacity Model H W D 7 0kg 595 495 850 61kg 2000W BD 70CVE 8 0kg 595 565 850 2000W 68kg BD 80CVE ...

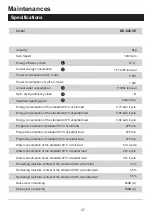
Page 26: ...0 C at full load Energy consumption of the standard 60 C at partial load Energy consumption of the standard 40 C at partial load Programme duration of standard 60 C at full load Programme duration of standard 60 C at partial load Programme duration of standard 40 C at partial load Water consumption of the standard 60 C at full load Water consumption of the standard 60 C at partial load Water consu...

Page 27: ... 60 C at full load Energy consumption of the standard 60 C at partial load Energy consumption of the standard 40 C at partial load Programme duration of standard 60 C at full load Programme duration of standard 60 C at partial load Programme duration of standard 40 C at partial load Water consumption of the standard 60 C at full load Water consumption of the standard 60 C at partial load Water con...

Page 28: ...Memo 28 ...

Page 29: ...Memo 29 ...

Page 30: ...3WPL131331 ...

Reviews: